Blog

  • How Often Should You Schedule RV Holding Tank Pumping? A High Desert Guide

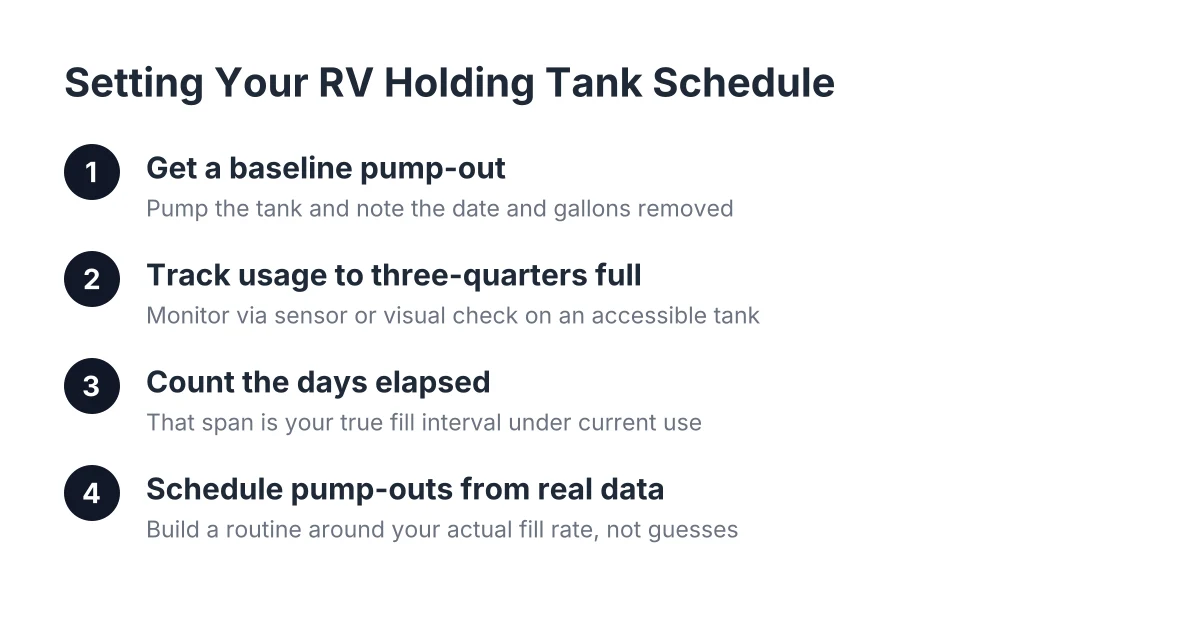
    Four-step process for setting an RV holding tank pumping schedule based on usage
    A simple baseline process to figure out your real RV holding tank pumping interval, as described in this guide.

    If you own an RV, a remote cabin, or a small campground in the High Desert, the question of RV holding tank pumping frequency comes up sooner or later, usually right after a bad smell or a tank sensor that reads full. Understanding your RV holding tank schedule is essential to prevent backups and maintain your system. There is no single magic number that works for everyone. How often a holding tank needs a pump-out depends on the size of the tank, how many people use it, and how it gets used. This guide walks through how to figure out your own schedule, what happens when you wait too long, and why properties out past the pavement in Hesperia and the surrounding High Desert often need a mobile crew that comes to the tank instead of the other way around.

    The people asking this question are usually not septic experts. Maybe you just bought a few acres with an old cabin on it and the seller left you nothing, no records, no maps, no idea where the tank even sits. Maybe you park an RV on your property most of the year and the nearest dump station is a long haul away. Either way, the question is the same: how often does this tank need to be emptied, and who is going to do it out here?

    Why Holding Tanks Fill on Their Own Schedule, Not Yours

    Here is the first thing to understand. A holding tank is not a septic system. A septic tank separates solids and sends liquid out to a drain field, so it only needs pumping every few years. Additionally, a holding tank stores everything. Nothing leaves until a truck pulls it out. That single difference changes the whole math on frequency.

    With a septic system, the U.S. Environmental Protection Agency recommends a professional inspection at least once every three years, and pumping happens on a multi-year cycle for most homes. A holding tank does not get that kind of grace period. Every gallon that goes down the drain stays in the tank until someone pumps it. If the tank holds 300 gallons and your household or RV produces 30 gallons of wastewater a day, you have about ten days before it is full. That is not a maintenance schedule; that is a countdown.

    This is why holding tank owners in the High Desert tend to fall into two camps. The first camp knows their fill rate and books pump-outs on a routine. The second camp finds out the tank is full when sewage backs up into the shower. Furthermore, the goal of this article is to move you from the second camp to the first.

    How Often Does an RV Holding Tank Need Pumping?

    An RV holding tank typically needs pumping every three to five days of full-time use for a black tank, and less often for occasional weekend use. The real answer depends on tank size, number of people, and water habits. A stationary RV used as a residence fills far faster than a rig used a few weekends a season.

    Let's break down the main factors, because "it depends" is not useful on its own.

    Tank size sets the ceiling

    Most RV black tanks fall somewhere between 15 and 50 gallons, and gray tanks are often a similar size or larger. A cabin or park-model holding tank might be several hundred gallons. You cannot manage what you have not measured, so the first step is finding out what your tank actually holds. Check the manufacturer specs on an RV. For a buried cabin tank with no records, a pump-out crew can measure capacity during the first service by tracking how many gallons come out. Do not guess from a generic septic tank size chart; those charts describe residential septic tanks, and holding tanks vary widely.

    Occupancy drives the fill rate

    Two people using an RV bathroom part-time produce a fraction of what a family of four produces living in it full-time. The same logic that applies to septic applies here. For comparison, Penn State Extension notes that an active family of four should pump a full septic tank every two to three years because of higher solids and liquid production. A holding tank compresses that same usage math into days or weeks instead of years. More people, more flushes, more dishwater, faster fill.

    Usage pattern matters as much as headcount

    A weekend rig that sits empty Monday through Friday might go a month or more between pump-outs. A full-time setup on a Hesperia lot fills on a steady clock. Seasonal patterns matter too. Suppose a small High Desert campground runs near capacity from spring through fall and sits mostly empty in winter. In that scenario, the operator might need campground holding tank service weekly in season and monthly off season. One fixed schedule for the whole year would either waste money in January or flood a site in July.

    Water habits stretch or shrink the interval

    Short showers, fixing drips, and running full loads of dishes all slow the fill rate. Long showers and a leaky toilet valve can cut your interval in half without anyone noticing. If your tank seems to fill faster than the math says it should, check for a running toilet first. It is the most common silent tank-filler there is.

    A Simple Way to Set Your Own RV Holding Tank Schedule

    The most reliable approach is to establish a baseline with your first pump-out, then build the schedule around real numbers instead of guesses. This mirrors how experienced septic operators think about residential tanks: measure how fast waste accumulates once, then set the interval from data.

    Here is a straightforward process:

    1. Get the tank pumped and note the date and the gallons removed.
    2. Track your usage until the tank reads about three-quarters full, either by sensor or by a visual check on an accessible tank.
    3. Count the days that took. That is your true fill interval under current use.
    4. Schedule your next pump-out at about 75 percent of that interval, so a heavy-use week does not push you past full.
    5. Recheck the math whenever occupancy changes, for example when family visits for a month or a seasonal renter moves in.

    For example, say a couple living full-time in a fifth wheel on a lot near Hesperia finds their gray and black tanks combined take 12 days to reach three-quarters full. In that illustrative case, booking a mobile RV tank pump-out every 9 to 10 days keeps them clear of a backup with a small margin for company or laundry days. That kind of margin is the entire difference between routine service and an emergency call. Establishing your RV holding tank schedule this way gives you precise timing based on actual usage patterns.

    One honest caveat: RV tank sensors are notoriously unreliable once waste coats the probes. If your sensor has read full for weeks or never leaves empty, do not build your schedule on it. Use elapsed days and gallons pumped instead, and consider having the tank cleaned, not just pumped, to restore accurate readings.

    What Happens When You Stretch RV Holding Tank Pumping Too Far

    Waiting too long between pump-outs causes problems that cost more than the service you skipped. The failure modes are predictable, and every one of them is worse than the smell that warned you.

    • Backups into the living space. A full black tank has nowhere to send the next flush except back up the line. In an RV, that means the toilet. In a cabin, it can mean the lowest shower or floor drain.
    • Solids hardening in the tank. When waste sits too long, especially in High Desert heat with low humidity, solids compact and dry into a layer that a standard pump-out struggles to remove. That is when a basic pump-out turns into a full holding tank cleaning job, which takes longer and costs more.
    • Sensor failure. Caked waste on the probes is the number one reason tank monitors lie. Once they lie, you lose the early warning that would have prevented the next backup.
    • Odors and vent problems. An overfull tank pushes gases back through the plumbing. If you smell sewage inside the rig or cabin, the tank is usually past due, not approaching due.
    • Damage from overpressure. Portable RV black water tanks and older buried holding tanks were not built to sit at capacity for weeks. Fittings, seals, and valves take the strain first.

    There is a useful comparison from the septic world here. The U.S. Environmental Protection Agency estimates septic repair or replacement typically runs $5,000 to $15,000, far more than routine pumping. Holding tanks are simpler systems, so the repair numbers are usually smaller, but the ratio holds. Routine service is cheap insurance against the expensive version of the same problem.

    Why Dump Stations Do Not Solve This for Everyone

    Plenty of RV owners handle their own tanks at a dump station, and if your rig moves regularly, that works fine. Searching for free RV dump stations near me before a trip is a reasonable habit for travelers. The trouble starts when the tank cannot come to the station.

    Consider three situations common in the High Desert. First, the stationary RV: a rig parked long-term on private land, hooked to power and water, functioning as a home. Breaking camp every week to drive to a dump station is not realistic. Second, the remote cabin: a buried holding tank with no drain field, sometimes with no records of where the tank sits or what it holds. That tank is never going anywhere; the truck has to come to it. Third, the small campground or RV park without a dump station of its own, where guests fill on-site tanks that someone has to empty.

    In all three cases, the answer is mobile service. A vacuum truck comes to the property, pumps the tank where it sits, and hauls the waste away legally. According to the New Hampshire Department of Environmental Services, waste pumped from tanks is trucked to a sewage treatment plant for disposal rather than handled on-site, and holding tanks specifically must be emptied by a licensed hauler. That legal disposal chain is the part a homeowner cannot do alone, no matter how handy they are.

    This is also where a lot of remote High Desert properties get skipped. Long dirt driveways, no marked tank location, and no records make some crews decline the job. A local Hesperia crew that works these properties regularly knows the drill: locate the tank if nobody knows where it is, confirm what it holds, pump it, and leave the owner with a real baseline for scheduling the next visit.

    Bought Land With a Mystery Tank? Start Here

    If you just bought or are about to buy High Desert property and the seller handed over nothing, do not assume the wastewater system is a septic tank. Some rural cabins run on holding tanks precisely because the soil or lot never supported a drain field. The difference matters enormously for your budget, because a holding tank means recurring pump-outs forever, while a septic system means occasional septic tank pumping every few years.

    Before you commit money, get three things:

    • A locate. Have the tank physically found and marked. No visible lid or riser does not mean no tank; it usually means a buried lid under decades of sand.
    • An identification. Confirm whether it is a septic tank with a drain field or a sealed holding tank. The presence or absence of an outlet line tells the story.
    • An inspection with a pump-out. Pumping the tank lets a professional see the walls, baffles, and condition, and it gives you the baseline gallons figure for future scheduling.

    A locate-and-inspect visit can feel like an unwelcome cost during escrow. Weigh it against the alternative: closing on a property, moving an RV onto it, and discovering the "septic system" is a 250-gallon holding tank that fills every two weeks. Knowing that before closing changes what you offer, or whether you offer at all. If the inspection turns up a failing or undersized system, you have negotiating leverage instead of a surprise.

    Condition questions beyond a straightforward pump-out, such as a cracked tank, root intrusion, or a system that may need county permits to modify, are worth a professional evaluation rather than a guess. This is one place where saving a service fee up front can cost real money later.

    Putting a Real RV Holding Tank Schedule Together for 2026

    If you take one thing from this guide, make it this: RV holding tank pumping works best on a calendar, not a crisis. Treat it like an oil change. You would not wait for the engine to seize; do not wait for the toilet to back up.

    Here is a practical way to think about intervals as you plan the year:

    • Full-time RV living on a lot: expect black tank service every one to two weeks depending on tank size and household size, with gray water on a similar or faster clock if it shares the tank.
    • Weekend and seasonal RV use: pump after each extended trip or when the tank reaches about three-quarters full, and never store a rig with waste sitting in the tank through a hot desert summer.
    • Cabin holding tanks: set the interval from your measured fill rate after a baseline pump-out; a few hundred gallons of capacity with light weekend use may stretch to monthly or longer, while full-time occupancy shortens it fast.
    • Campgrounds and small parks: build a seasonal schedule that scales with occupancy, and confirm your hauler can handle in-season frequency before the busy months start.

    Costs vary with tank size, access, and how far the truck has to travel, so treat any number you see online as a rough guide. As a loose frame of reference, Angi reports that residential septic tank pumping averages $427, with a range from $250 to $1,250 or more depending on tank size and location. RV and small holding tank pump-outs are a different job than a full residential septic tank, so your quote will reflect the actual tank and site, not a national average.

    The bottom line for High Desert owners is simple. Learn what your tank holds, measure how fast you fill it, and book service before the countdown runs out. A tank that gets pumped on schedule is a tank you never think about. A tank that gets ignored picks its own moment, and it always picks a bad one.

    If you need your septic tank serviced, Hesperia Septic can help.

    Prefer to talk it through? Call (760) 249-7872 — a quick call is usually the fastest way to get a straight answer for your situation.

    Related Reading

  • Grease Trap Cleaning vs. Pumping: Which Service Your Kitchen Actually Needs

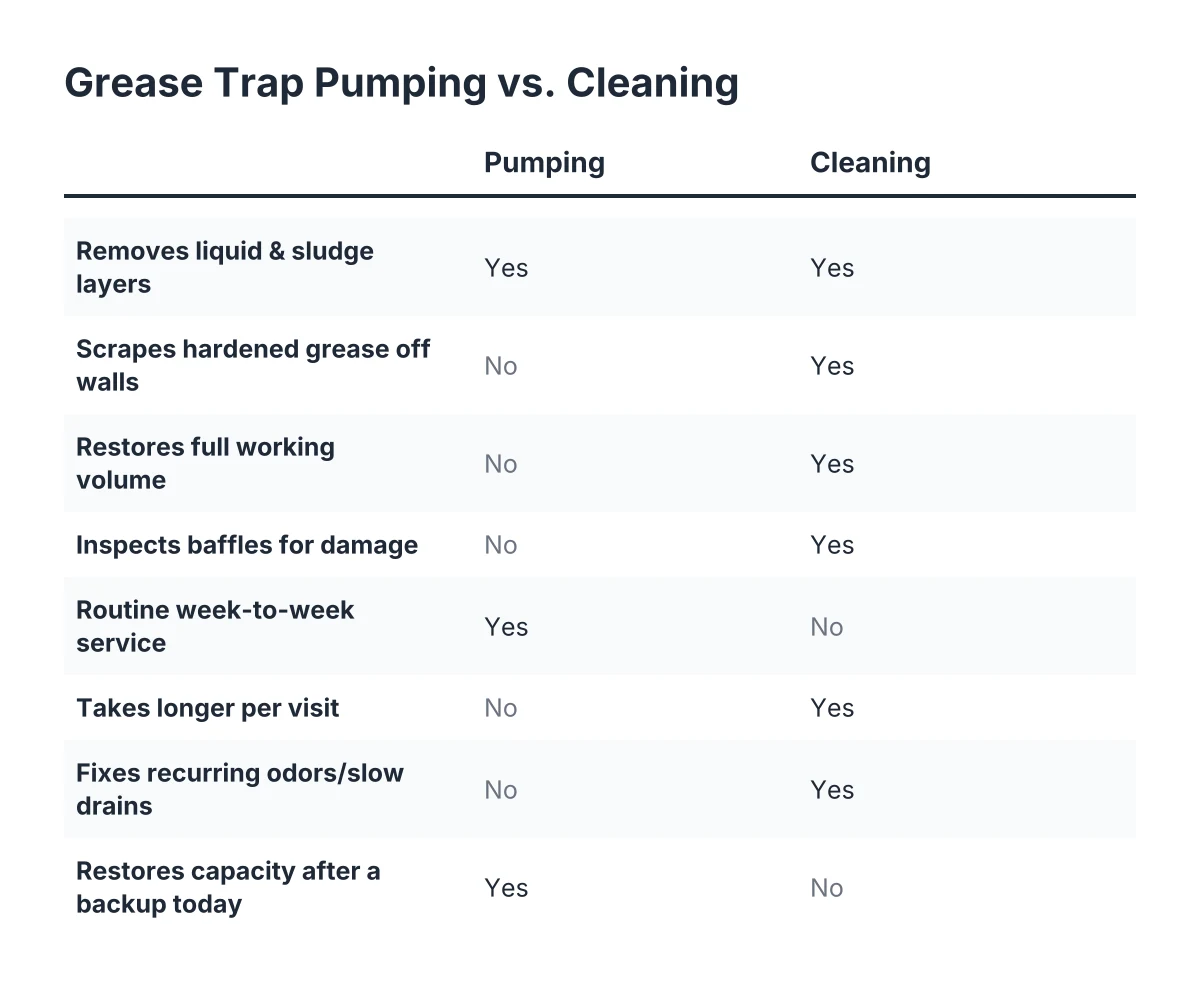
    Checklist comparing grease trap cleaning vs pumping across key service tasks
    A side-by-side look at what pumping covers versus what cleaning adds, as explained in this guide.

    If you run a commercial kitchen or own a rental property with a restaurant tenant, you have probably searched for grease trap cleaning, pumping, or both, and found companies using the two words like they mean the same thing. They do not. Knowing the difference between grease trap cleaning and pumping matters when an inspector is due next month, or when a floor drain is already backing up and you need the right truck today. This guide breaks down what each service actually involves, when to choose one over the other, and what to ask before you book a crew in Hesperia or anywhere in the High Desert.

    The short version: pumping removes the contents of the trap, cleaning removes the contents plus the buildup stuck to the trap itself. Most kitchens need both on a schedule, and the wrong choice at the wrong time is how a passing kitchen ends up with a failed health inspection or sewage in the dish pit.

    What Grease Trap Pumping Actually Involves

    Grease trap pumping is the removal of everything inside the trap with a vacuum truck. A technician opens the lid, drops a hose into the trap, and pulls out the floating grease layer, the wastewater in the middle, and the settled food solids at the bottom. The waste goes into the truck's tank and gets hauled to an approved disposal facility. It does not get dumped on site or handled by your staff.

    That layering matters. A grease trap works the same way a septic tank does. Fats, oils, and grease float to the top and form a scum layer, heavier solids sink to the bottom as sludge, and the liquid in between flows out to the sewer or septic system. According to the U.S. Environmental Protection Agency, this three-layer separation is exactly how these tanks are designed to work. Pumping only counts as done right when all three layers come out, not just the liquid. A crew that skims the easy liquid and leaves the sludge has not solved your problem; they have delayed it.

    For most kitchens, pumping is the routine service. It restores the trap's full capacity so it can keep catching grease before that grease reaches the sewer line or your septic system. The stakes are real. According to the U.S. Environmental Protection Agency, grease is the most common cause of reported sewer blockages, responsible for 47 percent of cases. And the volume adds up fast; Wastewater Digest reports that a single restaurant can release between 800 and 17,000 pounds of grease into the sewer system each year.

    What Grease Trap Cleaning Adds on Top of Pumping

    Grease trap cleaning starts where pumping ends. After the trap is pumped empty, cleaning means scraping the hardened grease off the walls, baffles, and lid, breaking up any crusted buildup in the corners, and often rinsing the trap so the technician can see the baffles and inspect their condition. Some crews call this a full clean-out or a scrape-down. Whatever the name, the point is the same: the trap goes back into service with its full working volume and its baffles clear.

    Why does that matter? Because a trap that gets pumped but never cleaned slowly shrinks. Hardened grease coats the interior and reduces how much the trap can hold. The baffles, which force water to slow down so grease can separate, get caked over and stop doing their job. You can pump that trap on a perfect schedule and still fail an inspection, because the inspector lifts the lid and sees an inch of rock-hard grease lining the walls.

    Cleaning also gives the technician a look at the trap's condition. With the walls scraped and the baffles visible, they can spot a cracked baffle, a corroded wall, or a damaged outlet before it turns into a backup. That inspection value is a big part of why cleaning belongs in your rotation even if pumping is your regular service.

    One honest trade-off: a full grease trap cleaning takes longer than a straight pump-out, and it costs more per visit. For a small indoor trap the difference may be under an hour; for a large in-ground interceptor it can add real time to the job. If your budget only covers one deep clean a year, most operators pair it with a regularly scheduled pump-out so the truck is already on site.

    Grease Trap Cleaning and Pumping: How to Choose Between Them

    The right choice depends on what problem you are solving. Here is the plain-language breakdown.

    Choose pumping when:

    • The trap is full or near full but draining normally
    • You are on a routine maintenance schedule and the last full clean was recent
    • You need waste hauled and documented before an inspection and the trap interior is in decent shape
    • A backup just happened and you need capacity restored today

    Choose cleaning (pump plus scrape-down) when:

    • The trap has been pumped repeatedly but odors or slow drains keep coming back
    • Hardened grease is visible on the walls or baffles when the lid comes off
    • You are taking over a property or a new tenant is moving in and you do not know the service history
    • An inspector flagged the trap's condition, not just its fill level
    • The trap has gone a year or more without a full clean-out

    For most working kitchens, the practical answer is a rotation: routine grease trap pumping on a set interval, with a full cleaning folded in once or twice a year. The pumping keeps capacity available week to week. The cleaning resets the trap and keeps the interior in a condition an inspector will accept.

    There is one situation where neither service is the whole answer. If the trap backs up again within days of a proper pump and clean, the problem is likely downstream, in the line between the trap and the sewer or septic tank. That calls for a diagnosis, not another pump-out, and it is worth having a professional trace the line before you spend more on service visits that cannot fix it.

    Why This Matters for Health Inspections in 2026

    Health and wastewater inspectors do not just check whether your trap is empty. In most jurisdictions, including the High Desert, they want to see three things: the trap is being serviced at an adequate frequency, the waste is being hauled by a legitimate service and disposed of properly, and the trap itself is in working condition. Cleaning and pumping each cover a different part of that checklist.

    Documentation carries most of the weight. Every service visit should produce a record showing the date, the volume removed, and where the waste went. Keep those records on site and organized. When an inspector asks for your grease trap service history, a folder of dated manifests answers the question in thirty seconds. A shrug does not. As of 2026, many local sewer authorities also set minimum pumping intervals for food service businesses, so confirm what your jurisdiction requires rather than guessing.

    This is where choosing a real grease trap cleaning and pumping service, rather than the cheapest truck on a classifieds site, pays for itself. A crew that hands you proper paperwork after every visit is protecting your inspection record, not just emptying a tank. If a hauler cannot tell you where the waste goes, that is a disqualifier, because improper disposal can land on the business that generated the waste.

    How Do You Know When a Grease Trap Needs Service?

    A grease trap needs service when the combined grease and solids take up a large share of its capacity, or when you notice odors, slow drains, or grease escaping past the trap. Many operators use the general rule that a trap should be serviced before it is a quarter full of grease and solids, though local rules may set a stricter standard.

    In practice, the warning signs show up in the kitchen first. Drains near the trap slow down. A sour, rancid smell builds up near floor sinks even after mopping. Grease appears in downstream cleanouts where it should never be. Any of those signs means the trap is past due, and if they show up soon after a pump-out, the trap likely needs a full cleaning or has a downstream problem.

    How Long Does It Take to Clean a Grease Trap?

    Cleaning a grease trap typically takes anywhere from about thirty minutes for a small under-sink unit to a few hours for a large in-ground grease interceptor. The time depends on the trap's size, how hardened the buildup is, how accessible the lids are, and whether the crew is doing a straight pump-out or a full scrape-down.

    For a working restaurant, the scheduling detail matters more than the clock time. A good crew can service most traps outside peak hours so the kitchen never stops. If your trap is indoors, plan the visit for before open or after close, since the lid has to come off inside the building and the process is not subtle.

    Grease Trap vs. Grease Interceptor: A Quick Distinction

    You will see both terms in quotes and regulations, and the difference affects which service you book. A grease trap usually means the smaller indoor unit, often under or near the sink, holding a modest volume. A grease interceptor is the large in-ground tank outside the building, often holding hundreds or thousands of gallons, and it looks and behaves much more like a septic tank.

    The service logic is the same for both, but the scale changes everything. Small indoor traps fill fast and need frequent attention; some kitchens handle interim maintenance in-house and bring in a pump truck for full removals. In-ground interceptors need a vacuum truck every time, and pumping one is closer to septic tank pumping than to scooping out a sink trap. A company that already runs vacuum trucks for septic work in Hesperia is set up for exactly this kind of job, since the equipment and the disposal process are the same trade.

    One more note for property owners: a residential grease trap is rare, but some older homes and small multi-unit properties in the High Desert have them, usually tied to a septic system. If you own a rental with one, it needs periodic service just like a commercial trap, because grease that gets past it ends up as scum in your septic tank and, eventually, in your drain field.

    What Grease Trap Cleaning and Pumping Costs Depend On

    Grease trap service pricing varies with the size of the trap, how full and how hardened the contents are, access, and whether the visit is scheduled or an emergency. As illustrative estimates only, a small indoor trap might run in the low hundreds per visit, while a large in-ground interceptor can run several hundred to over a thousand dollars, depending on volume and disposal fees.

    A few factors consistently move the number:

    1. Trap size and volume removed. Disposal is charged on volume, so a 1,500 gallon interceptor costs more to service than a 50 gallon indoor trap.
    2. Condition. A trap that has gone years without a full cleaning takes longer and may need extra work to break up hardened grease.
    3. Access. Buried lids, traps under equipment, or long hose runs add time.
    4. Timing. An emergency same-day pump-out generally costs more than a routine scheduled visit; that pattern holds across the industry.
    5. Documentation and disposal. Legitimate haulers pay to dispose of waste at approved facilities, and that cost is part of the price. Suspiciously cheap service often means corners cut on exactly this step.

    Compare that to the cost of skipping service. A grease-driven backup can close a kitchen for a day or more, and if you are a landlord, it can mean an unrentable unit and an angry tenant. On septic-served properties the downside is steeper. The EPA estimates septic repair or replacement typically costs between $5,000 and $15,000, and grease pushed past a neglected trap into a septic system is one way to get there.

    A Realistic Scenario: The Landlord With a Restaurant Tenant

    Suppose you own a small commercial building in Hesperia with a taco shop as your tenant, and the lease makes you responsible for the grease interceptor. The tenant calls on a Thursday: the floor drain by the three-compartment sink is backing up, and the county inspector is due within the month.

    In that scenario, the first visit is a pump-out, because the immediate job is restoring capacity and stopping the backup. When the crew opens the interceptor, they find the baffles caked with hardened grease, a sign the trap has been pumped over the years but never actually cleaned. The right call is to authorize the full cleaning while the truck is already on site, since the incremental cost is far lower than a second visit, and the scraped-down trap will pass a visual inspection that a merely emptied one might not.

    After the visit, you keep the service record with the date and gallons removed. When the inspector arrives, the trap is clean, the paperwork is in hand, and the question is settled in minutes. From there, you put the trap on a standing schedule so the next call from the tenant is not another Thursday emergency.

    Questions to Ask Before You Book a Service

    Whether you are comparing grease trap cleaners near me results or calling a septic company that also runs grease routes, a few direct questions separate a real operation from a truck with a magnet sign:

    • Do you pump all three layers, including the settled solids, or just the liquid?
    • Does the price include a scrape-down of the walls and baffles, or is that separate?
    • Will I get documentation showing the date, volume, and disposal location?
    • Where does the waste actually go?
    • Can you service the trap outside my kitchen's operating hours?
    • If the trap backs up again right away, will you help diagnose the line downstream?

    A company that answers these plainly is a company you can put on a schedule. Vague answers on disposal or documentation are the red flag that matters most, because that paperwork is what stands between you and a failed inspection.

    The bottom line: pumping empties the trap, cleaning restores it. Most kitchens in Hesperia and the surrounding High Desert need both, on a rotation matched to how much grease the kitchen produces. Get the trap on a schedule, keep every service record, and the grease trap becomes one of the few pieces of your building that never surprises you.

    If you need your septic tank serviced, Hesperia Septic can help.

    Prefer to talk it through? Call (760) 249-7872 — a quick call is usually the fastest way to get a straight answer for your situation.
    Related Reading

  • Septic System Backup Repair Costs in Hesperia: What to Expect and How to Avoid Them

    septic backup repair cost

    When sewage is backing up into your tub or pooling in the yard, the first question after "who do I call" is "what is this going to cost me." This guide walks you through septic backup repair cost and what you will likely pay in 2026, how to tell a fair quote from a padded one, and what to do right now to keep the damage and the bill from growing. The short version: most backups in Hesperia end with a pump-out, not a five-figure repair. Here is how to handle it in order.

    Step 1: Stop Adding Water to the System

    Before you call anyone, cut the water going down your drains. Every flush, shower, and load of laundry pushes more wastewater into a tank that has nowhere to put it. That is what forces sewage back up through the lowest drain in the house.

    Turn off the washing machine and dishwasher. Ask everyone in the house to stop flushing. If a toilet is running, shut its supply valve at the wall; according to the U.S. Environmental Protection Agency, a single leaky or running toilet can add as much as 200 gallons of extra water per day into a septic system. That alone can turn a slow backup into standing sewage overnight.

    This step costs nothing and it directly protects your floors, your drain field, and your final bill.

    Step 2: Figure Out If It Is the Septic System or the House Plumbing

    Next, do a quick check so you call the right professional. A septic backup and a plumbing clog can look identical from inside the house, but they get fixed by different people at different prices.

    Signs it is the septic system:

    • Sewage or gray water coming up in the lowest drains, usually a tub, shower, or floor drain
    • A wet, soggy, or smelly patch of yard over the tank or drain field
    • A septic alarm going off, if your system has one
    • Every drain in the house is slow or backing up, not just one

    Signs it is house plumbing: one fixture is clogged while everything else drains fine. In that case a plumber is the right call. For anything that looks septic, call a septic service first. They can diagnose the tank, the baffles, and the drain field, which a general plumber usually cannot. Many Hesperia homeowners lose a day and a service fee calling a plumber who then says they do not really do septic.

    Step 3: Call for Emergency Septic Pumping and Ask These Questions

    Once it looks like a septic backup, call a local septic crew and ask for emergency septic pumping. Before you commit, ask three questions on the phone:

    1. What is the base price for the pump-out, and what could add to it?
    2. Is there a separate after-hours or emergency fee, and how much?
    3. Do you charge extra for digging to find or uncover the tank lid?

    A straight answer to all three is the mark of an honest operator. According to Angi, septic tank pumping averages $427 nationwide, ranging from $250 to $1,250 or more depending on tank size and location. Emergency or after-hours service usually adds to that. A smaller 500 gallon septic tank generally costs less to pump than a larger one because the truck hauls away less waste.

    For example, suppose a homeowner in Hesperia has sewage coming up in the hall bathroom on a Saturday evening. A typical crew pumps the tank, checks the inlet baffle, and has the drains flowing again that day. In that scenario, the total lands in the hundreds, not the thousands, even with an after-hours charge. That is the most common outcome of a backup call.

    Step 4: Understanding the Cost of Septic Backup Repair by Tier

    Septic system backup repair costs fall into three tiers, and knowing which tier you are in is how you judge any quote. Most backups sit in the first tier: the tank is full because it went too long between pump-outs, and pumping alone fixes it. That is the hundreds range described above, and it is the outcome to hope for.

    The second tier is a component repair. A common example is a clogged or broken inlet baffle; according to the Washington State Department of Health, a clogged inlet baffle is a common cause of septic backups and one of the first things to check on a blocked line. Baffle work, a broken line between the house and tank, or a damaged lid usually costs more than a pump-out but far less than major work. As an illustrative estimate, think low hundreds to a couple thousand depending on digging and parts.

    The third tier is the one everyone fears: drain field failure or full system replacement. The EPA estimates septic tank repair or replacement typically costs between $5,000 and $15,000, far more than routine pumping. However, a backup alone does not mean you are in this tier. If the drains work fine after pumping and stay that way, the drain field is probably doing its job.

    Step 5: Verify the Diagnosis Before Agreeing to Major Work

    If a technician says you need drain field work or a new system, slow down and verify before signing anything. This is where the fear of a padded septic tank cost either comes true or gets put to rest.

    Ask the crew to show you what they found. A conventional system has two main parts, the tank and the drain field, according to the U.S. Environmental Protection Agency, and a real problem in either one is visible or testable. A failed drain field shows itself: water flows back into the tank from the outlet, the field stays soggy, or drains back up again within days of a fresh pump-out.

    Reasonable checks before approving big-ticket work:

    • Was the tank pumped first, and did the problem return afterward?
    • Did they inspect the inlet and outlet baffles and the line from the house?
    • Can they show you standing water or backflow at the outlet side?
    • Did you get an itemized written estimate separating labor, materials, and equipment?

    A quote that jumps straight to replacement without pumping and inspecting first deserves a second opinion. That said, if a system has failed, delaying real repair only spreads sewage and raises the eventual cost, so verification should take days, not months. Soil conditions, tank access, and county permitting all affect Hesperia repair pricing, so a firm number requires someone on site.

    Step 6: Prevent the Next Backup With Scheduled Pumping

    After the crisis passes, the cheapest repair is the one you never need. Nearly all emergency backup calls trace back to a tank that went years past its service interval, letting sludge and scum build until solids pushed into the lines or the drain field.

    The prevention plan is short:

    • Get on a pumping schedule. Penn State Extension notes that for an active family of four, pumping every two to three years is generally advisable.
    • Have the system inspected. The U.S. Environmental Protection Agency recommends a professional inspection at least once every three years.
    • Fix running toilets and dripping fixtures fast; extra water is the quiet killer of drain fields.
    • Keep grease, wipes, and food solids out of the drains. This goes double for commercial kitchens, where a grease trap on a regular pump-out schedule prevents both backups and health code trouble.
    • Skip additive products sold as a substitute for pumping. If additives fail to clear a buildup, the endgame can be replacing the system entirely.

    Do the math on this trade. A pump-out every few years costs hundreds. A replacement runs $5,000 to $15,000 by EPA estimates, and you carry that whole bill yourself; there is no city sewer department to absorb it. More than one in five U.S. households depend on septic or small cluster systems, according to the U.S. Environmental Protection Agency, and the ones that avoid emergencies are the ones on a schedule.

    Step 7: Keep Records So Future Service Costs Less

    Finally, write down what happened. Note the date of the pump-out, where the tank and lids are, what the crew found, and what they recommended. If the crew had to locate the tank this time, mark the spot or sketch it; skipping the locating step next time saves money on every future visit.

    These records also matter if you ever sell. Buyers and inspectors ask for septic service history, and a documented, regularly pumped system is worth more than a mystery in the yard. For an RV park or restaurant owner, the same log doubles as your compliance record for holding tank or grease trap service.

    A backup at 8pm feels like a disaster, and standing sewage is nothing to shrug off. But most Hesperia backups end with a same-day pump-out in the hundreds of dollars, a checked baffle, and a homeowner who now knows exactly what their system needs. Follow the steps in order, ask for itemized pricing, and the scary quote almost never materializes.

    If you need your septic tank serviced, Hesperia Septic can help.


    Prefer to talk it through? Call (760) 249-7872 — a quick call is usually the fastest way to get a straight answer for your situation.
    Related Reading

  • What Happens During Professional Grease Trap Cleaning: Step-by-Step Process and Timeline

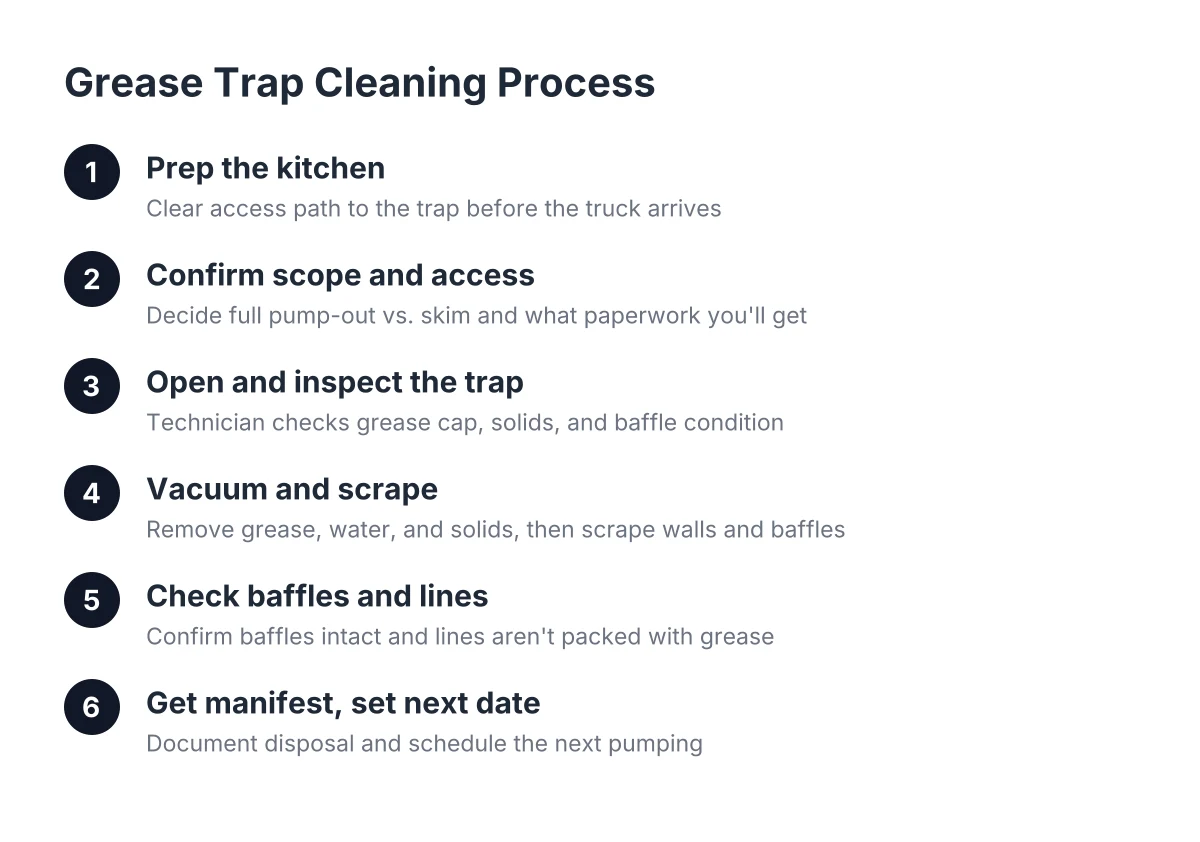
    Six-step diagram of the professional grease trap cleaning process for restaurants
    The professional grease trap cleaning process runs from pre-visit prep through scheduling the next pumping.

    If you run a restaurant or commercial kitchen, knowing exactly what happens during the grease trap cleaning process helps you plan around it, keep your paperwork straight, and pass your next health inspection without a scramble. This guide walks through the service step by step, from the pre-visit prep to the manifest you file away for the inspector. It is written for owners and managers who cannot afford a failed inspection or a Friday-night backup, and it applies whether your trap sits under a three-compartment sink or you have a larger in-ground interceptor outside the building.

    The stakes are real. According to the U.S. Environmental Protection Agency, grease is the most common cause of reported sewer blockages, responsible for 47% of cases. And according to Wastewater Digest, a single restaurant can release between 800 and 17,000 pounds of grease into the sewer system each year. That is why health departments and sewer districts want proof your trap gets pumped on schedule. Here is how the visit actually goes.

    Step 1: Prep Your Kitchen Before the Truck Arrives

    Before the crew shows up, clear a working path to the trap. For an indoor under-sink trap, that means moving mats, trash cans, and anything stored on or around the unit. For an outside in-ground interceptor, make sure the access lids are not blocked by a parked delivery van, a dumpster, or stacked patio furniture.

    Schedule the visit for a slow window if you can. Pumping an indoor trap opens the unit and releases odor, so mid-morning before lunch prep or after close works better than the middle of a dinner rush. Most single-trap visits take somewhere between 30 minutes and a couple of hours depending on trap size and access, so plan staffing around that window.

    In addition, pull your last service record if you have one. The crew can compare grease levels against the previous visit and tell you whether your current pumping interval is holding up or needs to tighten.

    Step 2: Confirm the Scope, Access, and Documentation Up Front

    When the technician arrives, walk them to the trap and confirm three things before any lid comes off: which unit is being serviced, whether it is a full pump-out or a partial skim, and what paperwork you will get afterward.

    This matters because a full pump-out and a skim are not the same service. A skim removes the floating grease layer only. A full clean-out removes everything, including grease on top, water in the middle, and settled solids on the bottom, then scrapes the walls and baffles. For health inspection purposes, most kitchens need the full clean-out documented; a skim leaves solids behind that keep building.

    Ask for the manifest or service receipt in writing. It should show the date, the volume removed, the disposal destination, and the company that did the work. Many health departments and sewer districts in California expect you to produce these records on request, so treat the paperwork as part of the service, not an afterthought.

    Step 3: Understanding the Grease Trap Cleaning Process During Professional Service

    Once the scope is set, the crew opens the trap and gets to work. The grease trap cleaning process begins when the technician removes the access lid and checks the condition of the trap before anything gets vacuumed. This first look tells them a lot: how thick the grease cap is, whether solids have piled up near the outlet, and whether the baffles are intact.

    Next comes the actual removal. The vacuum truck hose pulls out the contents in layers, similar to how a septic tank separates: fats, oils, and grease float on top as a scum layer, solids settle to the bottom, and water sits in the middle. According to the U.S. Environmental Protection Agency, that layering is exactly how grease and solids behave in a septic tank as well, which is why the same trucks and crews handle both jobs. A septic tank pumping outfit serving Hesperia and the High Desert typically runs grease trap routes with the same equipment.

    A thorough crew does not stop at vacuuming the liquid. They scrape hardened grease off the trap walls, clean the inlet and outlet baffles, and remove solidified chunks rather than leaving them to float back into the system. Grease that cools and hardens sticks to surfaces, so leaving a coated wall behind means the trap refills faster and clogs sooner.

    Step 4: Have the Baffles and Lines Checked While the Trap Is Open

    An empty trap is the only time anyone can see its parts clearly, so use it. Ask the technician to confirm the inlet and outlet baffles are present, attached, and not corroded through. A missing outlet baffle lets grease flow straight into your lateral line, and that is how a trap that "just got pumped" still causes a backup three weeks later.

    However, if your drains were already slow before the visit, pumping the trap alone may not fix it. Grease clogs coat the inside walls of the pipe, so punching a small hole through the blockage with a snake gives you a week of relief before it closes up again. Clearing a grease-coated line for good usually takes a jetter or similar tool that cleans the full pipe wall. If the crew finds grease packed in the line past the trap, get that handled while everything is open rather than booking a second emergency visit later.

    This is also the moment to ask honest questions about trap condition. Cracked concrete interceptors, rusted-out steel traps, and undersized units are structural problems that the grease trap cleaning process cannot solve. A trap that is too small for your kitchen's volume will fail inspection eventually no matter how often it gets pumped, and that call is worth a professional's judgment rather than a guess.

    Step 5: Get the Manifest and Confirm Where the Grease Goes

    The waste does not disappear when the truck leaves. It gets hauled to an approved disposal or treatment facility, the same way septic waste pumped from residential tanks is trucked to a treatment plant rather than processed on site, according to the New Hampshire Department of Environmental Services. Your manifest documents that chain, and it is your proof that the grease was disposed of legally rather than dumped.

    Before the truck pulls away, check the paperwork for these items:

    • Date and time of service
    • Address and unit serviced
    • Gallons or volume removed
    • Whether it was a full pump-out or partial skim
    • Disposal facility or destination
    • Company name and contact information

    File this with your other compliance records. Suppose a health inspector shows up at a Hesperia taco shop on a Tuesday and asks when the trap was last serviced; in that scenario, the owner who can hand over a dated manifest is done in two minutes, while the owner who says "a while ago, I think" is now on a re-inspection list. The document is cheap insurance.

    Step 6: Set the Next Pumping Date Before You Forget

    The best time to schedule the next visit is while the current one is fresh. Pumping frequency depends on your kitchen's volume; a high-output fryer operation fills a trap far faster than a coffee shop. A common rule inspectors use is servicing the trap once grease and solids fill about a quarter of its depth, and your technician can estimate how long that takes based on what they just pumped out.

    For example, say a mid-sized diner gets its trap pumped and the crew finds the grease cap took three months to reach that quarter-full mark. In that case, a quarterly schedule fits, and stretching it to six months to save money invites slow drains, odors, and an inspection failure that costs far more than the skipped visit.

    Between visits, cut what goes down the drain. Scrape plates into the trash, dry-wipe pans before washing, and never pour fryer oil into a sink. Reducing the grease that enters the trap in the first place is the single most effective way to stretch the interval between pump-outs.

    What Professional Grease Trap Cleaning Process Accomplishes Compared to DIY Cleaning

    What happens during professional grease trap service goes well beyond what a staff member with a bucket can do. The grease trap cleaning process employed by professionals removes all three layers, the walls and baffles get scraped clean, the waste is hauled to a legal disposal site, and you receive a manifest that satisfies an inspector. DIY scooping removes some surface grease, leaves the solids and wall coating in place, and produces no documentation at all.

    There is one honest trade-off to weigh: professional service costs money on a recurring basis, and a small trap in a low-volume kitchen may need it less often than a sales rep might suggest. Track your own grease accumulation between visits and let the actual measurements set the schedule. When in doubt about frequency, sizing, or a trap that keeps backing up despite regular pumping, bring in a professional to inspect the system rather than guessing.

    For kitchens in Hesperia and the surrounding High Desert, grease trap pumping is usually handled by the same local crews that run septic tank pumping routes, since the trucks, disposal process, and know-how overlap. The visit itself is straightforward. What separates a smooth compliance record from a scramble is the prep you do before the truck arrives and the paperwork you keep after it leaves.

    If you need your septic tank serviced, Hesperia Septic can help.


    Prefer to talk it through? Call (760) 249-7872 — a quick call is usually the fastest way to get a straight answer for your situation.
    Related Reading

  • Aerobic Septic System Costs vs. Conventional: What Hesperia Owners Really Pay

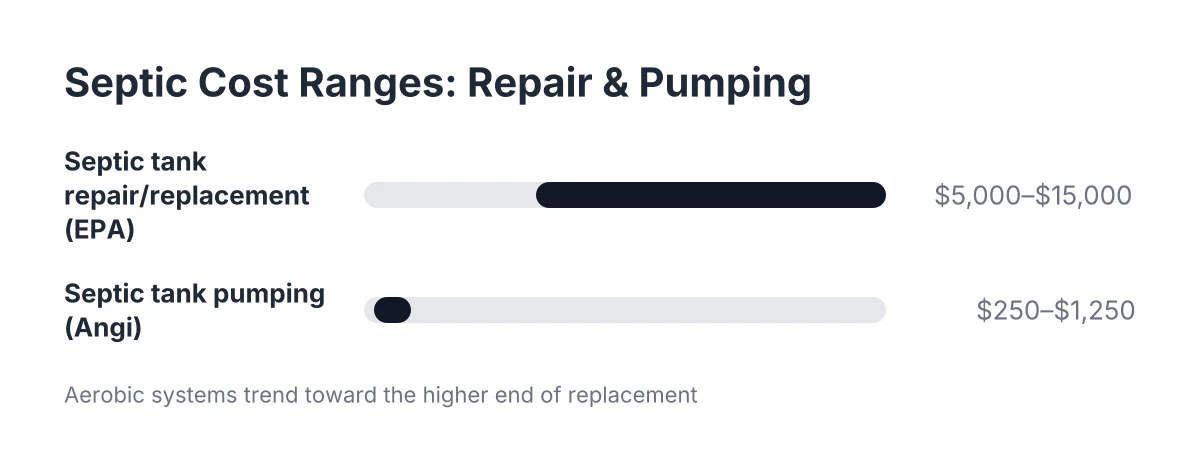
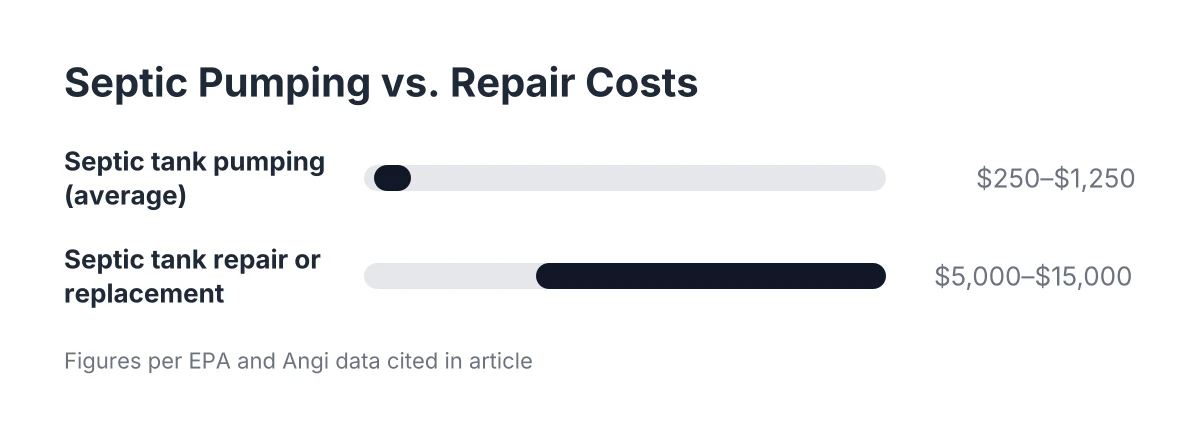
    Bar chart of aerobic septic system cost ranges for repair and pumping
    Aerobic systems tend toward the top of these EPA and Angi cost ranges due to added equipment and maintenance.

    Search for aerobic septic system costs and you will find prices that look nothing like a normal septic tank pumping bill. That gap is real. An aerobic system adds electricity, moving parts, and required service visits on top of everything a conventional gravity system already needs. Before you buy a home with one, or replace a failing tank, you should see the full cost picture side by side.

    This comparison lays out what conventional and aerobic systems actually cost to own, not just to install. If you are the kind of homeowner who plans pumping ahead instead of waiting for a backup, this is the math worth doing once so the next quote you get makes sense.

    The Two Systems in Plain Terms

    A conventional septic system has two main components: the septic tank and the drain field, according to the U.S. Environmental Protection Agency. Wastewater settles in the tank, and the clarified liquid flows out through perforated pipes into the soil. Gravity does most of the work. There are no motors, no air pumps, and usually no electrical parts at all.

    An aerobic system, sometimes called an aerobic treatment system, adds a mechanical step. Air is pumped into a treatment chamber so oxygen-loving bacteria break down waste faster and more completely. A typical setup moves wastewater through several stages: a primary or trash tank, an aeration chamber, a clarifier, and a pump tank that pushes treated water out. Some designs add a chlorination step before discharge.

    That extra treatment is the whole point of an aerobic system. It is also the whole reason aerobic septic system costs run higher, both on day one and every year after.

    What Drives the Cost of an Aerobic Septic System

    The purchase price is where the gap shows first. A conventional system is a tank, a drain field, and excavation. An aerobic system includes all of that plus an air compressor, internal pumps, float switches, electrical wiring to the tank, and often an alarm panel.

    To keep the comparison honest, here is how the installed cost typically breaks down for each:

    • Conventional system: the tank itself, a plumbing permit, drain field materials such as chambers, pipe, a junction box, clean-outs, and risers, plus equipment rental and fuel for the dig.
    • Aerobic system: everything above, plus the aeration equipment, discharge pump, electrical hookup, control panel, and in some configurations a chlorinator and extra tank compartments.

    Site conditions move both numbers. A lot with gentle slope, decent soil, shallow digging depth, and no rock costs less to work on than one that needs deep excavation or rock removal. In the High Desert around Hesperia, soil and lot conditions vary from street to street, which is one reason two neighbors can get different quotes for similar systems.

    Material choice matters too. Concrete tanks are common here, and concrete can cost substantially less than a poly tank of the same size. Tank shapes and configurations also vary by region; some areas use rectangular concrete tanks while others use circular tanks, according to the International Code Council.

    For scale on what is at stake, the EPA estimates septic tank repair or replacement typically costs between $5,000 and $15,000, far more than routine pumping, according to the U.S. Environmental Protection Agency. Aerobic systems generally land at the higher end of replacement scenarios because of the added equipment.

    Ongoing Aerobic Septic System Costs Most Quotes Leave Out

    Aerobic septic system costs do not stop at installation. The ongoing side includes electricity to run the air pump around the clock, periodic replacement of that pump, filter cleaning, chlorine tablets on systems that disinfect, and service contracts where local rules require them. A full-service visit on an aerobic system can include pumping, replacing a failed pump, replacing lines, and cleaning filters, which together cost far more than a simple pump-out.

    Inspection frequency is different too. Alternative septic systems with electrical float switches, pumps, or mechanical components should generally be inspected once a year, according to the U.S. Environmental Protection Agency. A conventional household system needs a professional inspection at least once every three years, per the same agency. That difference alone triples the inspection line on your maintenance budget.

    Here is an illustrative scenario. Say a Hesperia homeowner budgets for a conventional system: one pumping visit every few years plus an inspection every third year. Now suppose the same homeowner owned an aerobic system instead. The budget would need a yearly inspection, electricity for the compressor, a replacement air pump every several years, and pumping on top of that. Same house, same family, noticeably different annual number.

    Where the Costs Actually Overlap

    Both systems still need septic tank pumping. Solids build up in the primary tank of an aerobic system just as they do in a conventional tank, and no amount of aeration removes the need to haul them away. According to Angi data, septic tank pumping averages $427, ranging from $250 to $1,250 or more depending on tank size and location.

    Pumping frequency depends on household size and use, not system type alone. For an active family of four, pumping every two to three years is generally advisable because of higher solids and liquid production, according to Penn State Extension. In both cases, the waste pumped from the tank is trucked to a sewage treatment plant for disposal rather than processed on site, per the New Hampshire Department of Environmental Services.

    Both systems also share the same failure risk profile in one respect. Unlike a home on municipal sewer, a septic owner carries the full financial liability for a major failure. There is no city budget absorbing the repair. That is true whether the tank behind your house is a simple concrete box or a multi-chamber aerobic unit, and it is the strongest argument for staying on a maintenance schedule with either one.

    Side-by-Side: What You Pay and When

    Here is the comparison in one place:

    • Upfront cost: Conventional is lower; aerobic adds pumps, wiring, and controls.
    • Electricity: Conventional uses none in a standard gravity setup; aerobic runs a compressor continuously.
    • Inspections: Every three years for a typical conventional system; yearly for systems with pumps and float switches, per U.S. Environmental Protection Agency guidance.
    • Pumping: Required for both on a similar schedule driven by household size.
    • Parts that wear out: Few to none on conventional; air pumps, floats, and filters on aerobic.
    • Service visits: Occasional for conventional; regular and sometimes mandatory for aerobic.
    • Treatment quality: Aerobic treats wastewater more thoroughly, which matters on lots where soil or space cannot support a full conventional drain field.

    Read that last line carefully. Aerobic systems exist because some properties cannot make a conventional drain field work. On those lots, the higher aerobic septic system costs are not a choice; they are the price of having a working system at all.

    Why Maintenance Changes the Whole Comparison

    For a homeowner who already has a conventional system, the cheapest path is almost always keeping it healthy. A well-maintained gravity system can last a long time, and regular pumping is what protects the drain field from the solids that destroy it. Letting a conventional system fail, then being forced into an aerobic replacement, is the most expensive route on this entire page.

    This is where the numbers favor the planner. A pumping visit every few years plus a periodic inspection is a small, predictable septic tank cost. A failed drain field is a five-figure project. More than one in five U.S. households depend on individual septic systems or small community cluster systems to treat their wastewater, according to the U.S. Environmental Protection Agency, and the ones who avoid the big bills are usually the ones on a schedule.

    Suppose you bought a Hesperia house three years ago and the seller could not tell you when the tank was last pumped. The uncertain move is waiting for a smell or a slow drain. The cheaper move is scheduling a pumping and inspection now, learning what system you actually have, and setting a reminder based on what the crew finds in the tank.

    How to Choose

    If you are comparing systems for a new build or a replacement, start with the property, not the price list. Soil, lot size, slope, and local requirements decide whether a conventional drain field is even an option. A soil evaluation and a conversation with your local health department will settle that faster than any online estimate, and it is a decision worth professional eyes rather than a guess.

    From there, the decision logic is straightforward:

    1. If your lot supports a conventional system, it will almost always cost less to install and own.
    2. If your lot cannot support a standard drain field, an aerobic system is the working option, so budget for yearly inspections and equipment upkeep from day one.
    3. If you already own either type, protect it. Regular septic tank pumping and inspections are the cheapest line item in the whole comparison.
    4. When you collect quotes, ask each company to itemize pumping, inspection, and any parts separately so you can compare like for like.

    Both systems can serve a household well for decades. The difference is not which one works; it is how much attention and money each one asks for along the way. Know that number before you commit, and neither system will surprise you.

    If you need your septic tank serviced, Hesperia Septic can help.

    Prefer to talk it through? Call (760) 249-7872 — a quick call is usually the fastest way to get a straight answer for your situation.
    Related Reading

  • Septic System Inspection: What Inspectors Look For and the Red Flags That Matter

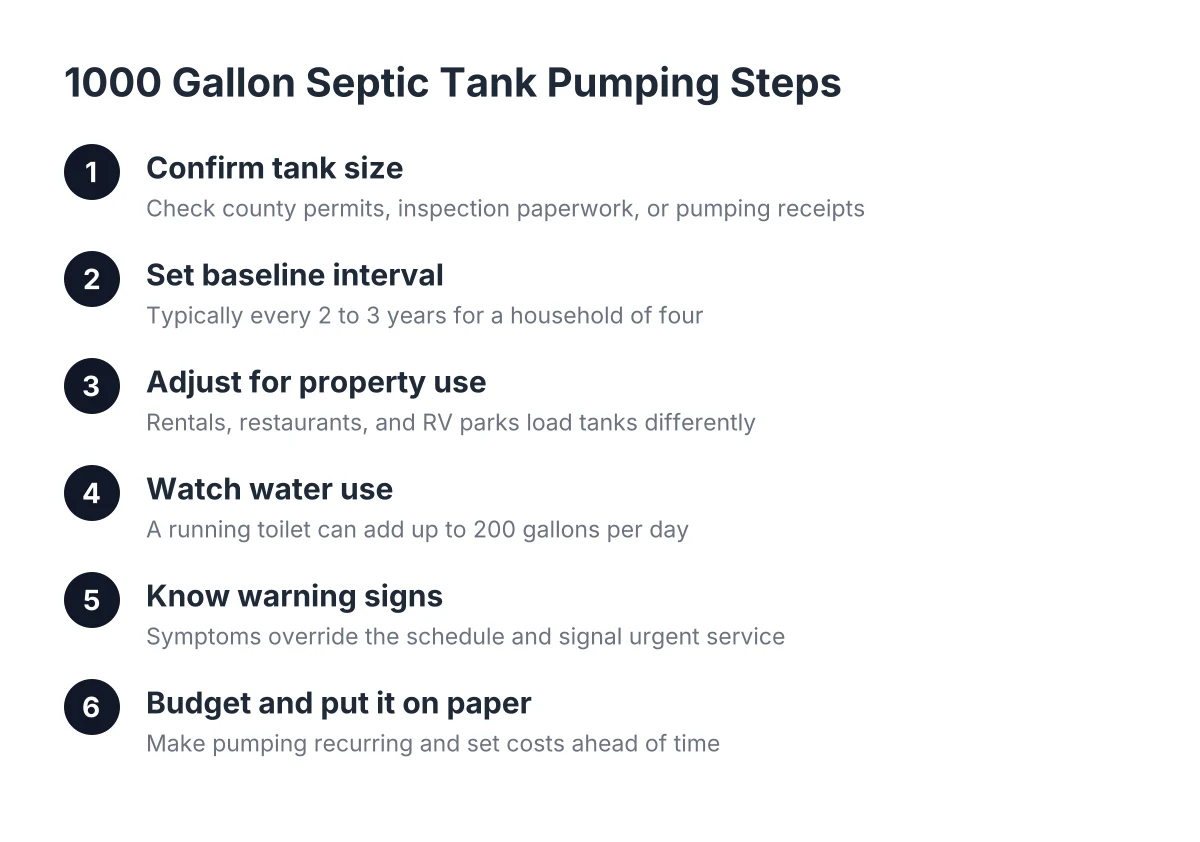
    Cost range chart comparing septic tank pumping and repair costs for septic inspection red flags
    Regular inspection and pumping stays far cheaper than the tank repairs that follow neglect, per EPA and Angi data.

    If you own a home on septic in Hesperia, sooner or later you will need a septic system inspection. Inspectors follow a specific checklist when they open your tank, and knowing what that checklist looks like helps you in two ways. First, you can tell a real inspection from a quick glance at a lid. Second, you can understand what the findings actually mean, so you know whether you are looking at a routine pump-out or a bigger problem with the tank or drain field. Understanding septic inspection red flags is the key to catching problems early.

    This guide walks through what a thorough inspection covers, step by step, and flags the findings that should get your attention. It is written for the homeowner who just bought a house with a septic system, or who has owned one for years and honestly cannot remember when the tank was last pumped. Either way, the goal is the same: know what is happening underground before it becomes a mess above ground.

    Why an Inspection Matters Even When Nothing Seems Wrong

    A septic system hides its problems until they are expensive. The tank sits underground, the drain field sits underground, and everything can look fine from the lawn while sludge builds toward the outlet pipe. By the time you smell sewage in the yard or watch a toilet back up, the cheap fix window may have already closed.

    The numbers make the case better than any sales pitch. According to the U.S. Environmental Protection Agency, septic tank repair or replacement typically costs between $5,000 and $15,000, far more than routine pumping. For comparison, Angi data puts the average cost of septic tank pumping at $427, with a range of $250 to $1,250 or more depending on tank size and location. An inspection is how you stay on the $427 side of that ledger instead of the $15,000 side.

    Timing matters too. The U.S. Environmental Protection Agency recommends that the average household have its septic system inspected at least once every three years by a professional. If your system has electrical float switches, pumps, or mechanical components, the EPA says those alternative systems should generally be inspected once a year. If you cannot remember the last time anyone opened your tank, you are overdue by definition.

    Septic systems are also less common in California than most homeowners realize. According to the U.S. Environmental Protection Agency, only about 10 percent of California homes are on septic, compared with highs of 55 percent in Vermont. That matters in a practical way: many buyers moving to Hesperia from sewer-served neighborhoods have never owned a septic system and do not know what normal maintenance looks like. An inspection is the fastest education you can get about your own property.

    What Septic System Inspection Inspectors Actually Check

    A thorough septic system inspection covers the tank, the baffles, the flow into and out of the tank, and the condition of the drain field. Inspectors are looking for cracks in the tank, clogged or missing baffles, signs of past leaks or overfills, root intrusion, and evidence that water is not draining out to the soil the way it should.

    That is the short version. Here is what each step looks like in practice.

    Gathering the History Before Anyone Digs

    A good inspection starts before a shovel touches dirt. The inspector or service company will usually ask about the age of the house, any repair history, how often the tank has been pumped, and where the property sits. A house on a hilltop drains differently than one in a low spot, and that context shapes what the inspector expects to find.

    If you just bought the house and have no records, say so. That is common, and it changes the approach. Without a pumping history, the inspector treats the tank as an unknown and looks harder at sludge levels and structural condition rather than assuming recent maintenance.

    Locating the Tank and Opening the Lids

    Next comes finding the tank. On older Hesperia properties, the lids may be buried under a foot or more of soil, and nobody living in the house knows where they are. Septic tank locating is a normal part of the job, not a sign something is wrong. The crew finds the tank, digs down to the lids, and opens them.

    For a pre-purchase inspection, this step is non-negotiable. Opening the lids lets the inspector visually check both the inlet side, where wastewater enters from the house, and the outlet side, where clarified liquid exits toward the drain field. An inspection that never opens the tank is not an inspection; it is a walk across the lawn.

    Checking the Baffles and the Flow

    Inside the tank, the baffles do quiet but critical work. The inlet baffle directs incoming wastewater downward so it does not stir up the surface scum. The outlet baffle keeps floating solids from escaping into the drain field. According to the Washington State Department of Health, a clogged inlet baffle is a common cause of septic backups and should be one of the first things checked when troubleshooting a blocked line into the tank.

    The inspector confirms both baffles are present, intact, and clear. There is also a design detail worth knowing: according to University of Nebraska-Lincoln Extension, a properly built septic outlet must sit lower than the inlet, because solids float on top of the liquid and only liquid should exit toward the drain field. If a previous repair got that wrong, solids push into the drain field and shorten its life.

    Flow gets tested too. The inspector may run water from the house and watch it arrive in the tank, then confirm liquid is leaving the tank at the expected level. Water sitting above the outlet pipe is a red flag we will cover shortly.

    Pumping the Tank and Looking at the Structure

    The most complete inspections include pumping the tank. There is a simple reason: you cannot see cracks, root intrusion, or deteriorating concrete through three feet of sewage. Once the tank is empty, the inspector can check the walls and bottom for cracks, look for roots that have worked their way in, and photograph the interior so there is a record of the tank's condition.

    Pumping during inspection also answers the question every new owner has: how full was it? A tank with sludge packed to the outlet tells a different story than a tank pumped two years ago. The inspector notes signs the tank has ever leaked or been completely full, both of which point to problems beyond a simple pump-out.

    Evaluating the Drain Field

    A conventional septic system has two main components, the septic tank and the drain field, according to the U.S. Environmental Protection Agency. The tank clarifies the wastewater; the drain field disperses the clarified liquid into the soil. Inspectors evaluate the drain field by looking at the ground surface for wet spots, unusually green or lush grass, and odors, and by testing whether the field accepts water at a normal rate.

    Physical defects show up here too. Root intrusion into drain field lines and crushed corrugated pipe are common problems, especially where trees grow near the lines or vehicles have driven over the field. A drain field that will not accept water is the most expensive finding an inspection can produce, which is exactly why you want to catch it early.

    Septic Inspection Red Flags Inspectors Watch For

    Not every finding is an emergency. Part of understanding your inspection report is knowing which items mean "pump it and move on" and which mean "budget for repairs." The most important septic inspection red flags and what they mean include:

    • Sludge at or above the outlet pipe. The tank is overdue for pumping and solids may already be entering the drain field. Usually fixable with septic tank pumping, but the drain field needs a close look.
    • Liquid level above the outlet. Water should sit at the outlet pipe level, not above it. A high level means the drain field is not accepting water the way it should.
    • Liquid level below the outlet. A low level after normal use can mean the tank is leaking into the surrounding soil, which is a structural problem, not a pumping problem.
    • Clogged or missing baffles. A clogged inlet baffle causes backups into the house. A missing outlet baffle lets solids escape and clog the drain field over time.
    • Cracks in the tank. Small cracks may be monitored; large ones or a compromised tank top are safety and function issues.
    • Roots in the tank or lines. Roots follow moisture. Once inside, they keep growing and keep blocking flow until removed.
    • Wet spots, sewage smell, or lush green stripes over the drain field. These are classic drain field failure symptoms. The soil is saturated and effluent is surfacing instead of soaking in.
    • Evidence the tank has been completely full or has overflowed before. Past overfills suggest the system has been stressed, and the inspector will look harder at everything downstream.

    One honest caveat: an inspection is a snapshot, not a guarantee. A drain field can pass a flow test today and still fail in two years if the household doubles its water use or a tree root finds a pipe joint. No inspector can promise a system's future, only report its present condition.

    Reading the Report: Understanding Septic Inspection Red Flags

    A standard inspection report documents the basics: the property address, the date of service, the work performed, and the tank material, such as concrete. It should also state whether maintenance issues or problems were found, whether the tank showed signs of ever being full, whether any tees or baffles were clogged, and the overall condition of the tank.

    When you read your report, sort every finding into one of three buckets. First, maintenance items: the tank needed pumping, and it got pumped. Second, watch items: a hairline crack, minor root presence near the tank, or a drain field that drains but slowly. Third, action items: a failed baffle, a leaking tank, or a saturated drain field.

    Suppose a homeowner in Hesperia buys a 1980s house and orders an inspection during escrow. Say the crew locates the tank under 18 inches of soil, pumps it, and finds the concrete sound but the outlet baffle deteriorated and sludge higher than it should be. In that scenario, the report would flag a modest repair and a recommendation to check the drain field again after a year of normal use. That is a manageable outcome, and far better than discovering it through a sewage backup the first winter.

    This is also where basic septic system troubleshooting knowledge pays off. If your report shows a healthy tank but you still have slow drains six months later, the problem is more likely a clog between the house and the tank than a system failure. Knowing what the inspection ruled out narrows down what could be wrong.

    Pre-Purchase Inspections Versus Routine Checkups

    Both types of inspection cover the same core ground, but the stakes differ. A pre-purchase inspection protects you from buying someone else's $10,000 problem. A routine checkup protects the system you already own.

    For a home purchase in Hesperia, insist on a full inspection with the lids opened and the tank pumped. A seller's statement that the system "works fine" is not documentation. You want the interior photographed, the baffles verified, and the drain field flow-tested before you sign anything. If the seller pumped the tank right before listing, ask for the receipt; a freshly pumped tank hides sludge history, so the interior structural check becomes even more important.

    For routine checkups, the EPA's schedule of at least once every three years is the baseline for standard systems. Pair the inspection with septic tank pumping when the sludge level calls for it, and keep the report. A folder of dated reports turns your next home sale from a negotiation risk into a selling point, and it means you never again have to guess when the tank was last serviced.

    A Note on New Installations and County Inspections

    Inspections are not only for existing systems. Before a septic system is installed, a percolation test must be dug and performed to confirm how well the soil drains, according to University of Nebraska-Lincoln Extension. After the perc test, a local health department inspection is typically required as part of the installation process, according to the Caroline County Health Department.

    County inspectors then verify the installation before it is covered, typically probing the gravel depth in the leach lines and measuring line lengths before approving backfill. Placement rules apply too; the Minnesota Pollution Control Agency notes that most local regulations require at least 10 feet between a septic system and the building it serves. If you are adding a system or replacing a failed one, expect this layer of oversight on top of your own service company's work.

    What to Do With What Inspectors Find in a Septic System Inspection

    Turn the report into a plan the same week you receive it. Action items come first: schedule baffle repairs or drain field work before the problem grows. Watch items go on a calendar note for the next inspection. Maintenance items usually mean setting a pumping schedule so you never hit the sludge line again.

    For most Hesperia households on a standard system, that plan is simple as of 2026: inspect at least every three years per EPA guidance, pump when the sludge level says to, and call sooner if you notice warning signs between visits. Those signs include slow drains across the whole house, a sewage smell in the yard, a wet spot over the septic tank or drain field, or gurgling fixtures. Any one of those between scheduled inspections is reason to get the tank opened early rather than wait for the calendar.

    A few situations call for a professional immediately rather than a scheduled visit. Sewage backing up into the house, standing effluent in the yard, or an alarm on a pump system are not wait-and-see problems. Emergency septic pumping exists for exactly those moments, and the sooner the tank is opened, the more options you have.

    The homeowners who avoid septic emergencies are not lucky. They know what inspectors check, they read their reports, and they act on the small findings before those findings become excavations. Now you know the checklist too.

    If you need your septic tank serviced, Hesperia Septic can help.

    Prefer to talk it through? Call (760) 249-7872 — a quick call is usually the fastest way to get a straight answer for your situation.
    Related Reading

  • 1000 Gallon Septic Tank Pumping Schedule: How Often and What It Costs

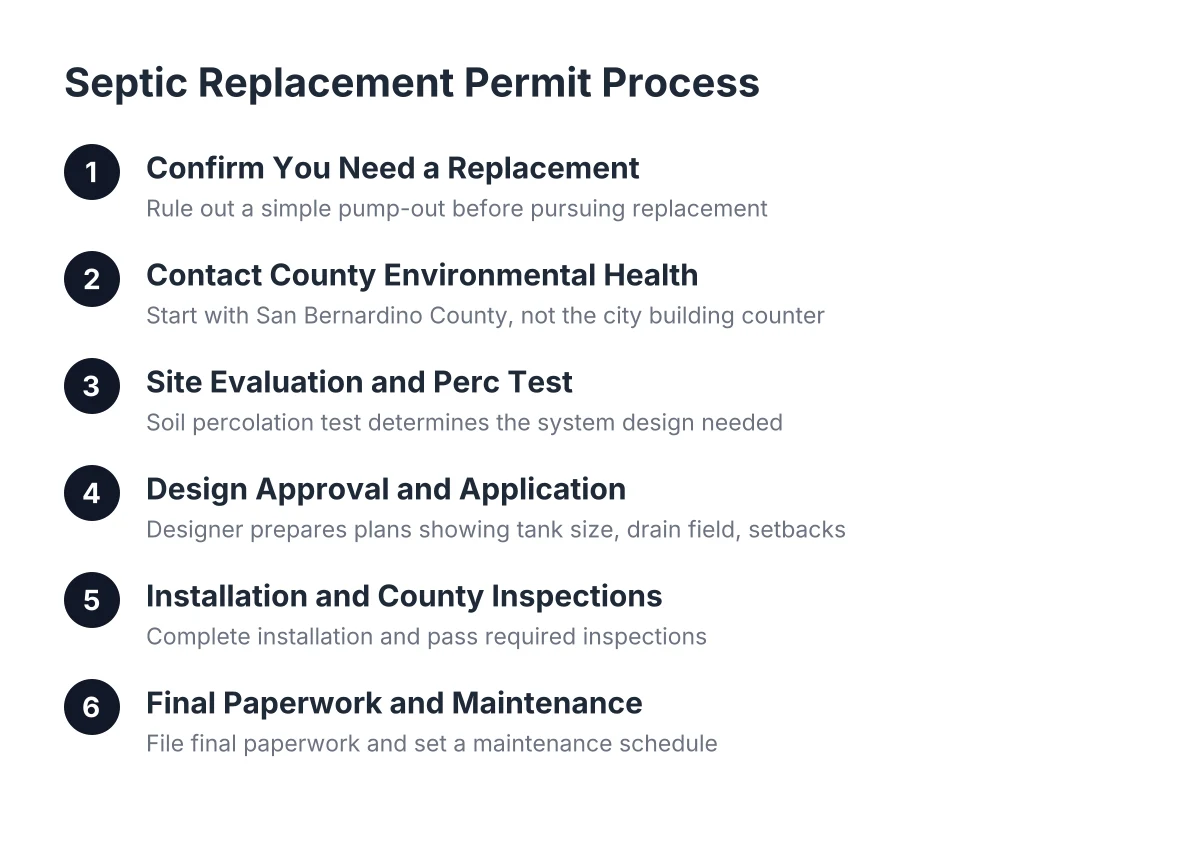
    Steps for setting a 1000 gallon septic tank pumping frequency schedule
    A step-by-step schedule for maintaining a 1000 gallon septic tank, as covered in this guide.

    A 1000 gallon septic tank is one of the most common sizes serving homes, small rental properties, and light commercial buildings in the High Desert. If you own one, or you just took over a property that has one, the question that matters most is simple: how often does it need pumping, and what happens if you wait too long? Understanding proper septic tank pumping frequency is essential to protecting your system and avoiding costly repairs. This guide walks through a step-by-step maintenance schedule so you can plan service, budget for it, and stop treating every tank problem as a surprise.

    This matters twice as much if you own the property but do not live there. A landlord in Hesperia, a restaurant manager with a grease trap, or an RV park operator with holding tanks cannot rely on noticing warning signs day to day. A schedule replaces noticing.

    Step 1: Confirm You Actually Have a 1000 Gallon Septic Tank

    Start by verifying the tank size, because pumping frequency depends on it. Pumping too rarely lets solids build up and push into the drain field. Pumping more often than the tank needs wastes money. You cannot set the right interval until you know what is in the ground.

    Check these sources in order:

    • County permit records. San Bernardino County keeps septic permits that often list tank size, material, and location on the lot.
    • The property's inspection or purchase paperwork. A septic inspection from the sale often records tank capacity.
    • A previous pumping receipt. Pumpers usually note gallons removed, which points to tank size.
    • A septic tank locating service. If nothing on paper exists, a crew can locate the tank, open it, and measure it.

    Tank material matters less than size for scheduling, but it is worth noting. A 1000 gallon septic tank in concrete is the common older install around Hesperia; plastic and polyethylene tanks show up on newer or replacement systems. Typical 1000 gallon septic tank dimensions run around 8 to 10 feet long, 5 feet wide, and 5 feet deep, though designs vary. Concrete lids are heavy and buried, so do not plan on opening one yourself.

    Step 2: Set Your Baseline Pumping Interval

    For a 1000 gallon tank serving a typical household, every two to three years is the standard working interval. According to Penn State Extension, an active family of four should generally pump every two to three years because of higher solids and liquid production. Fewer occupants can stretch that; more occupants, a garbage disposal, or heavy laundry use should shorten it.

    In addition, the U.S. Environmental Protection Agency recommends a professional inspection at least once every three years for the average household, and once a year for alternative systems with pumps, float switches, or other mechanical parts. A practical approach is to combine the two: schedule pumping and inspection together so the crew checks baffles, lids, and liquid levels while the tank is open.

    How Septic Tank Pumping Frequency Affects Tank Life

    Here is a simple starting matrix for a 1000 gallon tank. Treat it as a planning estimate, not a rule; actual need depends on water use and what goes down the drains.

    • 1 to 2 occupants: every 4 to 5 years
    • 3 to 4 occupants: every 2 to 3 years
    • 5 or more occupants, or heavy use: every 1 to 2 years

    Step 3: Adjust the Schedule for How the Property Is Used

    A house you live in, a rental you manage, and a commercial site all load a tank differently. Adjust the baseline accordingly.

    Rental properties. You do not control tenant habits. Suppose you own a three-bedroom rental in Hesperia on a 1000 gallon septic tank, and the tenants run a garbage disposal daily and do laundry for five people. That tank fills with solids faster than the same tank under a retired couple. For rentals, lean toward the shorter end of the interval and put the pump-out on a calendar instead of waiting for a tenant to call about a smell or slow drains. Getting the septic tank pumping frequency right protects your investment and avoids emergency calls.

    Restaurants and commercial kitchens. Grease traps are a separate schedule entirely. Fats, oils, and grease build up fast, and health inspectors check trap condition. Most operators end up on a monthly or quarterly grease trap pumping cycle depending on kitchen volume. If your building also has a septic tank, keep the two schedules separate; do not assume one pump-out covers both.

    RV parks, campgrounds, and holding tanks. Holding tanks store everything with no drain field, so they fill on a hard clock. Frequency depends entirely on occupancy, and a busy season can double the fill rate. Track it monthly during peak season until you know the pattern.

    Step 4: Watch Water Use Between Pump-Outs

    Water volume is the hidden variable in every septic schedule. A tank clarifies wastewater by letting solids settle before liquid flows to the drain field. Flood the tank with extra water and solids get pushed out before they settle, which clogs the drain field over time.

    The single biggest offender is a running toilet. According to the U.S. Environmental Protection Agency, one leaky or running toilet can add as much as 200 gallons of extra water per day into a septic system. On a 1000 gallon tank, that is a fifth of total capacity in extra flow every single day. For a landlord, this is a concrete reason to fix tenant-reported toilet issues fast; the toilet repair is cheap, and the drain field it protects is not.

    Between scheduled pump-outs, also keep grease, wipes, and harsh chemicals out of the drains. Additives sold as tank treatments do not replace pumping. The tank is a biological system, and regular pumping protects it better than anything poured down a drain.

    Step 5: Know the Warning Signs That Override the Schedule

    A schedule is the plan; symptoms are the exception that overrides it. If any of these show up before the next planned pump-out, move the service up.

    • Slow drains throughout the building, not just one fixture
    • A septic tank smell in the yard or near the tank lids
    • A wet spot or unusually green grass over the tank or drain field
    • Gurgling in drains or toilets after flushing
    • Sewage backing up at the lowest drain in the building

    However, be clear about what pumping can and cannot fix. Slow drains from a full tank clear up after a pump-out. Standing water over the drain field, or a tank that refills within days of pumping, points to drain field failure or a broken component. That is a repair conversation, not a pumping schedule problem. This is where septic system troubleshooting by someone who opens tanks every day earns its fee; the symptoms overlap, and guessing wrong gets expensive.

    Step 6: Budget for 1000 Gallon Septic Tank Pumping Costs

    Routine pumping is the cheap end of septic ownership. According to Angi data, septic tank pumping averages $427, with a typical range of $250 to $1,250 or more depending on tank size and location. As of 2026, a straightforward 1000 gallon pump-out with accessible lids usually lands in the lower part of that range; deep tanks, buried lids, or emergency timing push it up.

    Now compare that to the alternative. The EPA estimates septic repair or replacement typically costs $5,000 to $15,000, far more than routine pumping. Skipping two or three pump-outs to save several hundred dollars, then paying five figures for a drain field, is the worst trade in septic ownership. Regular pumping is the single most effective thing an owner can do to extend the life of the system.

    For grease trap and holding tank accounts, budget as a recurring line item rather than a one-off. A single-location restaurant or RV park generally plans for a few hundred dollars per pump-out on a monthly or quarterly cycle, depending on volume. Ask the pumper for documentation of each service; waste from these tanks is hauled by truck to a treatment facility for disposal, according to the New Hampshire Department of Environmental Services, and service records help with health code compliance.

    Step 7: Put the Schedule on Paper and Make It Recurring

    Finally, turn the interval into an actual system so it survives busy seasons and property handoffs. Visible symptoms only appear after a problem has already started, so a written schedule is the only reliable early warning you get.

    1. Record the tank size, material, and lid locations, with photos if possible.
    2. Note the date and findings of the last pump-out.
    3. Set the next pump-out date based on Steps 2 and 3, and put it on a calendar with a reminder.
    4. Ask your septic service whether they can schedule the next visit in advance, so it happens without you chasing it.
    5. Keep every receipt and inspection note in one folder; it protects you at sale time and during health inspections.

    For a non-residential operator, that last point is the whole game. One local crew handling the grease trap, the rental's tank, and the holding tanks on a recurring schedule means no fire drills, no babysitting, and a paper trail when an inspector asks.

    When to Bring in a Professional Instead of Waiting

    Some situations should skip the schedule discussion entirely. Sewage backing up into a building, standing wastewater in the yard, or a strong sewage odor indoors all call for emergency septic pumping and a professional look, not a calendar entry. Likewise, if you do not know where the tank is, do not dig blind; a locating service finds it without tearing up the yard or cracking a lid.

    A pumping crew can also tell you things a schedule cannot, such as whether baffles are intact, whether roots have entered the tank, and whether the sludge level suggests your interval is right. That feedback loop is how a generic two-to-three-year rule becomes a schedule tuned to your specific 1000 gallon septic tank and the way your property actually uses it.

    If you need your septic tank serviced, Hesperia Septic can help.


    Prefer to talk it through? Call (760) 249-7872 — a quick call is usually the fastest way to get a straight answer for your situation.
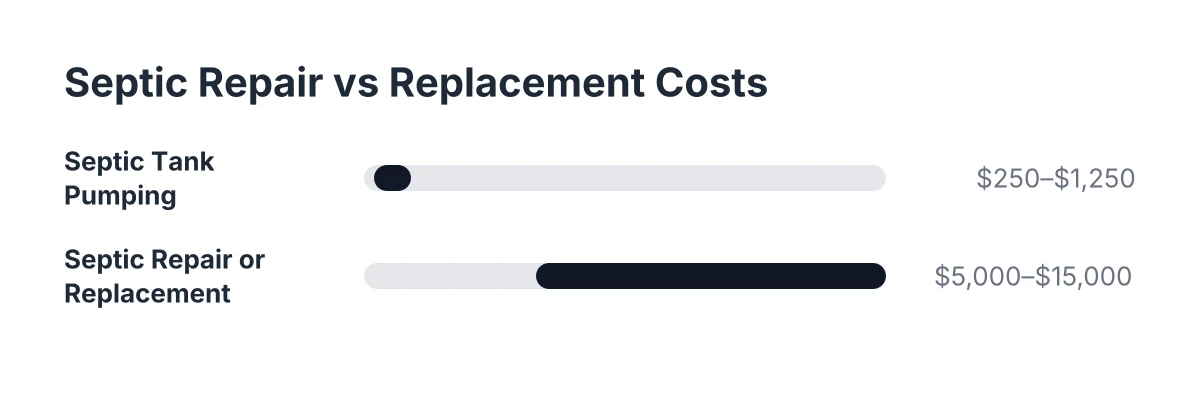
    Related Reading

  • How to Get Local Septic Replacement Permits in Hesperia, CA: A Step-by-Step Guide

    Six-step diagram of the septic replacement permit process in Hesperia, CA
    The septic replacement permit process in Hesperia runs from confirming failure to filing final paperwork, as covered in this guide.

    If your septic system in Hesperia has failed for good, the paperwork matters as much as the digging. Local septic replacement permits are required before any new tank or drain field goes in the ground, and San Bernardino County treats septic work as a public health issue, not a simple yard project. Skip the permit step and you risk fines, a stopped job, and problems when you sell or refinance the property. This guide walks you through the septic replacement permit process in order, from confirming the system is truly dead to passing the final inspection.

    It is written for property owners who have already decided to replace, especially landlords with one or a few rental units on septic who need the job documented and done right. First, though, a quick honesty check, because replacement is not always the answer.

    Step 1: Confirm You Actually Need a Replacement, Not a Pump-Out

    Before anyone pulls a permit, make sure the system is genuinely failing. A full tank causing a septic backup is a pumping job, not a replacement job. A tank that fills again within days of septic tank pumping, sewage surfacing over the drain field, or wastewater that has nowhere to go are different problems, and those point to real failure.

    Here is the practical test. Have the tank pumped and inspected. If the tank is structurally sound and the drain field accepts water again after pumping, you likely bought yourself years with routine service. According to the U.S. Environmental Protection Agency, the average household should have its septic system inspected at least once every three years, and that habit alone catches most problems before they become failures.

    However, if the drain field stays saturated after pumping, or the tank itself is cracked or collapsing, no amount of pumping fixes that. Health regulations do not allow a polluting discharge from a failed system, and the county can require full septic system replacement rather than accepting an additive or restoration product as a permanent fix. Any company that jumps straight to "you need a new system" without pumping and inspecting first deserves a second opinion. So does any company that insists pumping will fix a drain field that is clearly done.

    The cost gap is why this step matters. Angi data puts average septic tank pumping at $427, ranging from $250 to $1,250 or more depending on tank size and location. The EPA estimates septic repair or replacement typically runs $5,000 to $15,000. You do not want to pay replacement money for a pumping problem, and you do not want to pay for repeated pump-outs on a system that is already dead.

    Step 2: Contact San Bernardino County Environmental Health First

    For septic permitting in Hesperia, start with the county, not the city building counter. Unincorporated county areas and most High Desert septic questions route through San Bernardino County's environmental health and land use services. If your property sits inside Hesperia city limits, the city building department may also have a role, so confirm with both before you assume anything. Requirements vary by locality, and the rules that applied at a friend's property in another county will not necessarily apply to yours.

    When you call or visit, have these ready:

    • The property address and parcel number (APN)
    • What you know about the existing system: tank location, approximate age, and any past permits
    • The nature of the failure: backed-up tank, saturated drain field, or surfacing sewage
    • Whether the property is a rental, since tenant health complaints can change the urgency

    Ask three specific questions: what permits the replacement needs, whether a soil or percolation test is required, and whether current setback rules will force the new system into a different spot than the old one. As of 2026, getting these answers in writing before design work starts saves the most common delay, which is a plan the county rejects on the first pass.

    Step 3: Understanding the Septic Replacement Permit Requirements and Site Evaluation

    A percolation test measures how fast water drains through your soil, and it must be done before a new system is designed. According to University of Nebraska-Lincoln Extension, a perc test is performed before installing a septic system to confirm the soil drains well enough for the system to work. In the High Desert, soil conditions vary from sandy washes to hardpan, so the result on your lot drives the design.

    The county typically dictates what the perc results mean for your project. Good drainage may allow a conventional system, which per the U.S. Environmental Protection Agency consists of two main components, a septic tank and a drain field. Poor drainage, a small lot, or tight setbacks can push you toward an engineered or advanced treatment design, which costs more and takes longer to approve. In addition, most local regulations require at least 10 feet between the septic system and the building it serves, according to the Minnesota Pollution Control Agency, and setbacks from wells and property lines add further constraints.

    Suppose you own a rental on a half-acre lot off Ranchero Road and the old drain field sits where current setbacks no longer allow one. In that scenario, the perc test and site evaluation would identify a new drain field location on the other side of the lot, and the design would route new lines accordingly. That is exactly the kind of surprise you want to find on paper, not mid-excavation with a tenant asking when the toilets will work.

    Step 4: Design Approval and the Septic Replacement Permit Application Process

    With perc results in hand, a system designer or licensed installer prepares plans showing the tank size, drain field layout, and setbacks, then submits them to the county for approval. Approved design plans generally must be on file before construction can begin, and local septic replacement permits are issued against that approved design. Do not let anyone start digging on a promise that the permit is "in process."

    This is also where you choose who does the work. Septic installation is not the same trade as septic tank pumping. Becoming a licensed septic installer requires certification beyond a pumping operation, including exams on soil types, percolation rates, system design, and local regulations, according to the New Hampshire Department of Environmental Services. A local pumping and inspection crew still plays a role, though: pumping and decommissioning the old tank, locating buried components, and documenting the system's condition for the permit file. Understanding the septic replacement permit process and keeping all documentation ensures the work is properly recorded and will be recognized by future buyers or lenders.

    For landlords, ask for copies of everything at this stage. The approved plans, the permit number, and receipts become part of the property record. Suppose you sell that rental in five years; a buyer's inspector who finds a permitted, documented replacement treats it as an asset, while an undocumented system triggers renegotiation.

    Step 5: Complete the Installation and Pass County Inspections

    Once local septic replacement permits are issued, installation follows the approved plan: excavate, remove or abandon the old tank properly, set the new tank, lay the drain field, and connect the lines. Waste pumped from the old tank does not stay on site; per the New Hampshire Department of Environmental Services, pumped septic waste is trucked to a sewage treatment plant for disposal.

    Expect the county to look at the work before it disappears underground. A health department or county inspection is typically required as part of the installation process, often before backfill, so the inspector can verify the tank, lines, and drain field match the approved design. Build a day or two of schedule slack around inspections; a failed or delayed inspection with an open trench is the worst place to be rushed, especially with tenants on the property.

    One trade-off to be honest about: doing this correctly takes longer than an unpermitted rush job, sometimes by weeks when perc tests and plan reviews stack up. The unpermitted version can void insurance coverage, block a sale, and expose a landlord to liability if sewage contaminates a neighbor's well or property. The slower path is the cheaper one over the life of the investment.

    Step 6: File the Final Paperwork and Set a Maintenance Schedule

    After the final inspection passes, collect the closed permit, as-built drawing, and any inspection sign-offs, and store them with the property records. This is the file the next buyer, lender, or insurance adjuster will ask for, and it is also what saves the next owner from paying to locate a tank nobody mapped.

    Then protect the money you just spent. A new drain field fails the same way the old one did if the tank never gets pumped. Put the property on a schedule now:

    1. Record the installation date, tank location, and lid depth while it is fresh.
    2. Book a professional inspection at least every three years, per U.S. Environmental Protection Agency guidance, or once a year if the new system has pumps or float switches.
    3. Schedule septic tank pumping based on what those inspections find, rather than waiting for a tenant to report slow drains.
    4. Give tenants a one-page sheet on what not to flush and where the system sits, so nobody parks a trailer on the new drain field.

    Because homes on septic are the exception in California, about 10 percent statewide according to the U.S. Environmental Protection Agency, many owners and tenants have never lived with one. A little documentation and a standing pumping schedule keep this replacement the last one you deal with for a long time. The permit process for local septic replacement in Hesperia is paperwork-heavy, but each step exists to make sure the system you pay for actually works in High Desert soil. When in doubt at any step, a licensed installer or the county environmental health office is the right call; this guide covers the general process, not the specifics of your parcel.

    If you need your septic tank serviced, Hesperia Septic can help.


    Prefer to talk it through? Call (760) 249-7872 — a quick call is usually the fastest way to get a straight answer for your situation.
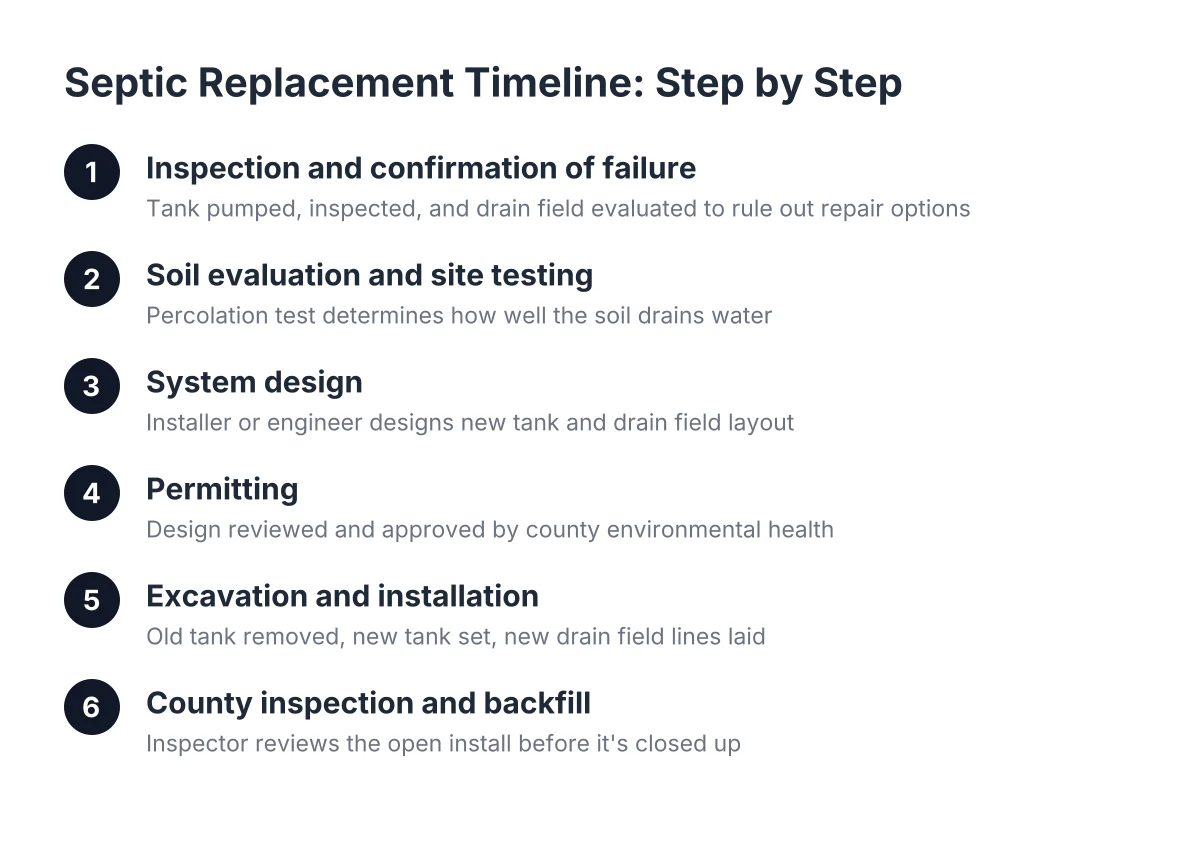
    Related Reading

  • Septic Replacement vs. Repair: When Hesperia, CA Homes Need to Replace, Not Fix

    Cost range chart comparing septic tank pumping to septic repair vs replacement expenses
    Routine pumping is a modest expense, but full septic repair or replacement costs far more, per Angi and EPA figures cited in this guide.

    If your septic system keeps acting up, you are probably weighing the same question every property owner in your spot asks: should you pursue a septic repair vs replacement, or can a pump-out and a small fix get things working again? The honest answer is that most septic problems in Hesperia, CA do not require a new system. However, some do, and knowing the difference protects you from paying for a replacement you did not need, or throwing money at pumping when the drain field is already gone.

    This guide walks through how a septic crew actually decides between repair and replacement, which signs point to a failing system versus a full tank, what the replacement process looks like in the High Desert, and how to avoid getting upsold by fear.

    Why the Repair-or-Replace Question Matters So Much

    The stakes are different depending on which side of the line you land on. Routine septic tank pumping is a modest, predictable expense. According to Angi, septic tank pumping averages $427, with a typical range of $250 to $1,250 or more depending on tank size and location.

    A full septic system replacement sits in a different category entirely. The EPA estimates septic tank repair or replacement typically costs between $5,000 and $15,000, far more than routine pumping, according to U.S. Environmental Protection Agency figures. That gap is exactly why you want a clear-eyed diagnosis before anyone starts digging up your yard.

    It also explains the fear many homeowners carry into this decision. Nobody wants to be told their system is dead when a $400 pump-out would have solved it. On the flip side, paying for pump-out after pump-out on a failed drain field just delays a replacement you will eventually have to make anyway, with extra money spent along the way.

    How a Septic System Fails, and Which Part Usually Goes First

    A conventional septic system consists of two main components: the septic tank and the drain field, according to U.S. Environmental Protection Agency. The tank clarifies wastewater by letting solids settle. The drain field, sometimes called the leach field or soil absorption area, disperses the clarified liquid into the ground.

    Understanding that split is the key to the whole repair-versus-replace question. Tanks and drain fields fail in different ways, and they carry different price tags.

    Tank problems tend to be fixable. A cracked lid, a broken baffle, a damaged inlet pipe, or roots intruding at a connection point can usually be repaired without touching the rest of the system. For example, a broken septic pipe gets fixed by cutting out the damaged section and installing new pipe, not by patching the old one in place. That is a repair job, not a replacement job.

    Drain field problems are the ones that push a system toward replacement. Soil around the trench lines can clog with biological buildup over decades. Once the soil stops absorbing water, no amount of pumping the tank will fix it. The tank fills back up, and wastewater has nowhere to go. Replacing a failed drain field is expensive precisely because it means digging up or abandoning the old trench lines and installing new ones in fresh soil.

    How Septic Repair vs Replacement Decisions Happen in Practice

    A trained septic crew decides between repair and replacement by finding where the failure lives. If the problem sits inside the tank or the pipes, repair usually wins. If the drain field soil can no longer absorb water, replacement becomes the realistic fix. The pattern of your backups tells most of the story.

    Here is the practical logic a crew works through on site:

    • One backup, tank is full, no standing water in the yard. This is almost always a pumping call. The tank filled up on schedule and needs service, nothing more.
    • Backup returns weeks or months after a pump-out. Now the drain field is suspect. A healthy system should go years between pump-outs, not months.
    • Soggy ground or sewage odor over the drain field, especially in dry High Desert weather. Water surfacing above the trenches means the soil is rejecting effluent. That points toward drain field failure.
    • Slow drains throughout the house right after a recent pumping. If the tank was just emptied and the house still drains poorly, the blockage or failure is downstream of the tank.
    • Visible damage found during inspection. A cracked tank, collapsed baffle, or crushed pipe is a specific, repairable defect if the rest of the system checks out.

    The repeated-backup pattern deserves emphasis. When a septic company keeps getting called back to pump the same tank every few months, the tank is not the problem. The drain field has stopped doing its job, and at that point replacement, not another pump-out, is the honest recommendation.

    One caution on the other side: a flagged drain field is not automatically a dead drain field. Sometimes a system that looks failed responds to reduced water use, resting the field, or remedial treatment before anyone commits to full excavation. However, health departments generally require full replacement of a truly failed absorption system rather than accepting aftermarket restoration products as a permanent fix. Treat remedial measures as a possible reprieve, not a substitute for a real diagnosis.

    Signs Your Septic System Needs Replacing, Not Another Pump-Out

    The signs of true system failure cluster around one theme: the ground can no longer accept water. Watch for these patterns over time, not just once:

    1. You need pumping far more often than you used to. For an active family of four, pumping every two to three years is generally advisable, according to Penn State Extension. If you are calling every six months, something downstream is failing.
    2. Wet spots or unusually green grass over the drain field. In Hesperia's dry climate, a lush green stripe in an otherwise brown yard is a red flag, not good luck.
    3. Sewage odors outdoors that come back after every pumping.
    4. Gurgling drains and slow flushing that pumping only fixes briefly.
    5. Standing water or effluent surfacing in the yard. At this stage the system is failing openly, and it becomes a health concern for your family and neighbors.
    6. The system is decades old with no repair history. Every septic system has a lifespan. A drain field installed when the house was built in the 1970s has likely used up its useful life, even if the tank itself is sound.

    Age matters more than most homeowners expect. If you just bought an older home in Hesperia with the original system and no service records, plan as if major work is coming. Buyers of older homes are wise to factor likely replacement costs into the purchase negotiation, because a decades-old system may simply be at the end of its run.

    When Repair or Pumping Solves It, and Replacement Would Be an Upsell

    Repair or routine septic tank pumping solves the problem whenever the failure is contained to one fixable part and the drain field still absorbs water. A full tank, a broken baffle, a root-invaded pipe, or a crushed line near the tank are all repairs. None of them justify replacing a working system.

    This is the section for the skeptical homeowner, and skepticism here is healthy. Some situations that sound scary are routine:

    • A first-time backup in a house you just bought. Suppose you closed on a Hesperia home last spring, the previous owner left no records, and now the shower is backing up. The most likely explanation is a tank that has not been pumped in years, not a dead system. Pump it first, inspect it, then decide.
    • Odor near the tank lids. Often a seal or riser issue, not system failure.
    • A single slow drain. That is usually a plumbing clog inside the house, not a septic problem at all.
    • Solids buildup in the tank. Pumping and cleaning handle this. It only becomes a replacement issue if buildup is ignored for years and solids migrate into the drain field.

    A fair way to test any replacement recommendation is to ask the crew to show you the evidence. Where is the water surfacing? What did the tank look like when opened? How fast did the tank refill after pumping? A legitimate diagnosis has observable facts behind it. If the answer is vague pressure to sign today, get a second opinion. Any honest local septic service in Hesperia, CA expects that question and can answer it in plain terms.

    There is a real limitation to acknowledge here: no article can diagnose your specific system. Soil conditions, system age, tank condition, and household water use all interact, and the repair-versus-replace call sometimes requires opening the tank and probing the field. Use this guide to ask sharper questions, not to skip the professional inspection.

    The Septic Tank Replacement Process in the High Desert

    If the diagnosis genuinely points to replacement, here is what the process looks like for property owners in Hesperia and the surrounding High Desert. Knowing the steps ahead of time removes most of the uncertainty.

    Step 1: Inspection and Diagnosis

    Everything starts with confirming what failed. That usually means locating the tank, pumping it so the inside can be seen, checking baffles and pipes, and evaluating the drain field. Septic tank locating matters more than people expect; on older Hesperia properties, nobody alive may know exactly where the components sit.

    Step 2: Permits Through San Bernardino County

    Septic work in Hesperia runs through San Bernardino County requirements. Replacement is not a handshake job; permits document that the new system meets current standards. As of 2026, expect the permitting step to involve site evaluation and approval before excavation starts. In some jurisdictions, a failed conventional gravel-and-pipe drain field cannot simply be rebuilt as-is; the property may be required to upgrade to a more advanced system, which raises cost. Confirm current county requirements before budgeting.

    Step 3: Soil Testing

    Before a new drain field goes in, the soil has to prove it drains. A percolation test must be performed before installing a septic system to determine how well the soil absorbs water, according to University of Nebraska-Lincoln Extension. High Desert soil varies from sandy washes to hard-packed layers, so this test drives where and how large the new field will be.

    Step 4: Design and Installation

    Installation is specialized work beyond pumping. Becoming a licensed septic installer requires certification and licensing beyond a pumping operation, including knowledge of soil types, percolation rates, system design, and local regulations, according to New Hampshire Department of Environmental Services. A pumping and service company may handle diagnosis, pumping, and coordination while a licensed installer performs the excavation and system construction.

    During installation, details matter. For example, after a new tank is set, fill material around pipe penetrations should be compacted thoroughly to prevent settling that damages the connection, per Onsite Installer. Sloppy backfill is a common cause of early failures at otherwise new systems.

    Step 5: Final Inspection and Restoration

    The county inspects the completed work before backfill in most cases, then the yard gets restored. Keep every document from this process. The next owner of your home, or the next crew that services the system, will thank you.

    One more planning note: home additions and remodels can force this issue too. If a planned garage or room addition sits over the existing tank or drain field, the system may need relocation or replacement even if it works fine today. Check system location before you design an addition, not after.

    What Repair and Replacement Cost in 2026

    Concrete numbers help you plan, so here is the honest picture as of 2026. Routine septic tank pumping averages $427 nationally, ranging from $250 to $1,250 or more, according to Angi. Minor repairs like a baffle or a pipe section typically land above a pump-out but well below system work.

    Full replacement is the big number. The U.S. Environmental Protection Agency estimates septic repair or replacement typically runs $5,000 to $15,000. Drain field replacement drives the high end because of excavation, materials, soil work, and permitting. Local factors in Hesperia, including soil conditions, system size, and county requirements, move the final figure, so treat these as planning ranges rather than quotes.

    Here is an illustrative scenario. Say a Hesperia homeowner has paid for three emergency pump-outs in one year at a few hundred dollars each, and the tank refills within weeks every time. In that scenario, another year of repeat pumping could cost over a thousand dollars while the drain field stays dead. Putting that money toward diagnosis and a planned septic system replacement gets the problem actually solved, on the homeowner's schedule instead of during a holiday backup.

    Maintenance: The Cheapest Answer to the Replace-or-Repair Septic Question

    The best outcome in the whole septic replacement, repair, or replace decision is never facing it at all. Routine maintenance and pumping is what keeps homeowners out of forced-replacement territory. Solids that stay in the tank never reach the drain field, and a drain field that never clogs can serve the property for decades.

    The maintenance baseline is simple. The average household should have its septic system inspected at least once every three years by a professional, according to U.S. Environmental Protection Agency. Alternative systems with pumps, float switches, or mechanical parts should be inspected once a year, per the same source. Pair inspections with pumping on a schedule that fits your household size and water use.

    This matters to more people than you might think. More than one in five U.S. households depend on individual septic systems or small community cluster systems to treat their wastewater, according to U.S. Environmental Protection Agency. In Hesperia and across the High Desert, where homes sit beyond centralized sewer lines, that share runs high. Homes in cities typically connect to municipal sewage treatment; septic systems serve areas without that service, per Environmental Finance Center Network.

    If you just bought a house and have no idea when the tank was last pumped, do this in order:

    1. Have the tank located and opened.
    2. Pump it and inspect the tank, baffles, and pipes while it is empty.
    3. Ask the crew for a plain assessment of the drain field's condition.
    4. Set a pumping schedule based on what they find, then put it on the calendar and stop thinking about it.

    That first pump-and-inspect visit resets the clock. From then on, you have records, a schedule, and a local crew who knows your system.

    The Bottom Line for Hesperia, CA Property Owners

    Most septic problems end with pumping or a targeted repair. Replacement is the right call in a narrower set of cases: a drain field that no longer absorbs water, repeated backups that return quickly after pumping, effluent surfacing in the yard, or a decades-old system at the end of its lifespan. When those signs stack up, repeated pumping is money spent delaying the inevitable.

    Ask for evidence before agreeing to a replacement. Ask for a real diagnosis before assuming another pump-out will hold. Between those two questions sits the honest middle ground, and a straightforward local septic crew in Hesperia, CA should be comfortable answering both.

    If you need your septic tank serviced, Hesperia Septic can help.

    Prefer to talk it through? Call (760) 249-7872 — a quick call is usually the fastest way to get a straight answer for your situation.

    Related Reading

  • Full Septic System Replacement Timeline: What to Expect Before You Commit

    Six steps in the septic replacement timeline from inspection to county backfill sign-off
    A full septic system replacement typically takes one to four months, from inspection to final sign-off.

    If someone just told you that your septic system is beyond saving, slow down before you sign anything. A full septic system replacement is one of the biggest checks a property owner in Hesperia will ever write for something buried underground. The EPA estimates septic tank repair or replacement typically costs between $5,000 and $15,000, far more than routine pumping, according to U.S. Environmental Protection Agency. Understanding the septic replacement timeline—what it involves, how long it takes, and when it is truly necessary—is critical before you commit to this major expense. That gap between a $400 pump-out and a five-figure dig is exactly why you should understand what replacement actually involves, how long it takes, and when it is truly necessary before you commit.

    This guide walks through the full timeline, from the first backed-up drain to the final inspection sign-off. Along the way, it covers the honest question most searchers are really asking: do I need a new septic system, or is someone trying to sell me one I don't need?

    First, Confirm You Actually Need a Full Septic System Replacement

    Most septic problems do not require replacement. A tank that has not been pumped in years, a clogged inlet baffle, a crushed pipe between the house and the tank, or roots in a distribution line can all cause the same symptoms as a failed system: slow drains, gurgling, sewage smells, or wet spots in the yard. Each of those has a fix that costs a fraction of a new system.

    Here is a useful way to think about it. A conventional septic system has two main components, the septic tank and the drain field, according to U.S. Environmental Protection Agency. Problems in the tank or the pipes are usually repairable. Problems in the drain field itself, where the soil can no longer absorb wastewater, are the ones that push you toward septic system replacement.

    Signs that point toward drain field failure rather than a simple clog include:

    • Sewage backing up again shortly after the tank was pumped
    • Standing water or persistently soggy ground over the drain field, even in dry High Desert weather
    • Strong sewage odor outdoors that returns after pumping
    • The tank refilling with groundwater or effluent flowing back from the field during pumping
    • A history of repeated pump-outs at shorter and shorter intervals

    That last one matters. If you pumped the tank 18 months ago and you are backed up again with normal water use, the wastewater has nowhere to go. That usually means the soil absorption area is saturated or clogged. Septic drain field failure is the most common reason a system genuinely needs to be replaced rather than repaired.

    One honest caution: you cannot confirm drain field failure from the surface. Before you accept a replacement quote, have the tank pumped and inspected. Pumping empties the tank so a crew can see the baffles, check the tank walls, and watch whether liquid flows back in from the field. That single visit often settles the repair-versus-replace question, and it is a step worth insisting on no matter who does the eventual work.

    Why the Pump-and-Inspect Step Protects You

    Suppose a landlord in Hesperia gets a call from tenants about a sewage smell and slow drains. A contractor drives by, looks at a wet spot in the yard, and quotes a full replacement in the five figures. In that scenario, a pump-out and inspection might reveal a root-blocked outlet pipe instead, a repair measured in hundreds, not thousands.

    That hypothetical plays out often enough that the pump-first rule should be non-negotiable. Routine septic tank pumping and inspection is also how you avoid this decision entirely. The average household should have its septic system inspected at least once every three years by a professional, according to U.S. Environmental Protection Agency. For an active family of four, pumping every two to three years is generally advisable because of higher solids and water use, according to Penn State Extension. Systems that get that attention rarely fail without warning.

    Septic Replacement Timeline: How Long Does It Really Take?

    A full septic system replacement typically takes one to four months from the first inspection to final sign-off, even though the excavation and installation work itself often takes only a few days to a week. Soil testing, system design, county permitting, tank delivery, and inspection scheduling consume most of the calendar. Plan for the paperwork, not just the digging.

    That surprises most property owners. The hole in the yard is the fast part. The sequence around it is where the weeks go, and understanding that sequence helps you plan around a rental property, a business, or a home sale deadline.

    Here is the typical order of events:

    1. Inspection and confirmation of failure. The tank is pumped and inspected, and the drain field is evaluated. This is where repair options get ruled out.
    2. Soil evaluation and site testing. A percolation test must be performed before installing a septic system to determine how well the soil drains water, according to University of Nebraska-Lincoln Extension. In the High Desert, soil conditions vary from lot to lot, so this step shapes the whole design.
    3. System design. Based on the soil results, household size, and available space, an installer or engineer designs the new tank and drain field layout.
    4. Permitting. The design goes to the county for review and approval. In this area, that means working through San Bernardino County's environmental health requirements for onsite wastewater systems.
    5. Excavation and installation. The old tank is pumped out and abandoned or removed, the new tank is set, and the new drain field lines are laid.
    6. County inspection and backfill. An inspector reviews the open installation before it can be covered. Backfill and grading finish the job.

    Each handoff in that list is a potential wait. Permit review times depend on county workload. Tank delivery depends on the manufacturer's schedule. The final inspection depends on when an inspector can come out. None of those are within the installer's control, which is why an honest contractor gives you a window rather than a promised date.

    What Can Stretch the Replacement Timeline

    Several things commonly add weeks to a replacement project. Knowing them upfront keeps the delays from feeling like something went wrong.

    Permit review is the most common. Septic system permits in San Bernardino County go through an environmental health review, and complex sites or incomplete applications take longer. In addition, failed or borderline percolation results can force a redesign, sometimes requiring an engineered or alternative system that needs extra review.

    Supply and scheduling issues matter too. Tank delivery timing and government inspection scheduling sit outside the installer's hands, and either one can pause the job mid-stream. During periods of broader supply disruption, wait times for installations have stretched to several months in some markets, with quotes rising during the wait. Weather is less of a factor in Hesperia than in wetter regions, but wind and ground conditions can still shift a dig by a day or two.

    Finally, surprises underground add time. Undocumented old tanks, unmarked utility lines, or a previous drain field in an unexpected location can all force design changes on the fly. This is one reason septic tank locating before excavation is worth the small extra step, especially on older properties with no records.

    What the Full Septic System Replacement Process Looks Like on Site

    Once permits are in hand, the on-site work moves fast. A typical crew starts by pumping the old tank completely, since septic waste pumped from residential tanks is transported by truck to a sewage treatment plant for disposal rather than being processed on-site, according to New Hampshire Department of Environmental Services. For a commercial property owner keeping compliance records, that off-site disposal is documented, which matters if a health inspector ever asks where the waste went.

    Next comes excavation. The old tank is either crushed and filled in place or removed, depending on the design and county requirements. The crew digs for the new tank and trenches for the new drain field lines. After separation in the tank, wastewater will flow through perforated lateral pipes into the absorption field, then filter through gravel or stone and finally through sand and soil layers, according to U.S. Environmental Protection Agency. Those trenches, their depth, and their spacing all come from the approved design, not guesswork.

    Setting the tank is precise work. The fill material around the point where the pipe penetrates the tank gets compacted thoroughly to prevent settling or damage at that connection, according to Onsite Installer. A tank that shifts after backfill can break its inlet or outlet connection, which is an expensive problem to discover a year later.

    Then the job pauses for inspection. The county inspector needs to see the open installation, verify it matches the permitted design, and approve it before anything gets buried. Only after that sign-off does the crew backfill, grade, and clean up. From first shovel to final grading, the on-site portion of a full septic system replacement usually runs a few days to a week for a standard residential system, longer for engineered or alternative designs.

    Repair, Replace, or Keep Pumping: Weighing the Options

    Do septic systems need to be replaced eventually? Yes, but the timeline varies enormously. A well-built conventional system that gets pumped on schedule can serve a property for decades. A neglected one can fail in half that time. Septic system lifespan is less about the calendar and more about how the system has been treated.

    Because you are at the consideration stage, here is a balanced way to weigh your three realistic paths:

    • Keep pumping and maintaining. Right choice if the tank and field are structurally sound and problems trace back to overdue pumping or minor clogs. According to Angi, septic tank pumping averages $427, ranging from $250 to $1,250 or more depending on tank size and location. That is the cheapest path by far when the system supports it.
    • Targeted repair. Right choice when one component failed: a cracked baffle, a broken line, a failed distribution box, or a damaged riser. Repairs cost more than pumping but far less than replacement, and they buy years when the drain field is still healthy.
    • Full replacement. Right choice when the drain field has failed, the tank is structurally compromised, or the county requires it. Health departments generally require full replacement of a failed absorption system rather than accepting additive products or restoration treatments as a permanent fix. Additives that promise to revive a dead field mostly delay the inevitable while the problem worsens.

    There is one more trigger worth flagging for property owners planning construction. Home additions or remodels can force a septic relocation or replacement if the new footprint overlaps the existing tank or drain field. Therefore, if you are planning to build on a septic property in 2026, get the system located and evaluated before you finalize the plans, not after the foundation is staked.

    A trade-off worth naming: replacement is expensive and disruptive, but repeatedly repairing a system at the end of its life can cost more over five years than replacing it once. If you are pumping every year just to keep drains flowing, you are renting time from a failing field. At some point the math flips, and an honest evaluation should show you where that point sits for your property.

    Planning Around Replacement as a Landlord or Business Operator

    Non-residential owners face a version of this problem that homeowners do not: the system fails while someone else is using the property. Say a rental property owner who lives out of the area gets a tenant complaint about slow drains and an odor near the leach lines. That owner needs a diagnosis, documentation, and a plan they can manage remotely, without flying in to stand over a hole.

    For that situation, a few practical moves make the process manageable:

    • Get the tank pumped and inspected first, and ask for written findings you can keep with the property file
    • Request documentation of waste disposal for compliance and habitability records
    • Ask for the realistic permit-to-completion window before committing, so you can plan tenant communication or temporary arrangements
    • Set a recurring pumping and inspection schedule afterward, so the next event is a calendar item rather than an emergency call

    The same logic applies to a small commercial property on septic, or a cabin with a holding tank that only gets seasonal use. One local crew that handles the pumping, the inspection records, and the backup response means the system stops being a recurring fire drill. More than one in five U.S. households depend on individual septic systems or small community cluster systems to treat their wastewater, according to U.S. Environmental Protection Agency, and out here in the High Desert the share of septic properties runs high. Managing one well from a distance is a solved problem when the maintenance routine exists.

    Note that if your replacement involves an alternative system with pumps, float switches, or mechanical components, the maintenance obligation changes. Those systems should generally be inspected once a year, according to U.S. Environmental Protection Agency, and full service can include pump replacement and filter cleaning, not just pump-outs. Factor that ongoing cost into the repair-versus-replace decision, not just the installation price.

    What to Do Before You Sign a Replacement Contract

    Before committing to a full septic system replacement, work through a short checklist. Each item protects you from paying for a system you did not need, or from a timeline surprise mid-project.

    First, confirm the diagnosis independently. A pump-out and inspection by a septic crew is the ground truth. If the tank drains and the field accepts water, replacement is premature. Second, verify the installer is properly licensed for installation work; installing a system requires certification and licensing beyond a pumping operation, including knowledge of soil types, percolation rates, system design, and local regulations, according to New Hampshire Department of Environmental Services. Pumping and installing are different trades, and a good pumping crew will tell you plainly which side of that line a job falls on.

    Third, get the permit plan in writing. Ask who files with San Bernardino County, what the design includes, and what happens if the percolation test forces a redesign. Fourth, ask for the realistic timeline window, including the parts outside anyone's control: permit review, tank delivery, and inspection scheduling. A contractor who promises an exact completion date on day one is guessing.

    Finally, plan the aftercare before the backfill. A new system fails the same way an old one does if it never gets pumped. Put the first inspection on the calendar the day the county signs off. The cheapest septic system you will ever own is the one you maintain, and the whole point of surviving a replacement once is never repeating it.

    If you need your septic tank serviced, Hesperia Septic can help.

    Related Reading