Tag: septic tank riser

  • Septic Tank Cleaning Terms Explained: A Plain-English Glossary

    septic tank cleaning glossary

    If you own a home with a septic system in Hesperia or anywhere in the High Desert, you will run into words on quotes and inspection reports that nobody ever explained to you. This septic tank cleaning glossary breaks down the terms you actually meet when you call a provider, read an estimate, or watch a crew work in your yard. Each entry gives you a plain definition first, then tells you why the term matters for your wallet or your property. Use it to read a quote line by line, ask better questions, and spot a problem before it becomes a backup.

    • Septic Tank
    • Drain Field
    • Baffle
    • Riser
    • Inlet and Outlet
    • Scum Layer
    • Sludge
    • Effluent
    • Effluent Filter
    • Septic Tank Pumping
    • Pumping vs. Cleaning
    • Vacuum Truck
    • Septic Tank Locating
    • Backwash or Backflushing
    • Septic Backup
    • Slow Drains
    • Septic Inspection
    • Grease Trap

    Parts of Your Septic System

    Septic Tank

    A septic tank is a buried, watertight container that receives all the wastewater from your home and holds it long enough for solids to settle out. Most tanks are concrete, fiberglass, or plastic. Everything that goes down your drains ends up here first, so the tank's condition affects your whole system. If you have a concrete tank, this step-by-step maintenance guide covers how to keep it working longer.

    Drain Field

    A drain field is the network of buried pipes and gravel trenches where liquid wastewater from your septic tank soaks into the soil. It is also called a leach field. The drain field does the final cleanup by filtering wastewater through the ground. A failed drain field is one of the most expensive septic repairs, so protecting it with regular pumping is worth the effort.

    Baffle

    A baffle is a barrier inside your septic tank that keeps floating grease and scum from flowing out into your drain field. Tanks have an inlet baffle where wastewater enters and an outlet baffle where liquid leaves. If a baffle breaks or rots away, solids can escape and clog the drain field. A provider who checks your baffles during service is looking out for your system, not padding the bill.

    Riser

    A riser is a pipe that extends from the top of your buried septic tank up to ground level, capped with a lid you can open. Without a riser, a crew has to dig down to the tank lid every time they pump it. Adding a riser costs money up front but saves digging fees on every future visit. If your quote mentions "riser installation," that is what it means.

    Inlet and Outlet

    The inlet is where wastewater from your house enters the septic tank, and the outlet is where the settled liquid leaves for the drain field. Providers check both during service because a clog at either point causes backups. If a crew says your outlet is blocked, expect the conversation to turn to what has been going down your drains.

    What's Inside the Tank

    Scum Layer

    The scum layer is the floating mat of grease, oils, and light solids that sits on top of the liquid in your septic tank. It builds up over time and is one of the two layers a pumping crew measures to decide if your tank needs service. A thick scum layer that reaches the outlet baffle can push grease into your drain field, which is where real damage starts.

    Sludge

    Sludge is the layer of heavy solids that sinks and collects at the bottom of your septic tank. Bacteria break some of it down, but sludge always builds up over time and can only be removed by pumping. When sludge gets deep enough to reach the outlet, solids flow into the drain field and clog it. Sludge depth is the main number a provider uses to tell you whether your tank is due.

    Effluent

    Effluent is the liquid wastewater that flows out of your septic tank into the drain field after the solids have settled out. It sits between the scum on top and the sludge on the bottom. Clean, mostly clear effluent means your tank is doing its job. If a provider mentions cloudy effluent or solids in the effluent, your tank is overdue for service or has a broken part.

    Effluent Filter

    An effluent filter is a screen installed at the tank's outlet that catches small solids before they can reach the drain field. Not every tank has one. If yours does, it needs cleaning during routine service, and a provider may list that as a line item. It is cheap protection for the most expensive part of your system.

    The Service Itself and Common Cleaning Terms

    Septic Tank Pumping

    Septic tank pumping is the process of removing the liquid, sludge, and scum from your tank with a vacuum truck. It is the core maintenance task for any septic system, and skipping it is how drain fields fail. Most homeowners search for pumping when drains slow down or smells appear, but pumping on a schedule is cheaper than pumping in an emergency. This walkthrough of the pumping process shows what happens from the moment the truck arrives.

    Pumping vs. Cleaning

    Pumping means removing the liquid and loose solids from your tank, while cleaning goes further by removing the compacted sludge stuck to the bottom and walls. Some providers use the words interchangeably, so ask which one your quote covers. When you're comparing cleaning services in our septic tank cleaning glossary, full tank cleaning takes more time and effort than a basic pump-out, and the price usually reflects that. If your tank has gone years without service, cleaning is often what it actually needs; this cost guide explains what drives the price up or down.

    Vacuum Truck

    A vacuum truck is the tanker truck a septic crew uses to suck the contents out of your tank through a large hose. It is also called a pump truck. The truck needs to park within hose reach of your tank, so access matters. If your tank sits far from the driveway or behind a fence, mention it when you call so the crew arrives prepared.

    Septic Tank Locating

    Septic tank locating means finding exactly where your buried tank and its lids sit on your property. Many homeowners, especially recent buyers, have no idea where their tank is. A provider may use records, probing, or locating tools to find it. If nobody has ever shown you your tank lids, expect locating to be part of your first service call.

    Backwash or Backflushing

    Backflushing means spraying some of the pumped liquid back into the tank to break up hardened sludge so the vacuum can remove it. It is a normal part of a thorough pump-out, not the crew putting waste back in your tank. If you see it happen and worry, ask; a good crew will explain it on the spot.

    Problems and Paperwork

    Septic Backup

    A septic backup is wastewater flowing the wrong way, coming up through your drains, toilets, or lowest fixtures instead of leaving the house. It usually means the tank is full, a line is clogged, or the drain field can no longer accept water. A backup is the loudest warning your system gives you. Learn the quieter warnings first in this list of signs your tank needs pumping.

    Slow Drains

    Slow drains are fixtures throughout the house that empty sluggishly at the same time, which points to a septic problem rather than a single clogged pipe. One slow sink is a plumbing issue. Every drain slow at once means the tank or drain field is struggling. Catching this early can mean a routine pump-out instead of an overflow in your yard.

    Septic Inspection

    A septic inspection is an evaluation of your tank and system condition, checking levels, baffles, lids, and how the system handles water. Buyers often order one before closing on a home, and owners use them to catch problems early. An inspection is different from pumping, though the two are often done together since an empty tank is easier to examine.

    Grease Trap

    A grease trap is a container that catches fats, oils, and grease from kitchen drains before they reach the septic tank or sewer line. They are common at restaurants and some larger properties. Grease traps need their own pumping on a regular schedule. If your property has one, make sure your provider services it, since a full grease trap causes its own backups.

    Using These Terms

    You now know what the words on a septic quote actually mean, from sludge depth to riser installation. When a provider in Hesperia hands you an estimate, you can read each line, ask whether the price covers pumping or full cleaning, and understand the answer. That is the whole point of this glossary: fewer surprises, sharper questions, and a system that lasts longer because you knew what to ask for.

    If you need your septic tank serviced, Hesperia Septic can help.

    Related guide: septic tank cleaning — Complete Guide

    Related Reading

  • How to Locate Your Septic Tank Without Records: DIY Methods That Work

    Steps to locate septic tank yourself without records, from checking documents to marking it
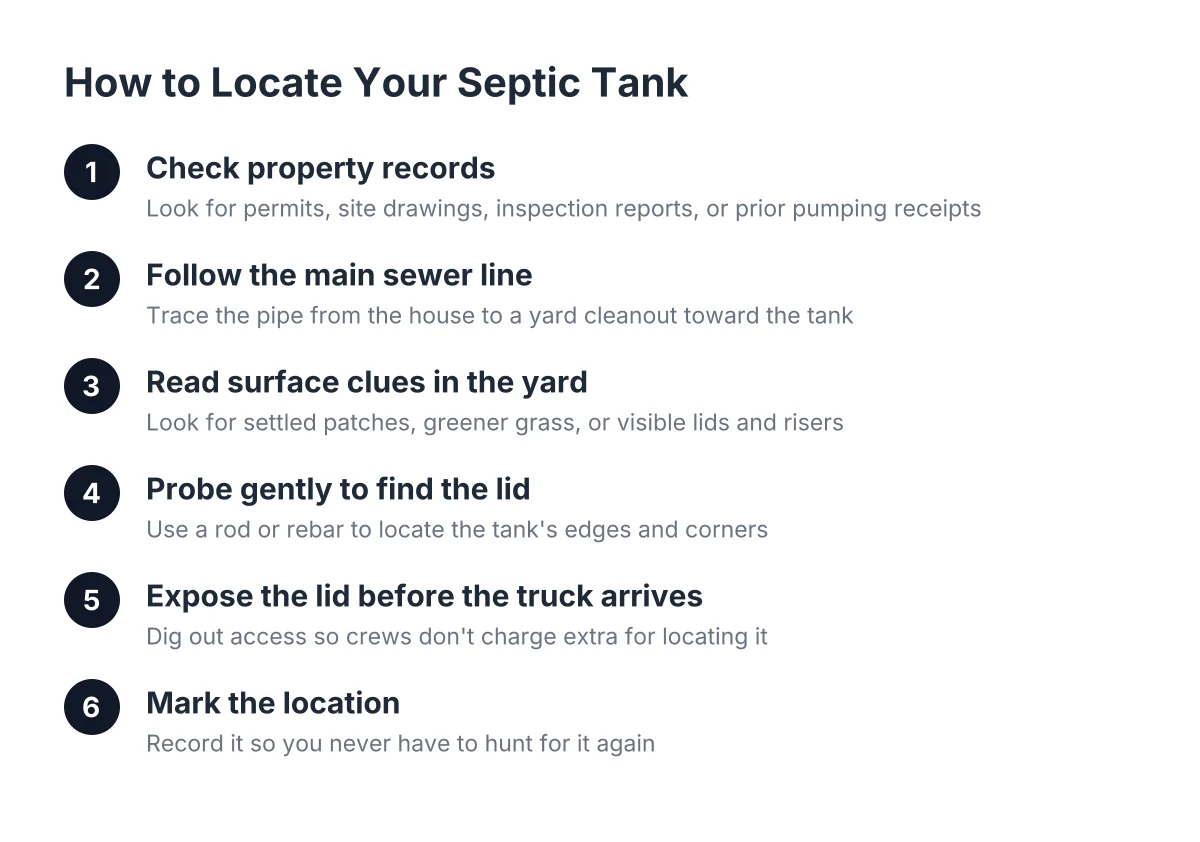
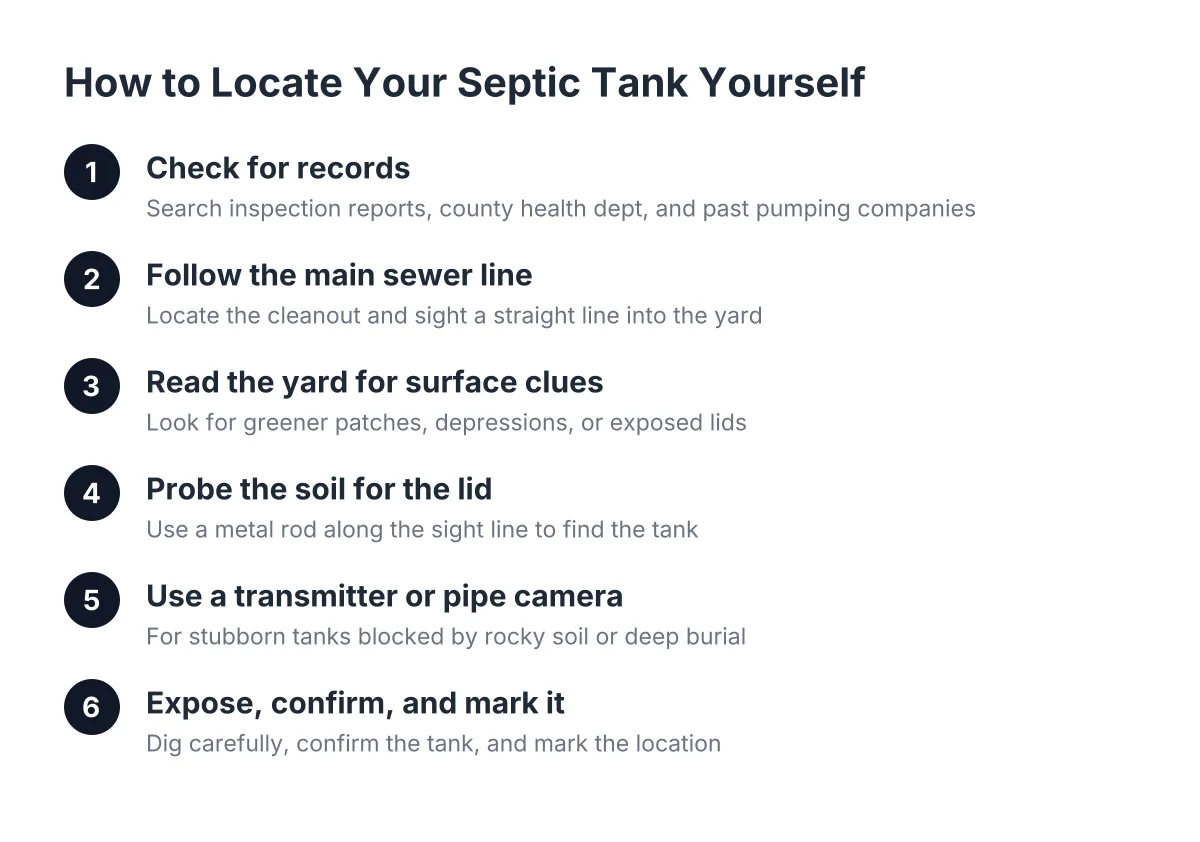
    The six-step DIY process this guide walks through to find a septic tank without records.

    Plenty of High Desert homes changed hands with no septic paperwork at all. If you just bought a place in Hesperia, or you have owned yours for years and never needed to dig, you may have no idea where the tank sits. The good news is you can locate septic tank yourself with a few simple methods and tools, no records required. This guide walks through the process step by step, then covers when it makes sense to bring in a locating crew instead.

    Missing records are common on older High Desert properties. Some homes here were built decades before counties kept consistent septic permits on file. Others have records that show a tank exists but not where it was buried. Either way, you cannot schedule septic tank pumping, pass a pre-sale inspection, or plan a remodel until someone finds the lid.

    Step 1: Check for Records Before You Dig Anything

    Start with paperwork, even if you think none exists. A permit sketch or as-built diagram can save you hours of probing in the yard.

    Look in these places first:

    • Your home purchase documents, especially the inspection report and any seller disclosures
    • The San Bernardino County environmental health department, which may have a permit or as-built drawing on file
    • The company that pumped the tank last, if a neighbor or previous owner remembers the name
    • The original builder or a long-time neighbor with a similar floor plan

    Even a rough sketch helps. A diagram that shows the tank 15 feet off the back door narrows your search from the whole yard to a strip of dirt you can probe in an afternoon.

    However, do not be surprised if the county has nothing. Many Hesperia parcels predate consistent record keeping. If the paper trail is a dead end, move to the physical clues.

    Step 2: Follow the Main Sewer Line From the House

    Your main drain line points straight at the tank. Find where the sewer pipe exits the house and you have a direction to follow.

    First, locate the main cleanout. It is usually a capped pipe, 3 to 4 inches wide, sticking a few inches out of the ground near the foundation. In homes with a basement or crawl space, you can often see the main line itself and note which wall it exits through.

    Next, stand at that exit point and sight a straight line out into the yard. Septic installers almost always run the pipe straight to the tank to keep the fall consistent. Most tanks sit 10 to 25 feet from the house, though older installs vary.

    In addition, note the slope of your lot. Sewage moves by gravity, so the tank will be downhill from the house, never uphill. On a flat Hesperia lot that clue matters less, but on a sloped parcel it can rule out half the yard immediately.

    Step 3: Read the Yard for Surface Clues

    A buried tank often announces itself if you know what to look for. Walk the area along your sight line slowly and check for these signs:

    • A rectangular patch where grass or weeds grow greener or faster, fed by moisture below
    • A low spot or shallow depression where backfill settled over the tank
    • A bare or stressed patch of ground, since some tanks sit shallow enough to dry out the soil above them
    • Concrete lids, risers, or inspection pipes barely poking through the dirt
    • Areas snow melts first in winter, if you catch a rare High Desert snowfall

    For example, say a homeowner in Hesperia bought a 1978 ranch house with zero septic paperwork. In that scenario, a faint rectangular dip about 18 feet off the back bathroom wall, right along the line from the cleanout, would be the first place to probe. That combination of clues finds a lot of tanks.

    Desert landscaping makes this harder. Gravel yards and native scrub hide settling and green patches that a lawn would reveal. If the surface tells you nothing, you will need to probe.

    Step 4: Probe the Soil to Locate Your Septic Tank Lid

    A soil probe is the classic tool to locate a septic tank, and it is cheap. Any 4 to 5 foot metal rod with a handle works; hardware stores sell purpose-made probes for the price of a tank of gas.

    Work along your sight line from the cleanout, pushing the probe into the soil every couple of feet. Most tanks sit with their top 6 inches to 2 feet below grade. When the probe hits something flat and hard at a consistent depth, you have likely found the tank; concrete feels solid and unforgiving, while fiberglass or plastic gives a duller thud.

    Once you hit the tank, probe outward to trace its edges. Finding the corners tells you the tank's footprint and orientation, which helps you find the lid. On most tanks, the access lid sits over the inlet end, the outlet end, or the center. Probe for a slightly raised or distinct spot within the footprint.

    Two cautions here. Probe gently; older concrete lids can be brittle, and a hard jab can crack one. Also call 811 before any digging so buried gas, water, and electric lines get marked first. That call is free and it is the law before you excavate.

    Step 5: Use a Flushable Transmitter or Pipe Camera for Stubborn Tanks

    Sometimes probing fails. Caliche layers and rocky High Desert soil can stop a probe cold, and deep-set tanks sit below comfortable probing depth. When that happens, electronic locating tools take over.

    A flushable transmitter is a small radio beacon you flush down a toilet. It travels the sewer line and stops at the tank inlet, and a handheld receiver above ground pinpoints its position. Some homeowners rent these; septic crews carry them as standard equipment.

    Similarly, a pipe camera with a locating sonde can be fed through the cleanout. The camera shows the pipe's condition on the way, and the sonde lets the operator mark the line's path and the tank connection from the surface. This method has a bonus for anyone planning maintenance: you learn whether the line has root intrusion or bellies before they cause a septic backup.

    Therefore, if you have already spent a weekend probing with nothing to show for it, electronics are the logical next step. This is also where a professional septic tank locating service earns its fee, since the equipment, the experience reading desert soil, and the ability to expose and mark the lid come as one visit.

    Step 6: Expose, Confirm, and Mark the Location

    Finding the tank is only half the job. Now confirm it and record it so you never search again.

    Dig carefully by hand over the spot you identified until you expose the lid. Confirm it is the access lid, not just the tank top, since pumping requires an opening large enough for the hose. If the lid sits more than a few inches down, consider having a riser installed; a riser brings the access to grade so future septic tank pumping does not start with a shovel.

    Then document everything:

    1. Measure from two fixed points, such as house corners, to the lid center, and write the distances down
    2. Take photos of the open hole with the house in frame for reference
    3. Sketch a simple map showing the tank, the sewer line path, and the drain field direction if known
    4. Drop a pin on your phone's map app and save it
    5. Keep a copy with your house documents and give one to whoever pumps the tank

    As a result, the next crew that services the system drives up, opens the lid, and gets to work. No searching, no extra digging charges, no wasted trip.

    When to Call a Pro Instead of Doing It Yourself

    Call a professional when probing fails, when you suspect the tank sits under concrete or a structure, or when a sale or permit deadline gives you no time to experiment. A crew with transmitters, cameras, and desert digging experience can find, expose, and mark a tank in one visit instead of your several weekends.

    There are also situations where DIY carries real risk. A backup in progress means the tank may be full to the lid; opening it without the right setup exposes you to sewage and dangerous gases. Old steel or failing concrete tanks can have unsafe lids that collapse under weight. If anything about the tank looks compromised, stop and get a professional opinion before anyone stands over it.

    The trade-off is straightforward. DIY locating costs you time and a probe rod, and it works on most straightforward lots. Professional septic tank locating costs money but comes with the equipment and judgment to handle no-record properties, buried lids under hardscape, and tight timelines. Neither choice is wrong; it depends on your soil, your schedule, and how the first attempt goes.

    Why Finding the Tank Now Beats Finding It During an Emergency

    Locating the tank while nothing is wrong is the cheapest version of this job. According to the U.S. Environmental Protection Agency, more than one in five U.S. households depend on individual septic systems, and the EPA recommends a professional inspection at least once every three years. You cannot follow that schedule if nobody knows where the tank is.

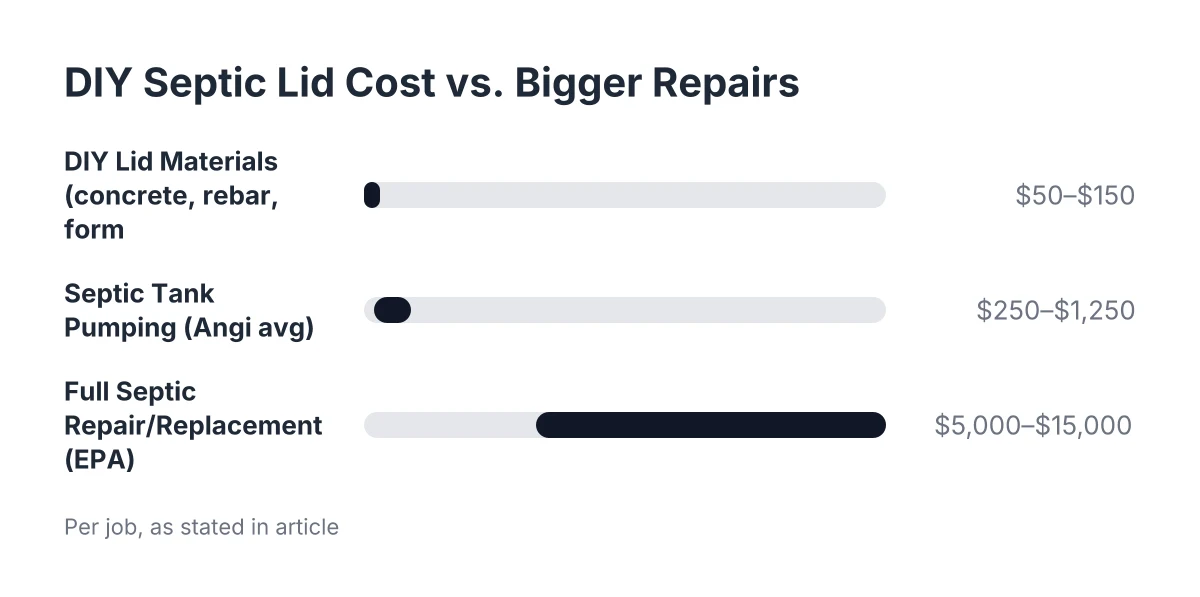
    The cost math backs this up. Angi data puts the average cost of septic tank pumping at $427, with a typical range of $250 to $1,250 depending on tank size and location. Meanwhile, the EPA estimates septic repair or replacement typically runs $5,000 to $15,000. A neglected tank that fails because it was never found and never pumped lands on the expensive side of that gap.

    So take the afternoon. Follow the sewer line, read the yard, probe the soil, and locate your septic tank before it forces the issue with a backup on a holiday weekend. Mark it, map it, and put pumping on the calendar. That is the whole difference between routine maintenance and an emergency call.

    If you need your septic tank serviced, Hesperia Septic can help.


    Related Reading

  • Septic Tank Locating Equipment: How Pros Find Buried Tanks With No Records

    Diagram of six steps in septic tank locating equipment process from paper trail to marking
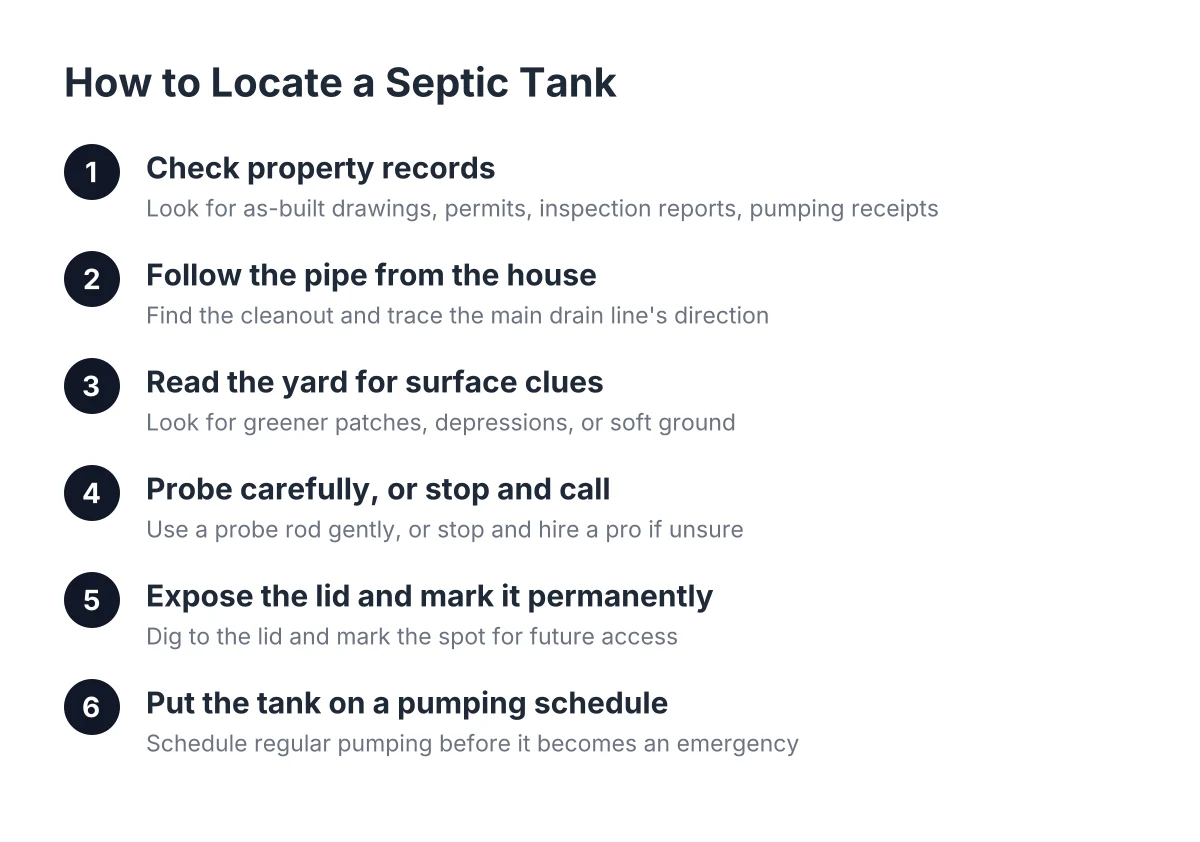
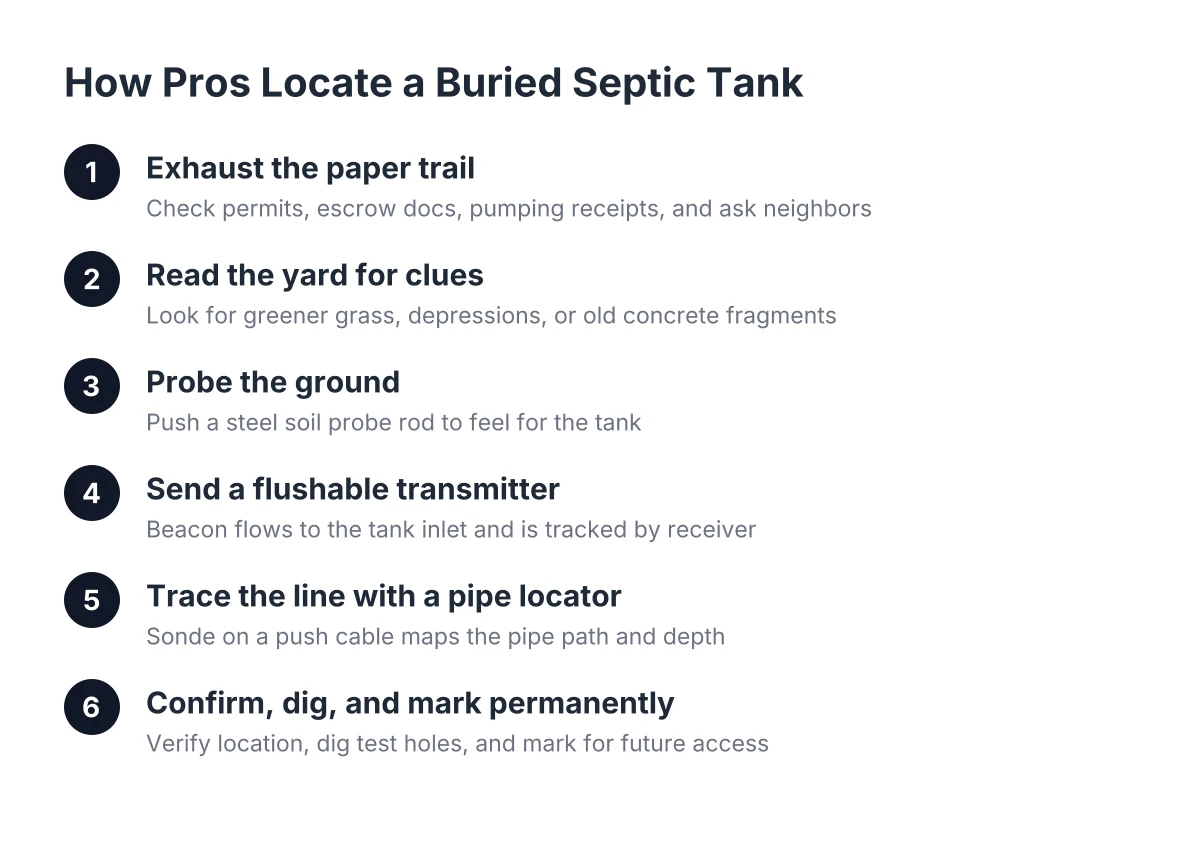
    The six-step process professional crews use to find a septic tank with no records, as covered in this guide.

    If you own a Hesperia property with no septic records, the fastest path to a found tank is knowing what septic tank locating equipment the pros actually use and how each tool works. Older High Desert homes often changed hands three or four times before anyone thought to save a site map. The county may have nothing on file. That leaves you with a buried concrete tank somewhere in the yard and no lid in sight. This guide walks through the equipment step by step, in the order a professional crew typically uses it, so you know what to expect and how to help the process go faster.

    Step 1: Exhaust the Paper Trail Before Anyone Powers Up a Locator

    First, check every record source you can reach. Equipment is the answer when paperwork fails, but paperwork is free and sometimes fast.

    Look for these before scheduling a locate:

    • The property's original permit or "as-built" drawing from San Bernardino County Environmental Health
    • Home inspection or escrow documents from when you bought the house
    • Receipts from any past septic tank pumping visit; pumpers often note lid location
    • A previous owner or longtime neighbor who remembers where the truck parked

    Suppose you bought a 1978 ranch house off Ranchero Road five years ago and the seller handed you nothing. In that scenario, a county records request might turn up a rough sketch, or it might turn up empty. Either way, gather what exists. Even a partial drawing that shows which side of the house the tank sits on cuts locating time in half.

    If the paper trail dies, move to the physical clues, then the equipment.

    Step 2: Read the Yard the Way a Locator Tech Does

    Next, walk the property and note the signs a professional looks for before unloading a single tool. This step costs nothing and often narrows the search to a 200-square-foot patch.

    Watch for:

    • The point where the main sewer line exits the house, usually visible in the crawl space or at a cleanout
    • A patch of grass or weeds that grows greener or faster than the rest, common even in dry High Desert yards
    • A shallow depression or slight mound where soil settled over the tank after backfill
    • Old concrete fragments, riser rings, or a suspicious square of different-colored dirt

    The tank almost always sits along a straight line from where the sewer pipe leaves the house, typically 5 to 25 feet out. Mark that line with stakes or flags. Every tool in the next steps works faster when the search area is already narrow.

    Step 3: Probe the Ground With a Soil Probe Rod

    A soil probe is the simplest piece of septic tank locating equipment and often the first one out of the truck. It is a steel rod, usually four to five feet long, with a T-handle and sometimes a slightly bulged tip.

    The technician pushes the probe into the soil every couple of feet along the suspected line. Dirt gives way with steady resistance. A septic tank made of concrete stops the rod cold with a hard, flat clunk you can feel in your hands. Fiberglass and plastic tanks give a duller thud, so an experienced hand matters.

    However, Hesperia's soil creates a wrinkle here. Our decomposed granite and caliche layers can be hard enough to stop a probe on their own, which produces false positives. A pro learns to tell the difference between a caliche shelf and a tank lid by the sound and the way the rod skips. This is one reason a locate that looks simple on YouTube goes faster with someone who probes High Desert dirt every week.

    One caution: probing blind near a steel tank or an old cesspool can be risky, since corroded lids can collapse. If your home predates the 1970s and you have no idea what is down there, let a professional do the probing.

    Step 4: Send a Flushable Transmitter Down the Line

    When probing alone does not settle it, the crew moves to electronic septic tank locating equipment, and the workhorse is the flushable transmitter. This is a small waterproof beacon, about the size of a large pill capsule, that broadcasts a radio signal at a set frequency.

    Here is how a typical crew uses it:

    1. The technician flushes the transmitter down a toilet or drops it in through a cleanout.
    2. Water carries it along the sewer line toward the tank.
    3. Above ground, a handheld receiver picks up the signal and shows signal strength.
    4. The tech walks the yard, following the strongest reading until the transmitter stops moving.
    5. Where it stops is the tank inlet, and the crew marks that spot with paint or a flag.

    The transmitter usually parks itself at the tank's inlet baffle because the flow slows down there. From the inlet, the tech can estimate where the lid and the outlet sit based on typical tank layouts, then confirm with the probe from Step 3. As a result, digging is limited to one or two small test holes instead of trenching up half the yard.

    Step 5: Trace the Sewer Line With a Pipe Locator and Sonde

    Some properties fight back. Maybe the sewer line takes an unexpected turn around an old addition, or the transmitter hangs up on a root intrusion before reaching the tank. For those jobs, crews use a sonde on a push cable, paired with a pipe locator wand.

    A sonde works like the flushable transmitter, except it rides on the end of a semi-rigid cable the technician pushes through the line by hand. The receiver above ground tracks the sonde foot by foot, so the tech can paint the entire path of the pipe across the yard, including every bend. When the cable hits the tank baffle, the final signal marks the tank wall.

    In addition, this method tells you the depth of the line at each point, which matters before a remodel or a fence post project. If you are locating the tank because you plan to pour a slab, add a garage, or run irrigation, ask the crew to mark the full pipe run, not just the lid. It is the same visit and saves you a second locate later.

    Step 6: Confirm the Tank Location, Dig, and Mark It Permanently

    Finally, the crew confirms and exposes. Electronic tools narrow the target to a small circle; the shovel does the rest. The technician hand-digs a test hole at the marked spot, usually 12 to 36 inches down in this area, until steel or septic tank concrete appears.

    Once the lid is exposed, this is the moment to get the most from the visit:

    • Photograph the open hole with the house in the frame for reference
    • Measure from two fixed points, such as a house corner and a fence post, and write the distances down
    • Ask about adding a riser, which brings the lid access to grade so no one ever digs for it again
    • Have the tank pumped and inspected while it is open, since the hardest part of the job is already done

    The EPA recommends the average household have its septic system inspected at least once every three years, and more than one in five U.S. households rely on septic or small cluster systems. A found and marked tank is what makes that schedule realistic. Nobody keeps up with maintenance on a tank they cannot find.

    Why Professional Equipment Beats a Metal Detector for Tank Locating

    A common question from homeowners: can a metal detector from the garage find the tank? Usually not. Most tanks in the Hesperia area are concrete, and concrete gives a metal detector nothing to hit unless the lid has steel rebar or handles near the surface. Detectors also chirp on every buried nail, pipe scrap, and bottle cap in a yard that has seen fifty years of projects.

    By contrast, a professional septic tank locating service pairs the transmitter, the receiver, and local digging experience into one visit. The equipment finds the tank; the experience keeps the crew from probing through an inlet pipe or digging into an abandoned cesspool. On a property with no records, that combination is the difference between two marked flags in the yard and a weekend of random holes.

    There is a limit worth naming. Locating tells you where the tank is, not what condition it is in. A tank with a cracked lid, a failed baffle, or a saturated drain field needs an inspection to catch, and repair or replacement runs far beyond routine service; the EPA estimates $5,000 to $15,000 for repair or replacement, compared with routine pumping that Angi data puts at a $427 average. Finding the tank is Step 1 of staying on the cheap side of that math.

    Keep the Location From Getting Lost Again

    You did the locate once. Make sure the next owner, or future you, never has to repeat it. Sketch a simple site map with your two measured distances, store the photos with your house documents, and note the date of the pumping that followed. Then put the next service on the calendar so the tank gets attention on a schedule instead of during an emergency, which is exactly the outcome a maintenance-minded homeowner is after.

    If you need your septic tank serviced, Hesperia Septic can help.


    Related Reading

  • Buying Property With a Concrete Septic Tank in Hesperia: The Inspection Checklist

    concrete septic tank inspection

    If you're about to close on land or a home in Hesperia with no septic records, a concrete septic tank inspection is the one step that turns the biggest unknown on the property into a number you can negotiate. The tank in the ground is almost certainly concrete: most older High Desert properties were built with concrete tanks, and knowing what that means for failure points, repairs, and lifespan changes how you budget. This guide walks through what an inspector checks (lid, baffles, walls, seams), what each finding costs to fix, how long a concrete tank should last, and how to price the results before you commit money to a property where nobody can tell you what's buried out back.

    No hidden-fee talk, no manufactured upsells. Just the numbers and trade-offs, so when a quote lands in your inbox you can tell whether it's fair.

    Why Septic Tank Concrete Dominates the High Desert

    Concrete is the default septic tank material in Hesperia and most of the High Desert for a simple reason: it holds up. A concrete tank is heavy, so it doesn't float or shift when groundwater or soil conditions change. It handles the weight of soil above it, and in many cases it can survive a vehicle accidentally driving over the area, which plastic tanks often cannot.

    For a land buyer with no records, this matters in a practical way. If the home on your new property was built decades ago, the odds are high that the tank is concrete. That tells you something about what to inspect, what parts wear out first, and roughly what a replacement would cost if the inspection turns up bad news.

    Concrete tanks are typically precast, meaning they were poured at a factory and delivered by truck. Some older rural tanks were poured in place on site. Poured-in-place tanks can be fine, but they can also be undersized, unbaffled, or built to no particular standard, which is one more reason a professional inspection matters on a property with no paperwork.

    What the Inspection Findings Cost to Fix

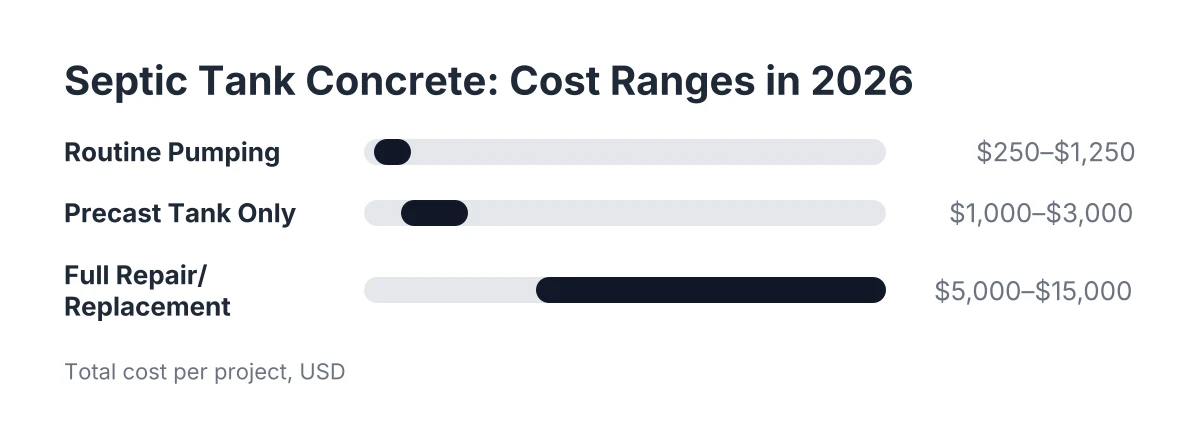
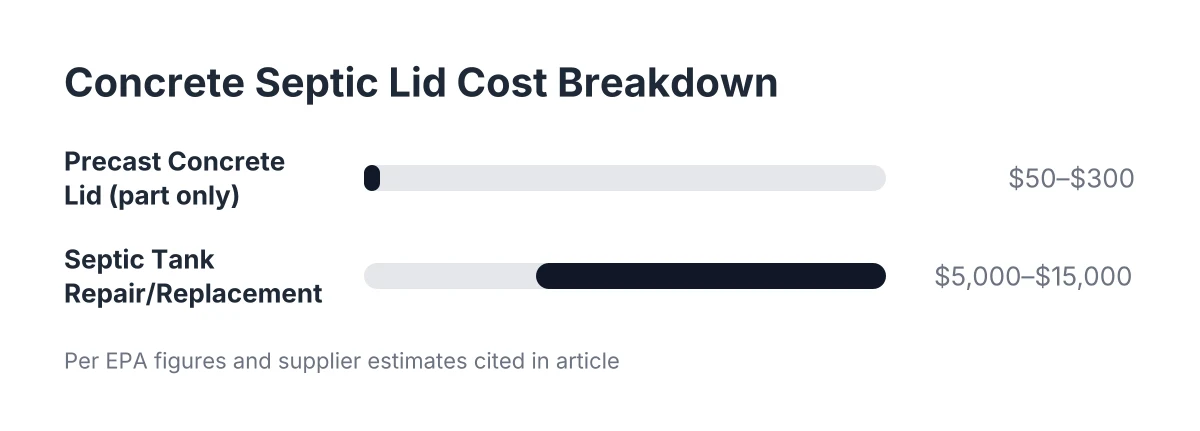
    Worst case first, so the rest of the numbers have context. A precast concrete septic tank itself typically runs somewhere in the range of $1,000 to $3,000 for the tank alone, depending on size and the supplier. However, the tank is the smaller part of the bill. Excavation, delivery, setting the tank with a crane truck, connecting the plumbing, permits, and backfill make up most of a full installation, which is why total project costs land far above the sticker price of the tank.

    According to the U.S. Environmental Protection Agency, septic tank repair or replacement typically costs between $5,000 and $15,000. That range covers most residential situations, and it's a useful sanity check when you're comparing quotes for the cost of septic tank replacement. If a bid comes in far outside that window, ask what's driving it. Sometimes there's a real reason, like deep burial, hard soil, or a failed drain field that also needs work. Sometimes there isn't.

    Here's how the pieces of a concrete tank project typically break down:

    • The tank itself: the precast concrete unit, priced by capacity
    • Excavation and site work: digging the hole, managing soil, and backfilling after the set
    • Delivery and placement: a boom truck or crane sets the tank, and access to your lot affects this cost
    • Plumbing connections: tying the house line and the drain field line into the tank
    • Permits and inspections: San Bernardino County requires permits for septic work, and fees vary
    • Risers and lids: a concrete septic tank riser and cover bring the access point to grade so future pumping doesn't require digging

    Compare that full-replacement picture to routine service. According to Angi, septic tank pumping averages $427, with a range of $250 to $1,250 or more depending on tank size and location. That gap between a few hundred dollars for pumping and five figures for replacement is the strongest argument for maintaining a concrete tank instead of letting it fail.

    One note on comparing quotes: septic tank cost varies with tank size, burial depth, and how easy the lid is to reach. A quote that seems high may reflect a deep tank with no riser, and a quote that seems low may not include digging to find the lid at all. Ask each company to itemize so you're comparing the same work.

    How Long Does a Concrete Septic Tank Last?

    A well-built concrete septic tank commonly lasts 40 years or more, and some last well past that with regular pumping and no structural damage. Lifespan depends on the quality of the original concrete, the soil conditions, and whether the tank was maintained or left to accumulate solids for decades. Plastic and fiberglass tanks generally have shorter expected lifespans and are more vulnerable to physical damage.

    That longevity is the core of the concrete value argument. A tank that costs more to install but lasts twice as long usually wins on total cost of ownership. However, longevity is not a guarantee. Concrete has specific failure points, and on a property with no records, those failure points are exactly what an inspection should look at.

    Where a Concrete Septic Tank Inspection Looks First

    Concrete rarely fails all at once. It degrades in predictable places:

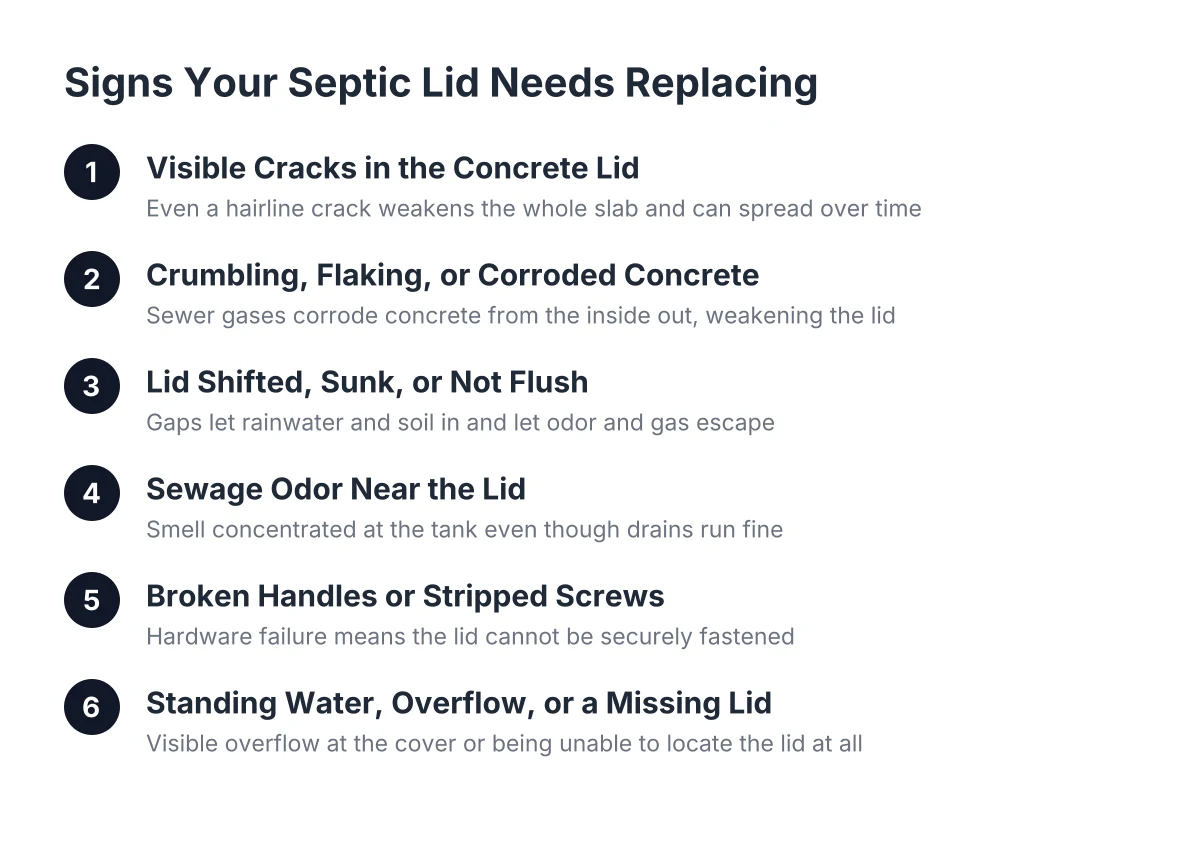
    1. The lid and cover. The concrete septic tank lid takes the most abuse. Lids crack from age, vehicle traffic, or careless digging. A cracked concrete cover is a safety hazard, especially on land where kids or livestock roam. Lid replacement is one of the cheaper concrete repairs, often a few hundred dollars installed, and it's worth doing immediately if the lid is compromised.
    2. The baffles. Baffles direct flow inside the tank and keep solids from washing into the drain field. In older concrete tanks, baffles were often concrete themselves, and sewage gases eat away at concrete above the waterline over decades. A deteriorated baffle lets solids escape and can quietly kill a drain field, which is the expensive part of the system.
    3. The tank walls above the waterline. The same corrosive gases that destroy baffles can pit and weaken the concrete crown of the tank. An inspector checks this when the tank is pumped and empty.
    4. Seams and connections. Cracks at the inlet, outlet, or the seam between tank sections can let groundwater in or sewage out. Either one is a problem worth knowing about before closing on a property.

    Septic Tank Concrete vs. Plastic and Fiberglass

    Concrete, plastic, and fiberglass all show up in residential septic systems, and each has a real trade-off profile. Concrete costs more upfront and lasts longer. Plastic costs less and installs faster, but it can crack under weight, and an empty plastic tank can float upward in wet soil if it isn't anchored. Fiberglass sits between the two on price and resists corrosion well, but it shares plastic's vulnerability to shifting and damage during installation.

    For example, here's how the materials compare on the factors that matter most:

    • Upfront cost: plastic is usually cheapest, fiberglass is mid-range, and concrete costs the most for the tank itself
    • Installation: plastic and fiberglass tanks are light enough to place without a crane; concrete needs heavy equipment, which adds cost
    • Durability: concrete handles soil weight and surface traffic best; plastic is most vulnerable to crushing and deformation
    • Lifespan: concrete typically outlasts both alternatives when maintained
    • Repairability: cracked concrete can often be patched or fitted with new baffles; a badly cracked plastic tank usually means replacement

    In Hesperia's soil and climate, concrete remains the common choice for full-size residential tanks. That said, material is only one part of the picture. Septic system types range from standard gravity systems, which most Hesperia homes have, to alternative designs with pumps and mechanical parts. An aerobic septic system cost runs meaningfully higher than a conventional gravity system, both to install and to maintain, because it uses powered components that need attention. The EPA advises that alternative systems with electrical float switches, pumps, or mechanical components should generally be inspected once a year, versus at least once every three years for a standard system.

    If you're replacing a failed system rather than just a tank, the county's requirements and your soil conditions may dictate the system type more than your preference does. That's a conversation to have with a septic professional and the county before you assume a like-for-like swap.

    Concrete Septic Tank Inspection: The Buyer's Sequence

    If you're buying land or a home in Hesperia with no septic records, treat the septic system as an unknown expense until someone physically opens the tank. The seller may not know where the tank is. The previous owner may never have pumped it. None of that shows up in a standard home inspection, which typically doesn't open or evaluate the septic tank at all.

    Here is the practical sequence that protects you:

    1. Get the tank located. A septic tank locating service finds the tank and marks it, even when there's no visible lid or riser on the lot. On older properties, the concrete lid is often buried under a foot or more of soil.
    2. Have the tank pumped and inspected together. A concrete septic tank inspection can't be done on a full tank. Pumping it empty lets someone check the baffles, the concrete walls, the lid, and the liquid levels that hint at drain field health.
    3. Ask for a written report. For a purchase decision, you want documentation: tank material, approximate condition, lid and baffle status, and any signs of drain field failure. Lenders and escrow officers can work with a written report; they can't work with a verbal "seems fine."
    4. Price the findings before you close. If the report shows a cracked concrete septic tank cover, that's a modest fix you can negotiate. If it shows a collapsing tank or a saturated drain field, you're looking at the EPA's $5,000 to $15,000 replacement range, and that belongs in your purchase negotiation, not in your first year of ownership as a surprise.

    Consider a realistic Hesperia scenario. A buyer closes on a 1970s home on an acre lot. No septic records exist, no lid is visible, and the seller shrugs. A locate finds the tank 18 inches down under the side yard. Pumping and inspection reveal a concrete tank in decent shape, but the concrete outlet baffle has dissolved and solids have been flowing toward the drain field for years. The fix is a new outlet tee, a few hundred dollars, caught before it destroyed a drain field worth thousands. That is the entire case for inspecting before you buy.

    The trade-off is real: a locate-and-inspect job costs money on a property you might walk away from, and it can add a few days to escrow. Weigh that against the alternative, which is absorbing a five-figure replacement with no negotiating leverage after closing.

    Getting the Most Life Out of a Concrete Tank

    Once you own the property, the goal shifts from evaluating the tank to protecting it. Concrete rewards maintenance more than any other tank material, because most concrete failures build slowly and get caught during routine pumping.

    First, establish a pumping baseline. If nobody knows when the tank was last pumped, have it pumped now and note the date. The EPA recommends professional inspection at least once every three years for the average household, and pumping visits are the natural time to do it. More than one in five U.S. households rely on septic or small cluster systems, according to the EPA, so this is ordinary homeownership on septic, not an exotic burden.

    Next, add a riser if the tank doesn't have one. A concrete septic tank riser, or a plastic riser bolted to the concrete tank, brings the access lid up to ground level. Every future pumping visit gets cheaper and faster because nobody has to dig to find the lid. On a property where you just paid to locate the tank, a riser means you never pay for that again.

    In addition, protect the ground above the tank. Don't park vehicles, place sheds, or pour patios over the tank or drain field. Concrete is the toughest tank material, but repeated vehicle loads crack lids and stress tank crowns. Mark the tank location on a simple property sketch, and keep it with your house documents so the next owner isn't in your position.

    Finally, know your warning signs. Slow drains across the whole house, sewage odor in the yard, or wet ground over the drain field mean the system needs attention now, not at the next scheduled pumping. Catching a backup early is the difference between an emergency pumping visit and a sewage cleanup inside the house.

    When to Repair Concrete and When to Replace It

    Repair a concrete tank when the structure is sound and the failure is a component: a cracked lid, a deteriorated baffle, or a bad inlet connection. These fixes typically cost hundreds, not thousands, and they restore decades of remaining service life. Replace the tank when the concrete itself has failed, meaning collapsed sections, major cracks below the waterline, or a crown so deteriorated it can't safely support a lid.

    A pumped-out, visual inspection is the only honest way to make that call. Anyone quoting a full replacement without opening and emptying the tank is guessing, and you shouldn't pay five figures on a guess. Likewise, a badly failed tank patched to limp along is a liability, especially if you plan to sell or build on the property later. Structural assessments and county permit questions are where a professional's judgment matters most; this guide can frame the decision, but it can't look inside your tank.

    For most Hesperia property owners, the math favors concrete's long game. Pump on schedule, inspect when you pump, fix small concrete failures while they're small, and a concrete tank installed decades ago keeps working for decades more. For the land buyer starting with zero records, one locate, one pumping, and one written concrete septic tank inspection report turn the biggest unknown on the property into a line item you can actually plan around.

    If you're buying in Hesperia and need the tank found, pumped, and inspected before you close, Hesperia Septic can help.

    Related Reading