Category: septic tank lid replacement

  • Septic Tank Cover Replacement in Hesperia, CA: Concrete vs. Plastic vs. Fiberglass

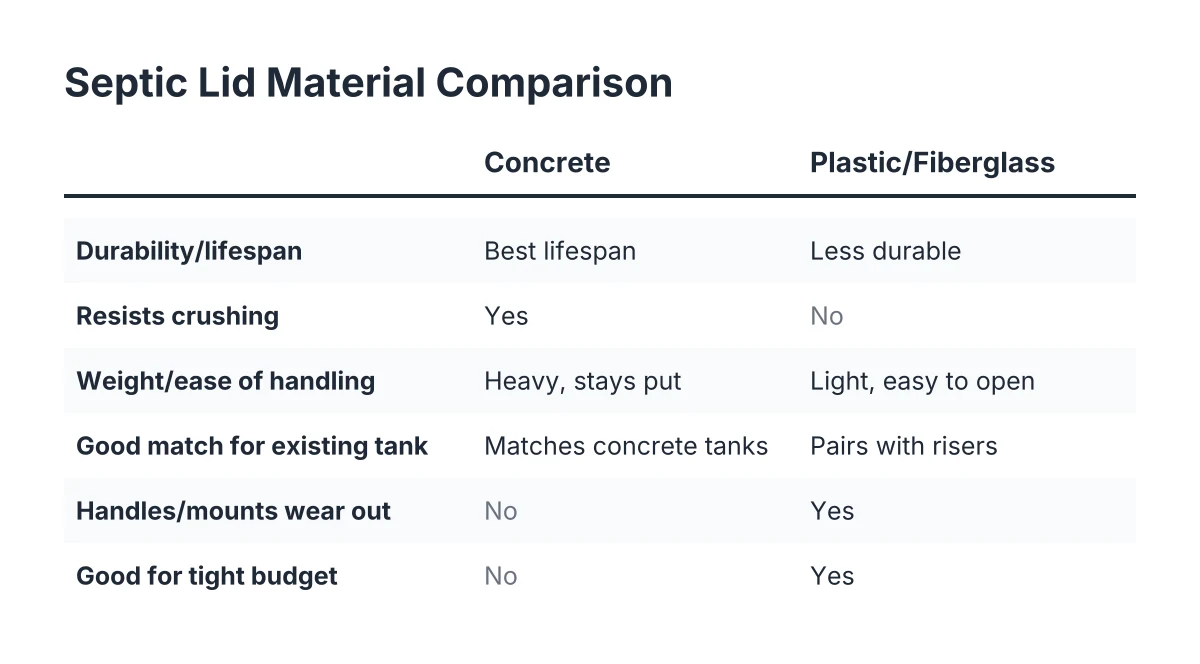
    Comparison checklist of concrete versus plastic and fiberglass septic lid materials
    How concrete, plastic, and fiberglass septic lids compare, as outlined in this guide.

    If you just found a cracked, sunken, or missing lid on your tank, your first question is what to put back in its place. Septic tank cover replacement comes down to three main materials: concrete, plastic, and fiberglass. A clear septic lid material comparison helps you weigh the trade-offs. Each one behaves differently under High Desert sun, shifting soil, and the weight of whatever crosses your yard. This FAQ walks homeowners in Hesperia, CA through the trade-offs so you can make the call before a crew shows up, not while they are standing over an open tank.

    What are the main material options for septic tank cover replacement?

    The three common materials for septic tank cover replacement are concrete, heavy-duty plastic (often called poly), and fiberglass. Concrete is the traditional choice for the rectangular concrete tanks common in many regions, while plastic and fiberglass lids usually pair with risers that bring the access point up to grade. Most older tanks in the Hesperia area were built with concrete lids, so a like-for-like concrete replacement is the default starting point.

    According to International Code Council, septic tank shapes and configurations vary by region; some areas use rectangular concrete tanks and others use circular tanks. That matters because the lid has to match the opening you actually have, not the one in a product photo.

    Concrete vs. Plastic vs. Fiberglass: Which Lid Material Comparison Matters Most?

    Concrete is the most durable and longest-lasting cover material for most residential tanks, which is why many installers prefer it. A properly made concrete lid resists crushing, holds up to decades of sun exposure, and will not warp or become brittle the way some plastics can. It is also the natural match for an existing concrete tank, since the fit and weight distribution were designed together.

    One detail surprises a lot of homeowners: the tank itself is solid, reinforced concrete, but access lids are often a lighter foam-core design covered in concrete. That keeps the lid removable for septic tank pumping without a crane, while still giving you a concrete surface that lasts.

    The downside is weight and handling. A concrete cover is not something one person slides aside to peek in the tank, and that is partly the point. It stays put.

    When does a plastic or fiberglass lid make sense?

    Plastic and fiberglass lids make sense when you are adding a riser, working with a poly tank, or dealing with unusual site conditions or a tight budget. They are light, easy to open for future pumping and inspections, and many models bolt or screw down for child safety. If your tank sits deep and you are tired of digging every three to five years, a riser with a plastic lid is a practical upgrade.

    However, plastic has known weak points. Plastic handles snap off when pulled, and screw mounting points on risers and covers wear out over time, which can force a second replacement later. When comparing septic lid material options, durability under soil and foot traffic tends to favor concrete over plastic components. Plastic tanks and components also tend not to last as long as concrete and are more prone to crushing. For a lid that will sit under soil, foot traffic, or occasional equipment, concrete usually wins on lifespan.

    How much does septic tank cover replacement cost in Hesperia, CA?

    The cost of septic tank cover replacement depends on the material, the size and shape of the opening, how deep the lid sits, and whether a riser is added at the same time. As an illustrative range only, a straightforward lid swap often lands in the low hundreds of dollars, while adding a riser system or pouring a custom concrete lid costs more. Ask for a written quote based on your actual tank before agreeing to anything.

    For perspective, replacing a lid is a small job compared to what happens when a damaged system goes unaddressed. The EPA estimates septic tank repair or replacement typically costs between $5,000 and $15,000, according to U.S. Environmental Protection Agency figures. A cover is one of the cheapest parts of the whole system to fix. Replacing just the lid is also far cheaper than replacing the tank itself; a crew can pour a custom concrete lid to fit an existing opening rather than touching the tank box.

    Many homeowners pair the lid work with a scheduled pumping visit, since the tank is already exposed. According to Angi data, septic tank pumping averages $427, with a range of $250 to $1,250 or more depending on tank size and location.

    Can I replace a septic tank lid myself?

    You can measure a lid and buy a stock plastic cover yourself, but most septic tank lid replacement jobs belong with a professional crew. An open tank is a fall hazard and a gas hazard, and a mis-sized or badly seated cover can let soil, debris, or a child into the tank. Concrete lids are also heavy enough to injure someone without the right equipment.

    There are a few things a homeowner can safely handle:

    • Marking the lid location and keeping vehicles and heavy equipment off it
    • Checking visible lids for cracks, chips, sinking, or movement a couple of times a year
    • Keeping soil, landscaping fabric, and decorations from burying the access point
    • Calling a pro immediately if a lid is cracked through, missing, or wobbles underfoot

    If the lid has collapsed, or you smell sewage or see a wet spot near the tank, treat it as urgent. At that point you may be looking at more than a cover problem, and an inspection should come before any parts get ordered.

    What does a professional septic lid and material comparison during replacement include?

    A professional septic tank cover replacement visit includes locating the tank, exposing the opening, measuring it, removing the damaged lid safely, and setting a properly fitted new cover. If the old lid was buried deep, the crew may recommend a riser so the next pumping does not require excavation. Good crews also protect the opening during the work so debris does not fall into the tank, then backfill and compact carefully.

    Suppose a homeowner in Hesperia calls because the pumping crew found a concrete lid cracked in half, say on a 1980s tank buried about a foot down. In that scenario, a typical crew would measure the opening, quote a matching concrete cover or a poured replacement, and offer a riser upgrade as an option rather than a requirement. The homeowner picks based on budget and how often they want to dig.

    Things that usually cost extra: septic tank locating when no records exist, deep excavation, riser installation, and any pumping or cleaning done during the same visit.

    Does Hesperia's climate affect which cover material to choose?

    High Desert conditions favor durable materials. Intense sun, big day-to-night temperature swings, and dry, sandy soil are hard on exposed plastic, which can grow brittle over years of UV exposure. Concrete shrugs off the sun, and a buried concrete lid is largely indifferent to surface temperature swings. When making a septic lid material comparison in this climate, concrete typically outperforms plastic over the long term.

    Soil movement matters too. According to Onsite Installer, fill around tank penetrations should be compacted thoroughly to prevent settling and damage, and the same care applies when backfilling over a replaced lid. Loose desert sand that settles unevenly can leave a lid unsupported at one edge, which is how cracks start.

    How do I choose a septic company for lid or cover work?

    Choose a local, septic-focused company that will look at your actual tank before quoting a fixed price. A fair quote names the material, the size, whether a riser is included, and what excavation and backfill are covered. Be cautious of anyone who pushes a full tank or system replacement before inspecting the lid and opening; a broken cover alone rarely means the tank is failing.

    Three questions worth asking before you book:

    1. Will you match my existing concrete opening, or do you recommend a riser, and why?
    2. What is included in the price: locating, digging, the cover itself, and backfill?
    3. Can you pump or inspect the tank on the same visit while it is open?

    That last question saves money. The U.S. Environmental Protection Agency recommends a professional inspection at least once every three years, and combining trips means you dig once instead of twice.

    Should I replace the cover or wait until my next pumping?

    Replace a cracked, sinking, or missing cover now rather than waiting for your next scheduled pumping. A compromised lid is a safety issue for kids, pets, and anyone walking the yard, and an open path for soil and debris to enter the tank. A hairline crack in a lid that still sits solidly can sometimes wait for a professional opinion, but any lid that moves, sags, or has a visible gap should not.

    If you are already dealing with a septic backup or slow drains on top of a bad lid, get the whole system looked at in one visit. The lid may be the visible symptom of a tank that has not been pumped in years.

    For homeowners in Hesperia, CA weighing concrete against plastic or fiberglass, the short version is this: concrete for longevity and a like-for-like fit on an older tank, plastic or fiberglass with a riser for easy future access. A local septic crew that pumps, inspects, and replaces covers can look at your tank, quote the options side by side, and handle the swap in a single visit. If your lid is cracked or missing, reach out to a Hesperia septic service to get an estimate and get the tank sealed up safely.

    If you need your septic tank serviced, Hesperia Septic can help.

    Prefer to talk it through? Call (760) 249-7872 — a quick call is usually the fastest way to get a straight answer for your situation.
    Related Reading

  • Emergency Septic Tank Lid Replacement in Hesperia: Cracked Cover Risks and Fixes

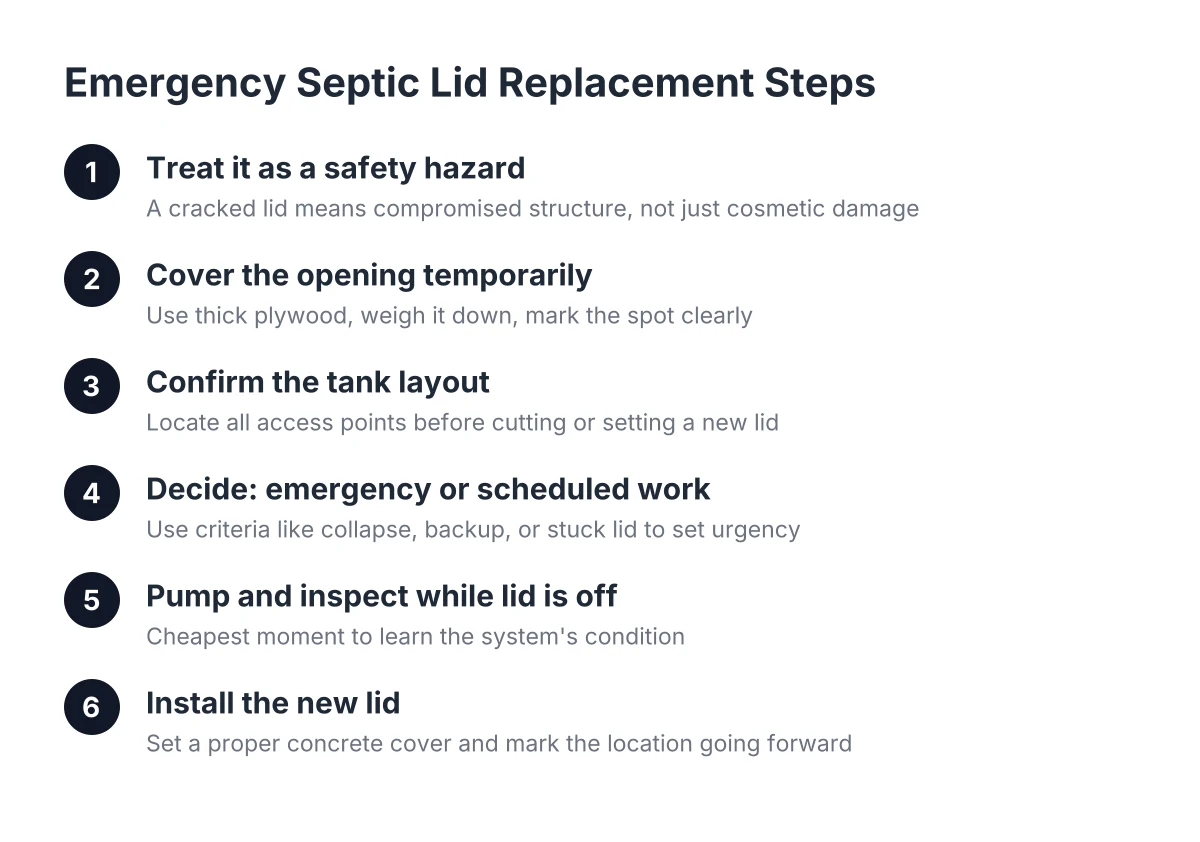
    Six-step process diagram for emergency septic lid replacement from hazard to installation
    The step-by-step process for safely handling a cracked or missing septic tank lid, as covered in this guide.

    A cracked or missing septic tank cover is not a "get to it next month" problem. An emergency septic lid replacement exists as a service for one reason: an open or failing lid is a fall-in hazard, a gas leak point, and an open door for dirt and debris to enter your tank. If you just bought High Desert land with no septic records and found a crumbling concrete cover, or no cover at all, this guide walks you through exactly what to do, in order, until the lid is safely replaced.

    This is written for the person who has already decided to fix it. You are not weighing options anymore. You need the hole covered safely today and a proper concrete lid installed as soon as the crew can get there.

    Step 1: Treat the Broken Lid as a Safety Hazard, Not a Repair Item

    First, understand what you are dealing with. A septic tank is a buried concrete box full of wastewater, and the lid is the only thing between the surface and a drop of several feet into liquid. A cracked lid, or a lid someone replaced with a rock, a board, or a trash can lid, can shift or collapse under the weight of a child, a pet, or an adult stepping on it.

    Concrete lids are heavy but structurally fragile. Gas buildup inside the tank corrodes some lids from the inside, so a cover can look solid on top while it is brittle underneath. That is why a lid that "seems fine except for one crack" still counts as an emergency septic tank lid situation. The crack tells you the structure is compromised; you cannot see how far the damage goes.

    Keep everyone away from the area right now. Rope it off, move vehicles, and keep kids and dogs on the other side of the yard until the opening is secured.

    Step 2: Cover the Opening Temporarily and Correctly

    Next, put a safe temporary cover over the tank opening. Do not balance the broken lid pieces back over the hole, and do not use a loose object like a rock or a plastic bin lid. Those dislodge easily, and a dislodged cover over an open tank is the single most dangerous condition a septic system can have on a residential lot.

    Here is what a safe temporary cover looks like:

    • A sheet of plywood at least 3/4 inch thick, large enough to overlap the opening by a foot on every side
    • A thin layer of dirt or gravel on top of the plywood to weigh it down and keep it from sliding
    • Something heavy on the corners if wind is a factor, which it often is in Hesperia
    • A visible marker, like a stake or a cone, so nobody drives or mows over the spot

    This is a bridge, not a fix. Plywood degrades, and it will not support a vehicle. It buys you a safe day or two until a proper concrete septic tank cover goes in.

    Step 3: Confirm What You Actually Have Under the Ground

    Before anyone can cut, cast, or set a new lid, you need to know the tank layout. This is the step that trips up land buyers with no records. If the previous owner left you nothing, you may not know whether the broken cover you found is the main access lid, a secondary compartment lid, or an old riser someone abandoned.

    Septic tank shapes and configurations vary regionally; some areas use rectangular concrete tanks while others use circular tanks, according to the International Code Council. A rectangular tank in the High Desert often has more than one access opening. Finding one broken lid does not mean you have found the whole tank.

    A septic tank locating service handles this. The crew traces the line from the house, probes carefully to find the tank edges, and marks every access point. Careful probing matters here: jabbing a probe rod straight down onto a lid with force can punch through a brittle cover and make the emergency worse. If you are probing yourself, work around the edges, not on top of the lid.

    For example, suppose you just closed on two acres outside Hesperia with a 1970s house and zero septic paperwork. You find a cracked concrete disc near the back porch and assume that is the tank. A locate could show the disc is a cleanout cover, and the actual tank with its failing lid sits 30 feet away under a woodpile. Replacing the wrong cover would have left the real hazard untouched.

    Step 4: Emergency Septic Lid Replacement or Scheduled Work

    Now decide how fast this has to move. Not every damaged cover needs same-day work, but some do. Use these criteria:

    1. The tank is open or the cover has collapsed. This is an emergency. Secure it per Step 2 and get a crew out as fast as possible.
    2. The lid is cracked but intact and the tank is not backing up. Schedule the replacement promptly, keep the area roped off, and do not let anyone stand on the lid.
    3. Sewage is backing up into the house along with the lid damage. You need septic backup and overflow response, not just a new cover. The lid gets handled as part of the emergency pumping visit.
    4. The lid will not come off for a needed pump-out. Sometimes a corroded lid cannot be pried loose. In that case, breaking the old lid and replacing it with a new one is an accepted approach; it is destructive on purpose so the tank can be serviced.

    If your situation is number 3, mention the backup when you call. A clogged inlet baffle is a common cause of septic backups and should be one of the first things checked when troubleshooting a blocked line into the tank, according to the Washington State Department of Health. The crew will want lid access to check it, which is another reason the cover work and the pumping usually happen in the same visit.

    Step 5: Get the Tank Pumped and Inspected While the Lid Is Off

    Once the old lid is off, the tank is open anyway. This is the cheapest moment you will ever have to learn the condition of a system you know nothing about. Have the tank pumped and inspected before the new lid goes on.

    For a land buyer with no records, this single visit answers the questions that have been hanging over the purchase: how full the tank is, whether the baffles are intact, whether the walls show damage, and whether the outlet toward the drain field looks right. A properly built outlet sits lower than the inlet so only liquid, not floating solids, leaves toward the drain field, according to University of Nebraska-Lincoln Extension. An inspector can see that with the lid off.

    The cost math supports doing it now. According to Angi data, septic tank pumping averages $427, ranging from $250 to $1,250 or more depending on tank size and location. Compare that with the EPA estimate that septic tank repair or replacement typically runs $5,000 to $15,000. A pump-and-inspect while the tank is already open is a small line item next to the surprise of a failed system you did not check.

    Ask for the findings in writing. If you are still in escrow, a written inspection report is what your lender or the county will want to see, and it gives you leverage if the system turns out to be in bad shape.

    Step 6: Installing an Emergency Septic Tank Lid Replacement

    The replacement itself is the fastest part. An emergency septic tank lid replacement means either fitting a precast cover sized to the opening or pouring a custom concrete lid to match an odd or older opening. Custom pours matter on older High Desert tanks, where openings do not always match modern precast sizes. Replacing just the lid this way costs far less than replacing the tank itself.

    If your lid sits deep below grade, this is also the time to ask about a riser. A riser brings the access point up to ground level with a secure cover, so the next pump-out does not require digging. One trade-off to know: plastic riser lids with molded handles can snap when pulled, and screw mounting points wear over time, so a riser cover is a maintenance item too, not a forever part.

    Whatever cover goes on, confirm it is fully secured before the crew leaves. Every screw or fastener goes back in so the lid cannot be dislodged by a curious kid or a shifting load of soil. Also confirm the fill around the lid and any pipe penetrations gets compacted; loose backfill settles and stresses the connections, a point installation guides from Onsite Installer stress for exactly this reason.

    Step 7: Mark the Location and Set a Simple Maintenance Rhythm

    Finally, do the thing the previous owner never did for you: record where everything is. Sketch the tank location, lid positions, and the line from the house. Measure from two fixed points, like house corners. Take photos before the dirt goes back. Future you, or a future buyer, will not have to hire a locate crew to find what you already uncovered.

    Then put the system on a schedule. The EPA recommends a professional inspection at least once every three years for the average household, and once a year for systems with pumps, floats, or other mechanical parts. In addition, watch household water use; a single leaky or running toilet can push as much as 200 gallons of extra water per day into a septic system, according to the U.S. Environmental Protection Agency, and that kind of load shortens the life of everything downstream of your new lid.

    When an Emergency Septic Lid Job Needs More Than a Cover

    Sometimes the broken lid is a symptom, not the whole problem. If the crew finds a collapsed baffle, cracked tank walls, standing water over the drain field, or sewage surfacing in the yard, the fix goes beyond a new cover. At that point you need a full system assessment before spending more money, especially if you are mid-purchase and can still negotiate.

    Skip the shortcut fixes while you sort it out. Additives marketed to dissolve sludge lack strong scientific backing, according to Washington State University Extension, and they will not repair a structural problem. A cracked cover and a struggling tank both come down to the same answer: get eyes on the system, get it pumped, and get a proper concrete lid set and secured. Anything less leaves an open hole in your yard and an open question over your property.

    If you need your septic tank serviced, Hesperia Septic can help.


    Prefer to talk it through? Call (760) 249-7872 — a quick call is usually the fastest way to get a straight answer for your situation.
    Related Reading

  • Concrete Septic Tank Lid Replacement: What to Expect, Timing, and Pricing

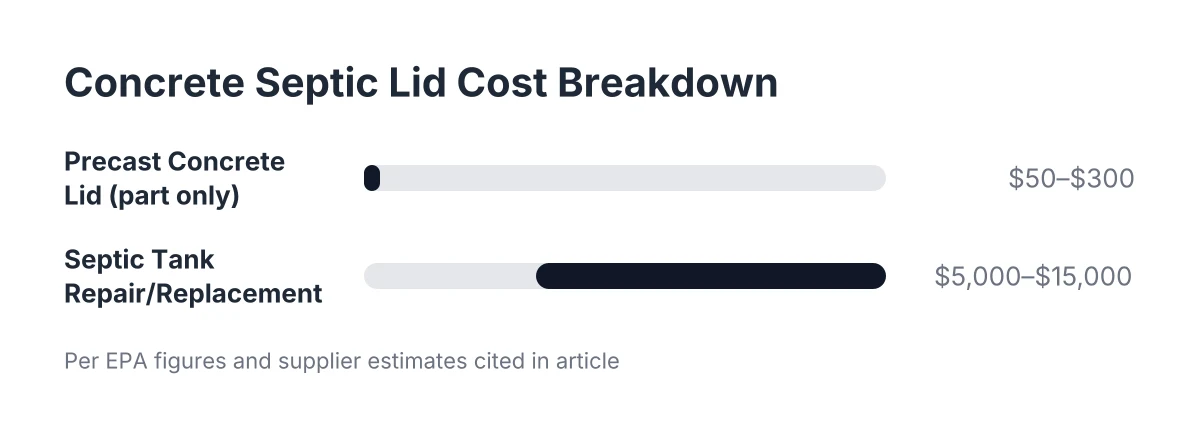
    Cost range chart comparing concrete septic lid cost to full septic tank repair
    Replacing a concrete septic lid typically costs far less than full tank repair, as outlined in this guide.

    A cracked or missing concrete septic tank lid is more than an eyesore. It is an open hole in your yard that a kid, a pet, or a lawn mower wheel can find before you do. If you are in Hesperia and just discovered a broken lid, or a pumping crew told you yours will not survive another opening, this guide walks you through the replacement process step by step. You will see what happens at each stage, how long it takes, where the concrete septic lid cost breaks down, and where the money goes, so you can decide whether to schedule it now or fold it into your next septic tank pumping visit.

    One quick note before the steps: the lid and the tank are not the same thing. Septic tanks are built from solid, reinforced concrete. The access lids are lighter, often a foam core wrapped in concrete, so a crew can lift them off for pumping. That difference matters, because replacing a lid is a fraction of the cost of replacing a tank. The EPA estimates septic tank repair or replacement typically costs between $5,000 and $15,000, according to U.S. Environmental Protection Agency figures, while a lid swap is usually a few hundred dollars. Catching lid damage early keeps you on the cheap side of that gap.

    Step 1: Confirm the Lid Is Actually the Problem

    Start by looking at what is broken before you order anything. A concrete septic tank lid fails in a few predictable ways: hairline cracks that spread, chipped or crumbling edges, a lid that rocks when you step near it, or a lid that has partially collapsed into the opening. Any of those means the lid needs to go.

    However, some symptoms point past the lid. Sewage smell, wet spots in the yard, or slow drains inside the house suggest a full tank or a drain field issue, not a cover problem. In that case, you need septic tank pumping or an inspection first, and the lid becomes the second item on the list. A typical residential system has two main parts, a tank that settles the wastewater and a drain field that disperses the liquid into the soil, according to US EPA, and lid damage only affects the first one.

    If the lid is cracked but still in one piece, do not stand on it and do not let anyone else near it. Concrete lids and internal baffles corrode over decades, especially on older tanks that have never been opened, so a lid that looks solid can be weaker than it appears.

    Step 2: Locate and Expose the Tank Opening

    Next, find the lid if it is buried. In Hesperia, many tanks sit under 6 to 18 inches of soil, and it is uncommon for a lid to be sitting exposed and ready when a crew arrives. If you do not know where your tank is, check for a previous pumping receipt, a county record, or the cleanout line direction from the house. A septic tank locating service can find it with equipment if the paper trail is dead.

    Digging out the access yourself before the crew shows up can save you money on the concrete septic lid cost. Most companies charge extra when they have to locate a buried lid and excavate it, since that adds an hour or more to the job. If you dig it out ahead of time, be careful around the edges of the opening; do not pry at a cracked lid, and stop if the concrete starts to crumble.

    Once the lid is exposed, cover the area temporarily. A sheet of plywood weighted with a thin layer of dirt over the opening keeps people and pets from falling in while you wait for service. An open septic tank is one of the most dangerous things on a residential property, so treat this step as non-negotiable.

    Step 3: Measuring and Sizing for Concrete Septic Lid Costs

    Concrete septic tank lids are not one-size-fits-all. Tank shapes and configurations vary by region; some areas use rectangular concrete tanks and others use circular ones, according to International Code Council, and the lids follow the tank design. Common round lid diameters run from about 18 to 30 inches, while rectangular tanks may use larger slab-style covers.

    Measure the opening itself, not the old lid, since a broken lid may have lost material at the edges. Note three things:

    • The shape of the opening (round, square, or rectangular)
    • The inside dimensions across the opening
    • The lip or ledge depth where the lid seats

    In addition, check whether your setup includes a riser, the vertical extension that brings the access point up to grade. If the old lid sat on a riser, the new one must match the riser diameter, not the tank opening below it. Getting these numbers right the first time avoids a second trip and a second delivery charge.

    Step 4: Choose Between a Precast Lid and a Custom Pour

    For most Hesperia homeowners, a precast concrete septic tank lid from a local supplier is the fastest option. Standard sizes are stocked, and a crew can pick one up and install it the same day in many cases. Precast lids typically run in the range of $50 to $300 for the part itself, depending on size and reinforcement, though that is an illustrative estimate and local prices vary.

    However, older tanks with odd-sized or hand-built openings sometimes will not accept a standard lid. In that scenario, a custom concrete lid can be poured to fit the existing opening. This costs more in labor and adds cure time, but it is still far cheaper than replacing the tank box itself. If your tank is from the 1970s or earlier, plan for the possibility that a custom fit is the only clean option.

    You may also see plastic lids marketed as replacements. They are lighter and easier to handle, but a concrete cover holds up better under High Desert sun exposure and casual foot traffic. If the lid sits where a vehicle could ever roll over it, tell your crew, because that requires a traffic-rated cover and possibly a different setup entirely.

    Step 5: Schedule the Swap Around a Pumping Visit If You Can

    Timing the lid replacement with septic tank pumping saves money, because the tank has to be opened either way. Since the average household should have its system inspected at least once every three years by a professional, according to U.S. Environmental Protection Agency, a lid check fits naturally into that visit. For example, if a crew is already on site pumping and spots a cracked lid, adding the replacement often costs little more than the price of the new cover.

    For reference on the pumping side, Angi data puts the average cost of septic tank pumping at $427, with a range of $250 to $1,250 or more depending on tank size and location, according to Angi. A lid-only visit with no pumping usually lands well under that, mostly labor plus the cover itself.

    Suppose a homeowner in Hesperia calls at 7pm because a toilet is backing up, and the crew that pumps the tank the next morning finds the lid crumbling at the edges. In that scenario, the smart move is to authorize the lid swap on the spot rather than schedule a separate trip, because the excavation, the hardest part of the job, is already done.

    Step 6: Install, Seal, and Backfill the New Cover

    Actual installation is the quick part. The crew sets the new lid onto the cleaned seat of the opening or riser, checks that it sits flush without rocking, and seals the joint where required. If a riser is being added at the same time, most of the total job time still goes to the digging; assembling and setting the riser itself moves fast once the tank is exposed.

    Before backfill, a layer of plastic sheeting over the lid keeps dirt and debris from working into the seams and falling into the tank. Then the soil goes back in and gets compacted so the area does not settle into a depression over the next few rainstorms. If you want easier access next time, ask about setting the lid at or near grade with a riser, which eliminates future digging fees at every pumping.

    One trade-off worth naming: a lid at grade is convenient, but it is also visible in the yard and needs a secure, child-resistant fit. Some homeowners prefer a few inches of soil over the cover for looks, accepting a small dig at each service visit.

    Step 7: Document the Location and Set a Reminder

    Finally, write down where the tank access sits before the yard heals over. Measure from two fixed points, like a house corner and a fence post, and keep the note with your home records. This one habit removes the locating fee from every future service call and makes emergency septic pumping faster if you ever face a backup at night.

    Set a reminder for your next inspection while you are at it. Alternative systems with pumps or float switches should be checked once a year, and standard systems at least every three years, according to U.S. Environmental Protection Agency guidance. Each of those visits is a free look at your new lid.

    How Much Does Concrete Septic Lid Cost in 2026?

    Concrete septic lid cost for replacement in 2026 typically runs from roughly $150 to $600 all-in for a standard residential swap, as an illustrative estimate covering the precast cover, labor, and basic sealing. Costs climb toward $800 or more when the job needs deep excavation, tank locating, a custom-poured lid, or a new riser.

    Here is where the money actually goes on a typical job:

    • The lid itself, with precast covers on the low end and custom pours on the high end
    • Excavation, which is often the biggest labor line if the tank is buried deep or the location is unknown
    • Locating fees, if no one knows where the tank is
    • A riser and adapter, optional but a one-time cost that pays back at every future pumping
    • Trip charges, which you avoid by bundling with scheduled septic tank pumping

    Commercial properties follow the same logic at a larger scale. A restaurant or RV park on a recurring grease trap or holding tank pumping schedule should have covers checked at every service, since a failed lid at a business is a liability issue, not just a repair. Septic tank lid replacement on a commercial account works best as a line item caught during routine service rather than an emergency call after someone steps through a weak cover.

    When to Call a Professional Instead of Handling It Yourself

    Call a professional any time the tank structure, baffles, or plumbing connections are in question, not just the lid. A crumbling lid on an old tank sometimes signals wider concrete deterioration inside, and only someone looking into an open, pumped tank can tell you which situation you have. Structural tank repair and system design work also fall under installer licensing that goes beyond a pumping operation, so a pumping crew that finds structural damage will point you to the right specialist.

    For a straightforward lid swap on a sound tank, though, the process is exactly what you just read: confirm, expose, measure, choose, schedule, install, and document. Handled that way, a broken concrete septic tank lid is a one-visit fix, not the start of a five-figure project.

    If you need your septic tank serviced, Hesperia Septic can help.


    Prefer to talk it through? Call (760) 249-7872 — a quick call is usually the fastest way to get a straight answer for your situation.
    Related Reading

  • How to Replace a Broken Septic Tank Lid: The Step-by-Step Process Explained

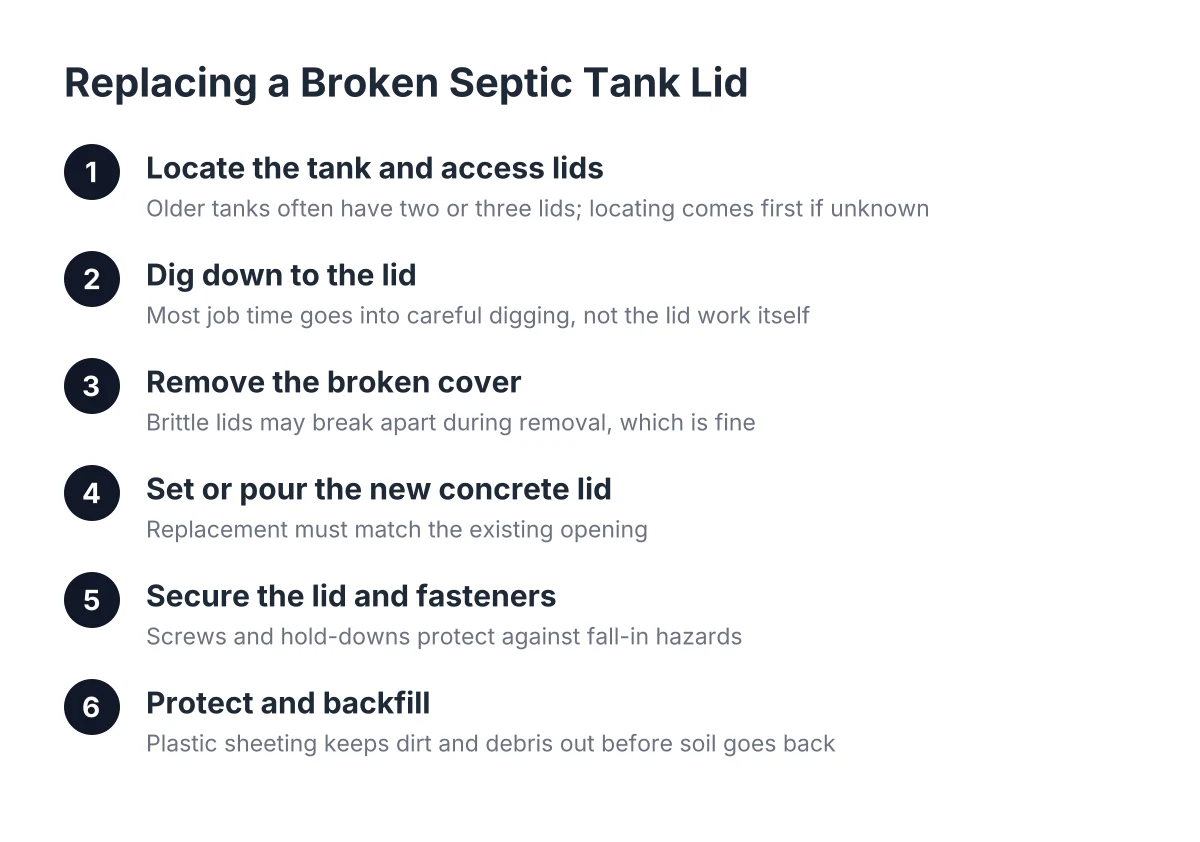
    Steps showing how a crew replaces a broken septic tank lid
    The typical step-by-step process a crew follows to replace a broken septic tank lid.

    If you need to replace a broken septic lid, the process is more straightforward than most Hesperia homeowners expect. The lid is a separate piece from the tank itself, so a cracked or crumbling cover usually means a targeted swap, not a full system project. This FAQ walks through the steps a crew follows, what you should do before they arrive, and how to keep the new lid in good shape.

    Does a broken lid mean I have to replace the whole septic tank?

    No, a broken lid almost never means the whole tank has to go. The lid, sometimes called the cover, is a separate concrete piece that sits over the access opening. A crew can remove the damaged cover and set or pour a new one to fit the existing opening, leaving the tank box alone.

    That matters for your budget. According to the U.S. Environmental Protection Agency, septic tank repair or replacement typically runs between $5,000 and $15,000. A lid swap sits at a small fraction of that, which is why confirming the damage is limited to the cover is the first thing a good crew checks.

    However, if the tank walls themselves are cracked or the concrete around the opening has deteriorated badly, the fix gets bigger. That is one scenario where you want a professional inspection before anyone quotes a number.

    How does a crew replace a broken septic tank lid, step by step?

    Replacing a broken septic tank lid follows a predictable sequence: locate the tank, expose the lid, remove the damaged cover, fit or pour a new concrete lid, secure it, and backfill. On most jobs, digging takes longer than the actual replacement. Here is how the process usually goes:

    1. Locate the tank and its access lids. Older tanks often have two or three lids at the front, middle, and back. If you do not know where yours sits, septic tank locating comes first.
    2. Dig down to the lid. Most of the total job time goes into careful digging, not the lid work itself. Probing has to be done gently, because forcing a probe into a weakened lid can punch through it.
    3. Remove the broken cover. Corroded or brittle lids sometimes break apart during removal, which is fine since they are being replaced anyway.
    4. Set or pour the new concrete lid. Openings vary by tank shape and era, so the replacement must match the existing opening. Some jobs call for a poured-to-fit lid; others take a standard concrete septic tank cover.
    5. Secure the lid and any fasteners. Screws and hold-downs go back in fully so nothing can be dislodged, which protects kids and pets from a fall-in hazard.
    6. Protect and backfill. A layer of plastic sheeting over the lid before backfilling keeps dirt and debris out of the tank, then soil goes back over the top.

    A typical crew that already knows Hesperia and High Desert tank setups can move through this quickly, because they have seen the common local tank configurations before.

    What should I do before the crew arrives?

    Before the crew arrives, mark anything you know about the tank location, clear the area above it, and keep people and pets away from the damaged cover. If the old lid is cracked or partially collapsed, do not stand on it or lay a loose rock or board over the hole. A loose covering is easy to knock aside and is a serious fall-in risk, especially for children.

    In addition, gather any paperwork you have. Say a homeowner in Hesperia bought the house four years ago and has a county diagram or an old pumping receipt in the closing documents; in that scenario, the diagram can save an hour of locating work. If you have nothing, that is common too, and locating equipment handles it.

    Should the tank be pumped when the lid gets replaced?

    Pumping at the same time as a lid replacement usually makes sense, because the tank is already dug up and open. Combining septic tank pumping with the lid work saves you a second excavation later, and it lets the crew look at the inside of the tank while it is empty.

    For a Routine Maintainer who is not sure when the tank was last pumped, this is the natural moment to reset the clock. According to Angi data, septic tank pumping averages $427, with a range of $250 to $1,250 or more depending on tank size and location. Once it is done, you can put the next service on a calendar instead of guessing.

    Why do concrete septic lids crack or fail in the first place?

    Concrete septic lids fail from age, gas exposure, and physical stress. Gases inside the tank corrode the underside of the lid over the years, so a cover can look fine from above while turning brittle underneath. That is why some lids snap when pried open, even though nothing ever drove over them.

    Other common causes include vehicles or equipment crossing the tank area, tree roots shifting the cover, and plastic handles that snap off and force the lid to be broken for access. Round lids on some tanks tend to corrode from the inside faster than older tapered designs, which makes them prone to breaking during service.

    Is it worth adding a riser when you replace a broken septic tank lid?

    Adding a riser during a lid replacement is often worth it, because the expensive part of the job, the digging, is already done. A riser brings the access point up to or near ground level, so future septic tank pumping and inspection visits skip the excavation entirely. Installing the riser itself is quick once the lid is exposed.

    For example, suppose your lid sits two feet down in hard High Desert soil. Every future pumping visit starts with digging unless a riser goes in now. For a homeowner who wants a maintenance schedule they do not have to think about, a riser turns every future visit into a lift-and-pump job.

    The trade-off is a visible cover in the yard and a modest added cost on this visit. Some homeowners prefer the buried look and accept the digging later; that is a fair choice as long as the lid location is documented.

    Can I replace a broken septic tank lid myself?

    Replacing a septic tank lid yourself is possible but risky, and for most homeowners it is not worth it. Concrete lids are heavy, tapered pieces that must be aligned carefully rather than dropped into place, and an open tank is a genuine fall hazard while the work happens. Tank gases are also dangerous in an open, unventilated excavation.

    There is also the fit problem. Tank shapes and openings vary by region and era; some areas use rectangular concrete tanks and others use circular ones, according to the International Code Council. A mismatched cover can leave gaps that let soil in or fail under weight. If the opening itself is deteriorating, or you find standing water around the tank, stop and bring in a professional, because that points to a problem bigger than the lid.

    How do I keep the new lid in good shape after a septic tank lid replacement?

    Protecting a new lid comes down to three habits: keep weight off it, keep it secured, and get eyes on it regularly. After any lid replacement, never let vehicles, trailers, or heavy equipment cross the tank area, and confirm that all fasteners went back in after each service visit.

    Fold the lid check into your regular maintenance rhythm. The U.S. Environmental Protection Agency recommends a professional inspection at least once every three years for the average household, and once a year for systems with pumps or float switches. Each inspection is a built-in chance to catch corrosion on the lid before it becomes the next thing you have to replace. Fixing household water problems helps too; per the U.S. Environmental Protection Agency, a single running toilet can push as much as 200 extra gallons per day into a septic system, adding load the whole system has to handle.

    What does a broken lid mean for the rest of my septic system?

    A broken lid by itself usually does not harm the rest of the system, but it removes the barrier protecting it. A conventional system has two main components, the septic tank and the drain field, according to the U.S. Environmental Protection Agency. An open or crumbling lid lets soil, debris, and runoff into the tank, and that added material can eventually push solids toward the drain field, where the expensive damage happens.

    Therefore, treat a cracked or missing cover as a now problem, not a someday problem. The lid swap is one of the cheaper septic fixes you will ever schedule; the drain field trouble it can prevent is one of the most expensive. Handling it promptly, and pairing it with pumping if the tank is due, is how you stay the neighbor whose yard never smells like anything at all.

    If you need your septic tank serviced, Hesperia Septic can help.

    Related guide: septic tank lid replacement — Complete Guide

    Prefer to talk it through? Call (760) 249-7872 — a quick call is usually the fastest way to get a straight answer for your situation.
    Related Reading

  • 7 Signs Your Septic Tank Lid Needs Replacement: Cracks, Damage, and Wear

    Diagram listing signs a cracked septic lid needs replacement, from cracks to missing lids
    Seven warning signs to check before your septic tank lid fails completely.

    Most people watch for signs your septic tank is full, but far fewer check the lid sitting on top of it. That concrete cover is the only thing standing between your yard and an open tank of sewage. In Hesperia and across the High Desert, sun, heat swings, and dry soil are hard on concrete septic tank covers. A cracked or crumbling lid is a safety hazard first and a repair job second, and it often shows warning signs long before it fails completely. Understanding the signs that indicate a cracked septic lid is critical to protecting your home and property.

    This list walks through seven signs your septic tank lid is damaged, deteriorating, or unsafe, plus what each one means for a homeowner dealing with a problem right now or a landlord managing a rental from a distance.

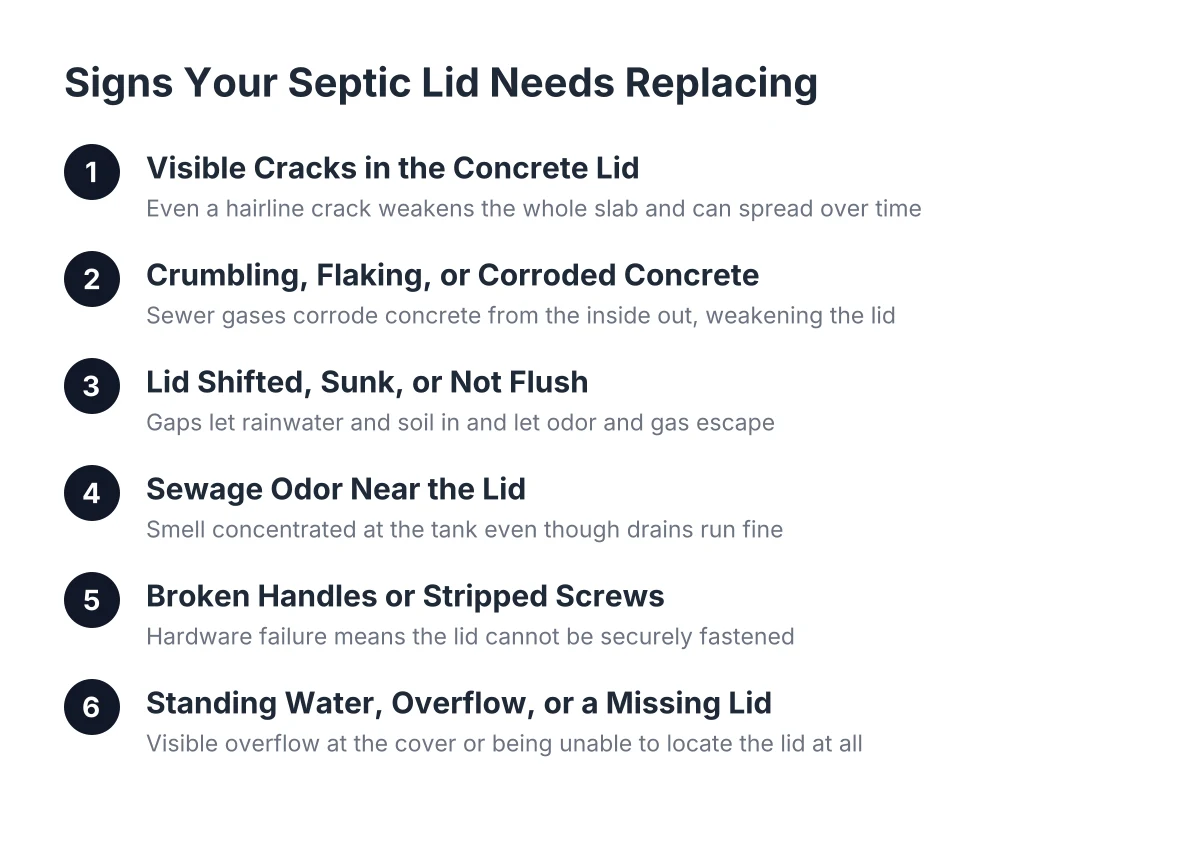
    1. Visible Cracks Running Across the Concrete Lid

    A crack in a concrete septic tank lid is never cosmetic. The lid carries its own weight plus whatever sits on it, so even a hairline crack weakens the whole slab. Concrete lids are heavy but structurally fragile; a crack that looks stable today can spread after one more hot summer or one vehicle rolling over the tank area.

    Cracks usually come from two sources: age-related brittleness in the concrete, or weight the lid was never designed to hold, like a truck, trailer, or RV parked over the tank. If you can see a crack from the surface, assume the underside looks worse. Moisture and septic gas attack the lid from below, where you cannot see the damage.

    The good news for the budget is that a broken lid does not mean a broken tank. Replacing just the cover is far cheaper than replacing the tank itself, and a new concrete lid can be poured or fitted to match the existing opening. For scale, the U.S. Environmental Protection Agency estimates full septic tank repair or replacement typically runs $5,000 to $15,000, which is exactly the bill a timely lid fix helps you avoid.

    2. Signs of a Cracked Septic Lid: Crumbling, Flaking, or Corroded Concrete

    Concrete septic covers do not fail all at once. They deteriorate. If the edges of your lid flake off when touched, or the surface has gone from smooth to sandy and pitted, the concrete is losing strength throughout, not just where you can see it.

    Gas buildup inside the tank drives much of this. The sewer gases in a septic tank corrode concrete from the inside out, which is why a lid can look passable on top while the underside is soft and brittle. Round lids on some tank designs are especially prone to this; they turn fragile enough to break when someone pries them open for service.

    Therefore, treat crumbling concrete the same as a crack. A deteriorated lid should be replaced promptly, because a weak cover, or worse, a makeshift one like a rock or plywood sheet, can be dislodged easily and creates a fall-in hazard, especially for children and pets.

    3. The Lid Has Shifted, Sunk, or No Longer Sits Flush

    A septic tank cover should sit level and flush on its opening. If your lid has sunk on one side, rocks when stepped near, or has a visible gap at the rim, the seal is broken. Gaps let rainwater and soil into the tank and let odor and gas out.

    Settling soil is a common cause in the High Desert, where dry ground compacts and shifts over time. Proper installation matters here; the fill around a tank and its pipe connections needs thorough compaction to prevent settling damage, according to Onsite Installer. A lid that has shifted may also mean the riser or tank rim underneath is damaged, which is worth a professional look during the same visit.

    In addition, a lid that no longer seats correctly is a sign your septic tank access was disturbed at some point. Landscapers, past service visits, or a vehicle can all knock a cover out of position without anyone noticing until the smell starts.

    4. Sewage Odor Near the Lid, Even When the System Drains Fine

    Odor around the tank area is one of the most searched signs your septic tank has a problem, and the lid is often the culprit. A sound, properly seated concrete cover contains most odor. A cracked or gapped one lets septic gas escape straight into your yard.

    Here is the useful distinction. If drains inside the house run normally and the smell is concentrated right at the tank location, suspect the lid or riser seal before assuming the whole system is failing. If the odor comes with slow drains across the whole house or gurgling fixtures, those are classic signs your septic tank needs to be pumped, and the lid may be a separate issue found during the same service call.

    For example, say a landlord in Hesperia gets a tenant call about a sewage smell in the side yard. The tenant reports the drains work fine. In that scenario, a crew can locate the tank, check the cover, and often find a cracked or unseated lid rather than a full or failing system. That is a one-visit fix instead of a habitability dispute.

    5. Broken Handles, Stripped Screws, or Access Issues with a Cracked Septic Lid

    A lid you cannot open safely is a lid that is due for attention. Plastic handles on septic covers are known for snapping off when pulled, and once that happens, service crews sometimes have to break the lid to get in, then replace it with a proper cover or an access riser. When homeowners observe signs of a cracked septic lid in the hardware—stripped mounting points or loose covers—the time to act has come.

    The fastening hardware matters just as much as the slab. Screw mounts on risers and covers wear out, and once the mounting points are stripped or broken, the lid cannot be secured. An unsecured cover is the real danger; lids should always be fully screwed down or seated after service so nobody can dislodge them by accident.

    Watch for these hardware-level warning signs:

    • Handles that are cracked, loose, or already missing
    • Screws that spin without tightening, or heads rusted beyond use
    • A cover that lifts or slides when stepped on
    • Riser rims with broken tabs or stripped mounting points
    • Any lid held down by a rock, brick, or board instead of hardware

    Any item on that list means the cover is not doing its job. If a crew had to force or break the lid on the last pumping visit, plan on concrete septic tank lid replacement before the next one.

    6. Standing Water or Overflow Right at the Cover

    Wastewater pooling at the lid is never normal. A functioning septic tank should not be overflowing when opened; liquid at the surface means the tank is overfull, the outlet is blocked, or the system downstream is struggling. A damaged lid makes this worse by giving that sewage a direct path into your yard.

    However, sort the cause before deciding on the fix. Standing water at the cover is one of the strongest signs your septic tank is backed up or overdue for pumping, and no new lid will solve that. The sequence that works: pump the tank, inspect the tank and baffles while it is open, then replace the damaged cover so the repaired system stays sealed. Handling the lid during a pumping visit saves a second dig and a second service charge.

    This is also the point where a professional inspection earns its cost. Overflow can trace back to a saturated drain field or a failed baffle, and those calls require someone looking inside the tank, not a guess from the surface. The EPA recommends the average household have its septic system inspected at least once every three years, and a lid replacement visit is a practical time to get that done.

    7. You Cannot Find the Lid at All

    A missing or buried lid is its own warning sign. If you bought a home in Hesperia and have no idea where the tank sits, or the previous owner buried the access under landscaping, you have two problems: you cannot service the tank, and you have no idea what condition the cover is in.

    Septic tank locating solves the first problem, but the method matters for the second. Probing for a buried tank has to be done carefully, because jabbing a rod into an aged concrete cover can punch right through it. A crew that locates tanks regularly knows to ease off once they hit the lid rather than break a brittle cover while finding it.

    Once the tank is uncovered, this is the moment to decide on the lid's future. If the old cover is intact, it can be reburied with a protective layer over it, or upgraded with a riser that brings access to grade so nobody has to dig next time. If it is cracked or crumbling, replace it while the hole is already open. For a rental owner or small business operator managing property remotely, a riser is worth weighing; it means future grease trap or septic tank pumping visits happen without excavation and without you standing in the yard supervising.

    What a Septic Lid Replacement Visit Looks Like

    Replacing a septic tank cover is a contained job when the tank itself is sound. A typical crew will locate and expose the tank, remove the damaged concrete, measure the opening, and fit or pour a new concrete cover to match. Tank openings vary; some areas run rectangular concrete tanks while others use circular ones, according to the International Code Council, so the replacement has to match your specific tank rather than a one-size stock part.

    Expect a few decision points during the visit:

    1. Pump first or not: if the tank is full or backed up, pumping comes before any lid work.
    2. Lid only or riser upgrade: a riser costs more up front but ends the digging on every future visit.
    3. Concrete or heavy-duty composite: concrete matches most existing High Desert tanks; either way, the cover must be rated for burial and secured.
    4. Backfill protection: a proper crew covers the new lid with plastic sheeting before backfilling so soil and debris cannot fall into the tank.

    One honest caveat: a new lid fixes a lid problem, nothing more. If the tank walls are cracked, the baffles have failed, or the drain field is saturated, the cover is the least of your concerns, and you need a full septic system inspection before spending on cosmetics. A local crew that pumps and inspects tanks daily can tell you which situation you have while the tank is open.

    The Bottom Line for Hesperia Property Owners

    The lid is the cheapest part of your septic system to replace and the most dangerous to ignore. Cracks, crumbling concrete, gaps, broken hardware, odor at the tank, overflow, and a lost access point are all signals worth acting on this season, not next year. In 2026, with full system replacement running into five figures by EPA estimates, a concrete cover swap is one of the few septic jobs that is both urgent and affordable.

    Whether you are a homeowner staring at a cracked cover after a backup or a landlord fielding a tenant complaint from across town, the path is the same: get the tank located, get it inspected while it is open, and get a solid, secured concrete cover on it before someone finds the weak spot the hard way.

    If you need your septic tank serviced, Hesperia Septic can help.

    Prefer to talk it through? Call (760) 249-7872 — a quick call is usually the fastest way to get a straight answer for your situation.
    Related Reading

  • Septic Tank Lid Replacement Cost Factors: Concrete vs. Plastic Covers

    septic tank lid replacement

    If you own a rental property or small commercial building in Hesperia with a septic system, a broken tank lid is one of those problems that seems minor until it isn't. A cracked or missing cover is a safety hazard, an odor source, and often the first thing a tenant or health inspector notices. Septic tank lid replacement is usually a fast, contained repair, and it costs far less than most owners fear. The real question is what kind of cover goes back on, because the choice between concrete and plastic drives most of the cost and most of the long-term headaches.

    This guide walks through why lids fail, what a proper replacement includes, what pushes the price up or down, and how the concrete versus plastic decision plays out on real properties in the High Desert. If you are here to work out what septic tank lid replacement cost comes down to for a Hesperia property, the short version is that the cover material and the depth of the dig set most of the number, and the sections below show how. If you manage a rental from a distance, or you run a business where a tenant or inspector found the problem before you did, this is written for you.

    Why a Broken Septic Tank Lid Replacement Is Essential

    A septic tank lid does three jobs. It keeps people and animals out of the tank, it keeps dirt and debris from falling in, and it seals in the gases the tank produces. When the lid cracks, sinks, or goes missing, all three of those protections fail at once.

    The safety issue comes first. A septic tank is deep enough and full enough that a person falling in can drown, and an old lid that looks solid can give way under a footstep. For a landlord, that risk sits on your property whether you know about the lid or not. Kids, pets, and maintenance workers all walk over that patch of yard.

    Next comes contamination. An open or cracked lid lets soil, rocks, and yard debris fall into the tank. That material does not break down. It takes up capacity, and it can interfere with the outlet that feeds your drain field. Since the drain field is the expensive half of the system, anything that threatens it deserves attention. According to the U.S. Environmental Protection Agency, a typical residential septic system has two main components: a tank that clarifies wastewater and a drain field that disperses the clarified liquid into the ground. Protect the second one by keeping the first one sealed.

    Finally, there is the smell. Septic gas escaping through a bad lid seal is often the first symptom a tenant reports. If you have ever gotten the call that starts with "something smells bad in the backyard," a compromised lid is one of the first things a crew will check.

    How Septic Lids Fail in the High Desert

    Most septic tanks in this area are reinforced concrete boxes buried a foot or two below grade. The tank walls are solid, heavy concrete. The access lids are different. They are typically a lighter foam-core construction with a concrete surface layer, built that way on purpose so a pumping crew can lift them without machinery. That lighter build is also why lids fail long before tanks do.

    A few failure patterns show up again and again:

    • Gas corrosion from the inside. The gases inside a septic tank slowly eat at the underside of the lid. Round lids in particular can become brittle over the years, then crack apart the first time someone pries them open for pumping.
    • Snapped handles. Plastic pull handles on older lids break off under load. Once the handle is gone, the lid often has to be broken to open the tank, which means it needs replacement anyway.
    • Vehicle and equipment damage. A car parked over the tank, a trailer backed across the yard, or landscaping equipment can crack a lid that was never rated for that weight.
    • Age and weathering. Hesperia's temperature swings, hot summers and freezing winter nights, cycle the concrete surface and open hairline cracks over time.
    • Rough past service. Lids that were pried carelessly during a past pumping or inspection often carry chips and cracks that grow with each visit.

    The pattern worth noting for a property owner: lids frequently fail at pumping time. A crew shows up to pump the tank, goes to lift the cover, and the cover crumbles or the handle snaps. That is not the crew being rough; it is the lid finally showing damage that gas corrosion caused years earlier. It also means the smart time to deal with a questionable lid is during scheduled service, not during an emergency backup.

    What Septic Tank Lid Replacement Includes

    A proper septic tank lid replacement covers more than dropping a new cover on the hole. Done right, the job includes locating and exposing the tank access, removing the broken lid safely, checking the opening and the tank rim for damage, fitting a correctly sized replacement cover, and sealing and backfilling so the repair stays clean.

    Here is the sequence a typical crew follows:

    1. Locate the tank access. On many older Hesperia properties, nobody knows exactly where the lid sits. Septic tank locating is its own task, and it comes first if the access is buried or undocumented.
    2. Dig and expose. The crew clears soil off the lid and the tank rim so they can see the full opening and the condition of the surrounding concrete.
    3. Remove the damaged lid. Broken pieces come out carefully so debris does not fall into the tank. Fragments already in the tank get noted, and if the tank is due for pumping, this is the moment to do it.
    4. Inspect the opening. A cracked lid sometimes signals a cracked rim or a deteriorating tank top. Catching that now is the difference between a lid job and a much bigger conversation.
    5. Fit the new cover. The replacement has to match the opening. Tank shapes and openings vary; according to the International Code Council, septic tank shapes and configurations differ by region, with some areas using rectangular concrete tanks and others circular ones. Openings can be round or square, and the lid must fit the one you have.
    6. Seal, protect, and backfill. A good crew protects the new lid before backfilling so dirt and debris cannot work their way into the tank, then restores the grade over the top.

    What usually counts as extra: adding a riser to bring the access up to grade, pumping the tank while it is open, repairing a damaged tank rim, or replacing multiple lids on a two-compartment tank. None of those are upsells for their own sake. A riser, for example, means the next pumping visit does not start with a shovel, which matters if you own the property but never plan to be on-site for service.

    Concrete vs. Plastic Covers: The Cost Factors That Actually Matter

    The material question is where most of the cost variation lives, and it is not as simple as one being cheap and one being expensive. Each choice moves the price in different places: the part itself, the labor to fit it, and the cost of the next failure.

    Why concrete remains the default

    Concrete covers match the tanks most Hesperia properties already have. A concrete lid on a concrete tank seats properly, resists sun and heat, and stands up to decades of weather. Concrete also handles incidental weight better; a plastic lid that gets driven over is done, while a properly rated concrete cover has more margin.

    There is also a fit issue. Older concrete tanks were often built with openings that off-the-shelf plastic lids do not match. In those cases, the practical answer is a concrete cover sized to the existing opening, sometimes poured or cut to fit. That is a big part of why replacing just the lid costs a fraction of replacing the tank. The tank box is fine; only the access cover failed. A custom-fit concrete lid restores the system without touching the rest of it.

    Many installers in the septic trade simply prefer concrete, and there is a reason behind the preference. Plastic tanks and components have a track record of shorter lifespans and are more prone to crushing or deforming under soil pressure. Concrete is heavier to handle on installation day, but it stays put for decades.

    Where plastic covers make sense

    Plastic earns its place in one specific setup: riser systems. A riser is a vertical extension that brings the tank access from below grade up to the surface, capped with a secure plastic lid. If your tank sits deep, or if you want every future pumping visit to skip the digging, a riser with a plastic cover is often the right call.

    Plastic riser lids are lighter, they lock down securely, and they eliminate the pry-and-lift routine that breaks aging concrete covers in the first place. For a landlord who wants service visits to happen without anyone digging up the tenant's yard, that convenience has real value. The trade-off is upfront cost; adding a riser costs more than swapping a like-for-like concrete lid, and the payback comes over years of easier service.

    The cost factors, side by side

    For 2026 planning purposes, these are the variables that move the price of a lid replacement in either direction:

    • Depth of the tank. A lid six inches down is a quick hand-dig. A lid two feet down in compacted High Desert soil takes real excavation time.
    • Whether the tank needs locating. If nobody knows where the access is, locating adds time before the repair even starts.
    • Fit of the opening. A standard-size opening takes a stock cover. An odd or older opening may need a custom-fit concrete lid.
    • Concrete lid vs. riser with plastic cover. Like-for-like concrete is usually the lower upfront cost. A riser costs more now and saves labor on every future visit.
    • Condition of the tank rim. A clean rim means a straightforward job. A crumbling rim means repair work before the new lid can seat.
    • Bundled service. If the tank is open anyway, pumping at the same time avoids paying for excavation twice. For reference, Angi reports septic tank pumping averages $427, with a range of $250 to $1,250 or more depending on tank size and location.

    To keep the stakes in perspective: the EPA estimates septic tank repair or replacement typically runs $5,000 to $15,000. A lid is a small component of that picture. Catching a failed cover early, before debris damages the tank or the drain field, is one of the cheapest forms of insurance a septic property owner has.

    A Rental Property Scenario Worth Thinking Through

    Suppose you own a three-unit rental in Hesperia and a tenant texts you a photo of a sunken, cracked concrete disc in the side yard. You are two hours away and cannot meet anyone on-site. In that scenario, the sequence that protects you looks like this: get the area roped off or covered with something the tenant cannot step through, get a septic crew out to assess the lid and the tank opening, and decide on concrete versus a riser based on how the property gets serviced.

    For that hypothetical property, a like-for-like concrete cover restores safety at the lowest upfront cost. However, if you plan to hold the property for years and want pumping visits handled without your involvement, a riser with a locking cover means future crews find the access at grade, open it, service the tank, and leave. No digging, no calls asking where the tank is, no tenant disruption beyond a truck in the driveway. That is the version of septic ownership that does not require babysitting.

    Either way, ask the crew to document the work with photos and an invoice that describes what was replaced. If you ever face a habitability question or an insurance conversation, a dated record showing the access was secured is worth keeping in the property file.

    When to Call a Pro vs. Handling It Yourself

    There is a limited DIY lane here, and it is worth being honest about where it ends. A property owner can safely mark and rope off a damaged lid, keep people and pets away, and photograph the damage for the service call. If the existing cover is intact but heavy, leave it alone; lifting a concrete lid wrong is how backs get hurt and how lids get dropped and cracked.

    Everything past that point belongs to a crew that works on septic systems. Opening a tank exposes you to gases that can overwhelm a person in an open excavation, and an uncovered tank is a fall hazard the moment you walk away from it. Fitting a replacement also requires judgment about the opening, the rim condition, and whether the tank itself has a problem. Note that lid work can uncover bigger issues; if the tank top or rim is deteriorating, you will want a professional assessment before deciding anything, and full tank work involves licensing and design knowledge beyond what any guide can cover.

    Call for service now, not later, if you see any of these:

    • A visible hole, gap, or missing section over the tank
    • A lid that has sunk below the surrounding grade
    • Sewage odor concentrated near the tank area
    • A lid that shifts or rocks when stepped near
    • Cracks wide enough to see into

    Choosing a Crew for Septic Tank Lid Replacement Work in Hesperia

    Lid replacement is a small job, which means the main thing you are buying is judgment. You want someone who has opened enough local tanks to know what your opening probably looks like before the shovel hits dirt, and who will tell you plainly whether you need a simple cover or a riser.

    Three questions sort providers fast:

    1. Do you handle the lid fit, or just supply a cover? A stock lid on a nonstandard opening is a bad seal waiting to leak odor. You want a crew that measures the opening and fits the cover to it, including custom concrete when the tank calls for it.
    2. Will you inspect the tank opening while it is exposed? The dig is the expensive part. A crew that checks the rim, the baffles it can see, and the sludge level while the tank is open gives you far more value from the same hole.
    3. Can you pump the tank in the same visit if it needs it? If the tank is due, combining the work saves a second excavation. The EPA recommends a professional septic inspection at least every three years for the average household, and an open tank is the easiest inspection you will ever schedule.

    A fair quote for this work spells out what is included: locating if needed, excavation, the cover itself with material specified, sealing, and backfill. Vague one-line quotes are where surprise charges live. For rental owners, also confirm the crew can invoice by property and send documentation without you standing in the yard.

    One more local note. High Desert soil is often hard and compacted, which affects dig time, and many older properties here have tanks with no records of where the access sits. A crew that already knows local tank setups spends less of your money finding the problem and more of it fixing it.

    Fix the Lid Before It Becomes the Tank

    A broken septic lid is a genuinely fixable problem. The tank underneath is usually fine; the cover just wore out first, the way it is designed to. Concrete covers remain the durable default for the tanks most Hesperia properties have, and a riser with a plastic locking lid is the upgrade worth considering when you want future service to happen without digging or without you on-site.

    What does not work is waiting. Every month a cracked or missing cover sits open, debris falls in, gas escapes, and the liability sits on your property. If you have a lid that is cracked, sunken, or missing on a home, rental, or commercial property in Hesperia or the surrounding High Desert, reach out to a local septic crew for an assessment and an estimate. One visit can secure the access, check the tank while it is open, and put the whole thing back in the ground where you never have to think about it.

    If you need your septic tank serviced, Hesperia Septic can help.

    Prefer to talk it through? Call (760) 249-7872 — a quick call is usually the fastest way to get a straight answer for your situation.

    Related Reading

  • DIY Septic Tank Lid vs. Professional Replacement in Hesperia, CA: Risks and Costs

    Cost range chart comparing DIY septic lid cost to pumping and full septic repair prices
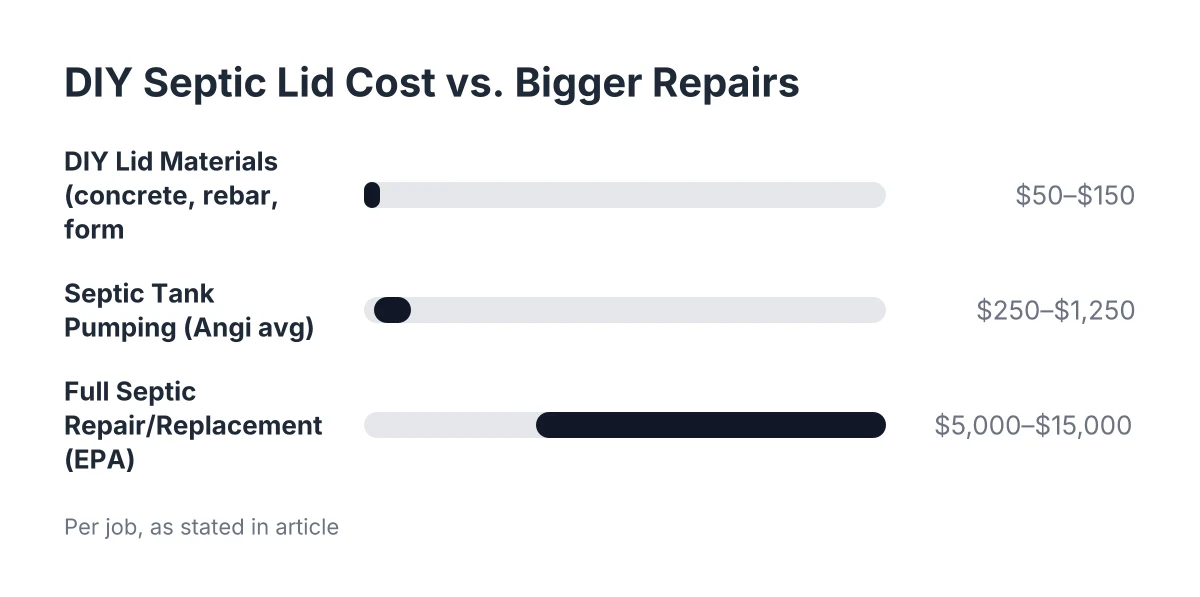
    DIY lid materials are cheap compared to septic pumping or full tank replacement costs cited in this guide.

    A cracked or missing septic tank lid is one of those problems that looks simple until you start digging. Plenty of homeowners in Hesperia, CA search for a DIY septic lid cost estimate, and the internet is full of videos on pouring your own concrete cover. Some of those projects work out. Others end with a lid that does not seal, does not hold weight, or worse, a hidden opening someone can fall through. This guide walks through the actual steps of replacing a lid, where a DIY approach makes sense, where it gets risky, and what a professional job in Hesperia typically involves so you can decide with clear eyes.

    Step 1: Confirm the Lid Is Actually the Problem

    Before you buy concrete or call anyone, confirm what you are dealing with. A lid problem usually shows up one of three ways: a visible crack in the concrete cover, a lid that crumbles or breaks when someone pries it open, or a plastic handle that snaps off and leaves you no way to lift it.

    Round concrete lids on older tanks deserve special caution. Gas builds up inside the tank and corrodes the underside of the lid over the years. From the top it looks solid; underneath it may be brittle enough to break through under a person's weight. If your lid flexes, sounds hollow, or sheds chunks at the edges, treat it as unsafe now, not later.

    Also check whether the tank itself is the issue. If you smell sewage in the yard, have slow drains across the whole house, or see standing water over the tank, the lid is the least of your worries. In that case you need septic tank pumping or an inspection first, because a new lid on a failing tank solves nothing.

    Step 2: Locate and Expose the Tank Safely

    Most septic tanks in the High Desert sit under 6 to 18 inches of soil, though some are buried deeper. If you do not know where your tank is, check your property records or the county permit file, or have a septic tank locating service find it. Guessing wrong means a lot of wasted digging in hard Hesperia ground.

    When you probe for the tank, go gently. Lids are heavy but structurally fragile, and jamming a probe rod straight down onto an aging concrete cover can punch right through it. Once you find the edges, dig around the perimeter and clear the full lid before you try to lift anything.

    One money-saving note: exposing the lid yourself before a service crew arrives usually cuts your bill. Most pumping companies charge extra to dig out access, so a homeowner willing to handle a shovel can keep that fee off the invoice even when the lid work itself goes to a pro.

    Step 3: What to Know About DIY Septic Lid Costs and Installation

    A homemade concrete lid is not just a slab. To do it right, you need to build a form matched to the exact opening, bend and place rebar for reinforcement, mix and pour concrete to a thickness that supports weight, and cure it properly before it ever goes on the tank. A homemade DIY septic lid with a proper cost estimate will account for all materials needed; one that skips the rebar or comes out undersized can shift, crack, or drop into the opening.

    There are also hazards that have nothing to do with concrete skill:

    • Septic gases are toxic and can knock a person out fast; never lean over or enter an open tank.
    • An open or poorly covered tank is a fall hazard for kids, pets, and anyone walking the yard.
    • Concrete lids commonly weigh well over what one person can lift safely; dropping one can crush a hand or damage the tank rim.
    • A lid that does not seal lets rainwater in and odors out, and it invites the exact backup problems you were trying to avoid.

    Tank shapes and lid configurations vary by region too. Some areas use rectangular concrete tanks and others use circular ones, according to the International Code Council, so a generic set of DIY plans from a video may not match what is buried in your yard. Measure the actual opening before you commit to anything.

    Step 4: Budget for DIY Septic Lid Costs Versus Professional Replacement

    Here is the honest math. Materials for a homemade lid, meaning concrete, rebar, form lumber, and a handle, often run somewhere in the range of $50 to $150 as a rough estimate. A pre-cast concrete replacement lid or a plastic riser lid sized to your tank typically costs more than raw materials but far less than most people fear. Professional septic tank lid replacement adds labor for excavation, removal of the broken cover, fitting, and sealing, and total job cost depends heavily on how deep the tank sits and how accessible it is.

    For scale, keep the bigger numbers in mind. According to Angi data, septic tank pumping averages $427 and ranges from $250 to $1,250 or more depending on tank size and location. Meanwhile the EPA estimates full septic repair or replacement typically runs $5,000 to $15,000. A lid, whether DIY or professional, is cheap compared to either. The real cost risk of a botched DIY lid is not the lid itself; it is what happens if the tank gets damaged, contaminated with debris, or left unsafe.

    Suppose a homeowner in Hesperia pries open an old round lid before a scheduled pumping and it crumbles in half. Replacing just the lid, or pouring a properly reinforced custom cover to fit the existing opening, costs a fraction of replacing the tank box. In that scenario, the smart move is pumping the tank on schedule and fitting a new lid or riser in the same visit, since the hole is already dug.

    Step 5: Consider a Riser Instead of a Buried Lid

    If the tank is already exposed, this is the moment to stop burying the problem. A riser is a stackable ring, usually plastic or concrete, that brings the access point up to ground level with a secure lid on top. Once a riser is in, every future septic tank pumping, cleaning, or inspection happens without anyone digging up your yard.

    Most of the labor in a riser job is the digging, not the assembly. So if you have already excavated the lid for a repair or a pumping visit, adding a riser costs the least it will ever cost. For a Routine Maintenance Planner trying to set a schedule and forget it, this is the single best upgrade. The EPA recommends a professional septic inspection at least once every three years, and a riser makes each of those visits faster and cheaper.

    Some homeowners hesitate because a riser lid sits visible in the yard. Fair trade-off. There are plenty of ideas to cover a septic tank lid, such as a light planter, decorative rock, or a removable birdbath, as long as nothing heavy or permanent blocks access.

    Step 6: When DIY Septic Lid Installation Makes Sense

    A DIY approach is reasonable when the tank is shallow, the opening is standard-sized, the existing tank is in good shape, and you are comfortable working with concrete forms and rebar. Pouring a custom cover for a simple, accessible opening is within reach for a capable weekend builder who respects the gas and fall hazards.

    Call a professional instead when any of these apply:

    1. The lid broke during pumping or the tank is currently open, which is an immediate safety hazard.
    2. You cannot locate the tank or the lid sits deeper than a comfortable dig.
    3. The old lid is corroded, oddly shaped, or the opening is damaged at the rim.
    4. You are seeing backup symptoms, odors, or wet spots that suggest the problem goes past the lid.
    5. Local code questions come into play; septic installation work requires knowledge of regulations that goes beyond pumping, and in many states installers carry separate licensing for exactly that reason, according to New Hampshire Department of Environmental Services.

    There is one more limitation worth stating plainly. A lid replacement fixes access and safety; it does not fix a full tank, a clogged drain field, or a failing baffle. If your system has not been pumped in years, get an inspection along with the lid work rather than assuming the new cover solved everything.

    Step 7: Secure the Lid and Set Your Maintenance Schedule

    Whichever route you choose, finish the job completely. Every screw or fastener on the new lid should go back in and be tightened so the cover cannot shift or be dislodged. An unsecured lid is how a mower, a curious kid, or a dog ends up over an open tank.

    Then mark the location, note the lid type and depth, and put your next service on the calendar. Penn State Extension notes that an active family of four generally should pump the tank every two to three years. For a Hesperia homeowner who just bought a house and honestly does not know when the tank was last pumped, the cleanest path in 2026 is one combined visit: pump the tank, inspect it, and replace or upgrade the lid while everything is open. One dig, one bill, and no mystery lid waiting to crack the next time someone needs in.

    If you need your septic tank serviced, Hesperia Septic can help.


    Prefer to talk it through? Call (760) 249-7872 — a quick call is usually the fastest way to get a straight answer for your situation.

    Related Reading

  • Septic Tank Lid Replacement Terms Explained: A Plain-English Glossary

    septic tank lid replacement glossary

    If you own a home in Hesperia and a contractor just told you your tank lid is cracked, this septic tank lid replacement glossary is for you. It explains the words you will see on quotes, inspection reports, and service calls in plain English. Use it to understand what a provider means, ask sharper questions, and spot a problem before it turns into a septic backup. No entry takes more than thirty seconds to read.

    • Septic Tank Lid: the cover over your tank's opening
    • Riser: a pipe that brings the lid to ground level
    • Access Port: the opening the lid covers
    • Concrete Lid: the heavy traditional cover
    • Polyethylene (Plastic) Lid: the lighter modern cover
    • Safety Lid or Locking Lid: a lid that resists being opened by kids
    • Gasket or Lid Seal: the seal that keeps gases in and water out
    • Septic Tank Locating: finding where your tank and lid sit underground
    • Excavation: digging down to reach a buried lid
    • Septic Tank Pumping: emptying the tank with a vacuum truck
    • Septic System Inspection: a check of the tank, lids, and parts
    • Baffle: the fitting inside the tank that directs flow
    • Effluent: the liquid that leaves the tank
    • Drain Field: the underground area that absorbs treated water
    • Scum and Sludge Layers: the waste layers pumpers measure
    • Service Quote or Scope of Work: the written list of what you are paying for

    Septic Tank Lid Replacement: Parts and Hardware Glossary

    These are the words you will hear most often during a septic tank lid replacement, from the cover itself to the seal that keeps it tight. This part of the septic tank lid replacement glossary covers the hardware.

    Septic Tank Lid

    A septic tank lid is the removable cover that closes off the opening on top of your septic tank. It keeps people, pets, and debris out of the tank and keeps sewer gases in. Lids crack from age, vehicle traffic, or careless digging, and a damaged lid is a safety hazard because a person can fall through it. If a provider says your lid needs replacing, they mean the cover itself, not the whole tank.

    Riser

    A riser is a wide pipe that extends from the tank opening up to ground level, so the lid sits at or near the surface. Without a riser, the lid may be buried a foot or more underground, and every service visit starts with digging. Adding a riser during a lid replacement costs more up front but makes future septic tank pumping faster and cheaper because no excavation is needed. Many homeowners add one the first time a crew has to dig.

    Access Port

    An access port is the opening in the top of the septic tank that the lid covers. Most tanks have one or two ports, one over each compartment, and a pumper needs to open at least one to empty the tank. If an inspector says a port is inaccessible, it means something is blocking it, such as a deck, concrete, or landscaping. Knowing how many ports your tank has tells you how many lids you may eventually replace.

    Concrete Lid

    A concrete lid is the traditional heavy cover found on older septic tanks, often weighing enough that one person cannot lift it safely. Concrete lasts for decades but eventually cracks, spalls, or crumbles at the edges. A cracked concrete lid should be replaced rather than patched, because a patch can hide how weak the rest of the slab has become. If your home is older, expect this to be the type you have.

    Polyethylene (Plastic) Lid

    A polyethylene lid is a modern septic cover made of heavy-duty plastic, usually paired with a riser of the same material. It is light enough for one person to handle, resists cracking, and often includes screw-down fasteners. Providers frequently suggest swapping a broken concrete lid for a plastic riser-and-lid kit. The lighter lid also makes routine septic tank pumping simpler for whoever services the tank next.

    Safety Lid or Locking Lid

    A safety lid is a septic cover designed with locks, screws, or safety nets so children and animals cannot open it or fall in. Falls into septic tanks are rare but can be fatal, which is why many areas expect secure lids; check your local code. If a provider quotes a safety lid, they are addressing a real risk, not padding the bill. Ask how the lid secures and whether you can still open it for service.

    Gasket or Lid Seal

    A gasket is the rubber or foam seal between the lid and the riser or tank opening. A good seal keeps sewer gas from escaping and keeps rainwater and soil from getting into the tank. If you smell septic odors in your yard near the lid, a failed seal is one of the first things to check. Replacing a gasket is a small job, but a badly warped lid may need full replacement to seal again.

    Finding and Opening the Tank: Septic Tank Lid Replacement Glossary Terms

    Before anyone can replace a lid, they have to find it and get to it. These terms describe that work.

    Septic Tank Locating

    Septic tank locating is the process of finding where your tank, lids, and access ports sit underground. Crews use property records, probing rods, or electronic locators to pinpoint the spot without tearing up the whole yard. If you bought your Hesperia home without septic paperwork, locating is often the first line on a quote. Once the tank is found, mark the spot so you never pay to find it twice.

    Excavation

    Excavation means digging down through soil to expose a buried septic lid or tank top. It can be hand digging for a shallow lid or machine work for a deep one, and depth drives the labor involved. A quote that includes excavation tells you your lid is buried and there is no riser. This is the moment many homeowners choose to add a riser so the digging never happens again.

    Septic System Inspection

    A septic system inspection is a check of the tank, lids, baffles, and liquid levels to judge the system's condition. Inspectors open the lids, so a cracked or stuck lid often gets discovered during an inspection rather than by the homeowner. Buyers ordering an inspection before a home sale should ask the inspector to note lid condition specifically. A bad lid found now is a cheap fix compared to one found after someone steps on it.

    Inside the Tank

    You do not need to be an expert on what happens under the lid, but these terms come up on almost every service report.

    Septic Tank Pumping

    Septic tank pumping is the removal of the waste inside your tank using a vacuum truck. The crew opens the lid, lowers a hose, and empties the solids and liquid so the tank can keep working. Pumping is when most lid problems get found, because it is the one time the lid comes off. If a pumper says your lid crumbled during removal, that is normal wear on old concrete, not carelessness.

    Baffle

    A baffle is a fitting inside the septic tank that directs incoming and outgoing flow so solids stay in the tank. The outlet baffle matters most, because it keeps sludge from washing out to the drain field and clogging it. Inspectors check baffles through the access port whenever the lid is off. A missing or broken baffle is a separate repair from the lid, so read your quote line by line.

    Effluent

    Effluent is the liquid that flows out of the septic tank after solids settle to the bottom. It travels to the drain field, where the soil filters it. The word sounds technical, but it just means the partly treated wastewater leaving your tank. If a report says effluent levels are high, the tank may be overdue for septic tank pumping or the drain field may be struggling.

    Drain Field

    A drain field is the network of buried pipes and gravel or soil that absorbs and filters the liquid leaving your septic tank. It is the most expensive part of the system to replace, which is why protecting it matters. A failing drain field shows up as soggy grass, odors, or slow drains all over the house. Lid work does not touch the drain field, so a lid quote should not include drain field repairs unless a problem was found.

    Scum and Sludge Layers

    Scum and sludge layers are the two waste layers inside a septic tank: scum floats on top, and sludge settles on the bottom. Pumpers measure both to decide whether the tank needs emptying. Thick layers mean the tank is overdue for service, and letting them build up can push solids into the drain field. These measurements only happen when the lid is open, which is one more reason a working lid matters.

    Pricing and Paperwork

    Service Quote or Scope of Work

    A service quote, sometimes called a scope of work, is the written list of exactly what a provider will do and what each part costs. For lid work, a clear quote separates locating, excavation, the lid or riser parts, and labor. Vague one-line quotes make it hard to compare providers or question a charge. Ask for the scope in writing before the truck arrives, and ask what happens if the crew finds more damage once the lid is off.

    Using These Terms

    What this septic tank lid replacement glossary gives you is the ability to read a quote line by line and know what each charge covers. You can now ask a provider whether the price includes locating, excavation, or a riser, and understand the answer. That is usually all it takes to feel in control of the job instead of confused by it.

    If you need your septic tank serviced, Hesperia Septic can help.

    Prefer to talk it through? Call (760) 249-7872 — a quick call is usually the fastest way to get a straight answer for your situation.

    Related Reading